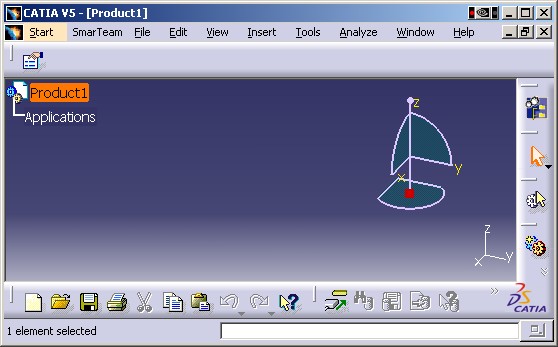
3D PLM PPR Hub Open Gateway |
Product Modeler |
Adding a Toolbar to all Product WorkbenchesImplementing the |
| Use Case | ||
AbstractThis article presents the CAAPuiPRDWorkshopAddin use case which illustrates how to create a toolbar that is active in all Product workbenches including Product Structure workshop's. |
By implementing the CATIPRDWorkshopAddin interface, a toolbar with its commands can be made active in any Product Structure Workshop. Please see article [5] if the toolbar should only be made active in the Product Structure workshop.
[Top]
CAAPuiPRDWorkshopAddin is a use case of the CAAProductStructureUI.edu framework that illustrates the ProductStructureUI framework capabilities.
[Top]
The goal of CAAPuiPRDWorkshopAddin is to demonstrate how to implement the CATIPRDWorkshopAddin interface. It consists of the following parts:
Our toolbar appears on top of the CATIA frame and contains a single command represented
by the
![]() icon.
icon.
[Top]
To launch CAAPuiPRDWorkshopAddin:
#CAAPuiPRDWorkshopAddin use case CAAPuiPRDWorkshopAddin CATIPRDWorkshopAddin libCAAPuiPRDWorkshopAddin |
[Top]
CAAPuiPRDWorkshopAddin code is located in the CAAPuiPRDWorkshopAddin.m module of the CAAProductStructureUI.edu framework.
[Top]
There are three parts in CAAPuiPRDWorkshopAddin:
We will now detail each of those sections:
[Top]
The implementation of CATIPrdWorkshopAddin is provided by our CAAPuiPRDWorkshopAddin class. Its purpose is to create the toolbar and to do the layout the commands on it. Only two methods need be defined: CreateToolbars and CreateCommands.
...
class CAAPuiPRDWorkshopAddin: public CATBaseUnknown {

CATDeclareClass;

public:

        // Standard constructors and destructors for an implementation class
        // -----------------------------------------------------------------
        CAAPuiPRDWorkshopAddin();
        virtual ~CAAPuiPRDWorkshopAddin();

        /**
         * @see ApplicationFrame.CATIWorkbenchAddin#CreateToolbars
         */
        CATCmdContainer * CreateToolbars();

        /**
         * @see ApplicationFrame.CATIWorkbenchAddin#CreateCommands
         */
        void CreateCommands();

private:
        // The copy constructor and the equal operator must not be implemented
        // -------------------------------------------------------------------
        CAAPuiPRDWorkshopAddin(CAAPuiPRDWorkshopAddin &);
        CAAPuiPRDWorkshopAddin& operator=(CAAPuiPRDWorkshopAddin&);

};
...
|
The purpose of the CreateToolbars method is to create all the command headers of our toolbar. In this case a toolbar named CAAToolbar with a command named CAAPuiPRDWorkshopAddinCmd1 is created.
The purpose of the CreateCommands method is to create all the command headers of our toolbar. Our command header class CAAPuiPRDWorkshopAddinHeader, is defined by way of the MacDeclareHeader macro.
Here a command named CAAPuiPRDWorkshopAddinCmd1 is created. It is located in the CAAPuiPRDWorkshopAddin shared library and its class is CAAPuiPRDWorkshopAddinCmd. The ShowProduct identifier will be used to locate resources related to this command.
[Top]
The command that gets executed must be of a class named CAAPuiPRDWorkshopAddinCmd as specified by CAAPuiPRDWorkshopAddin::CreateCommands. This class must also derives from the CATCommand class. The only method we need to override is the Activate method.
...
class CAAPuiPRDWorkshopAddinCmd: public CATCommand {

public:

        CAAPuiPRDWorkshopAddinCmd();
        virtual ~CAAPuiPRDWorkshopAddinCmd();

        /**
         * Activates our command.
         * @param iFromClient
         * The command that requests to activate the current one.
         * @param iEvtDat
         * The notification sent.
         */
        virtual CATStatusChangeRC Activate(CATCommand * iFromClient,
                                           CATNotification * iEvtDat);
};
...
|
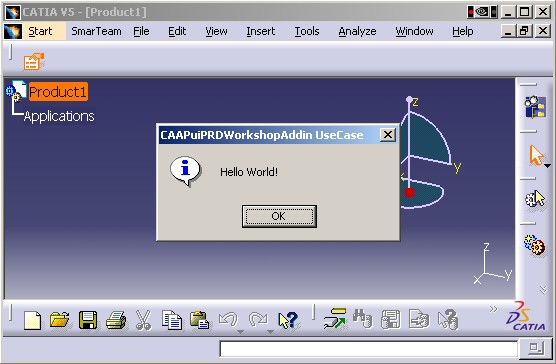
In the Activate method, we just get the current window and display its title in a dialog box
...
CATStatusChangeRC CAAPuiPRDWorkshopAddinCmd::Activate(CATCommand *iFromClient,
                                                      CATNotification *iEvtDat)
{
        CAAPuiPRDWorkshopAddinTRACE (">> CAAPuiPRDWorkshopAddinCmd::Activate");

        CATApplicationFrame *pApplication = CATApplicationFrame::GetFrame();
        if (NULL != pApplication) {
                CATDlgWindow * pMainWindow = pApplication->GetMainWindow();
                CATDlgNotify *pNotifyDlg = new CATDlgNotify
                        (pMainWindow, "CAAPuiPRDWorkshopAddin", CATDlgNfyOK);
                if (NULL != pNotifyDlg) {
                        pNotifyDlg->DisplayBlocked
                                ("Hello World!",
                                 "CAAPuiPRDWorkshopAddin UseCase");
                        pNotifyDlg->RequestDelayedDestruction();
                }
        }
        RequestDelayedDestruction();

        CAAPuiPRDWorkshopAddinTRACE ("<< CAAPuiPRDWorkshopAddinCmd::Activate");
        return CATStatusChangeRCCompleted;
}
...
|
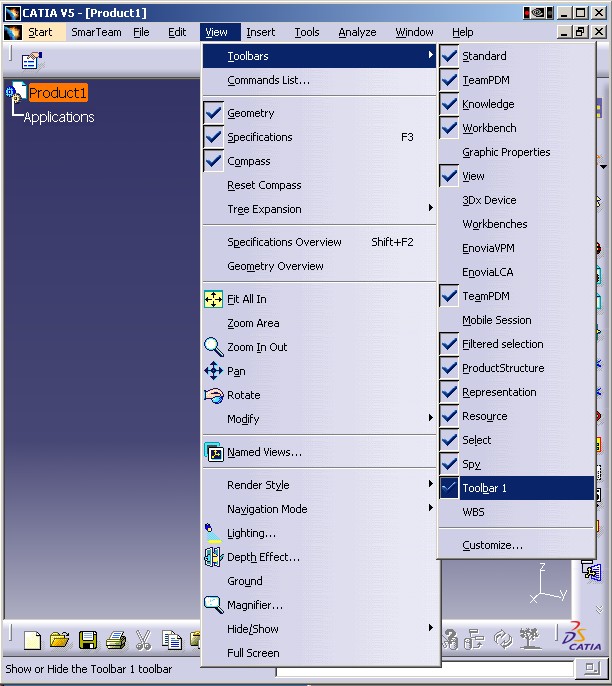
Now that we have completed the code implementation, we need to take care of the user interface with the help of resource files.
[Top]
There are two visible objects: the toolbar and its command.
The title of the toolbar named CAAPuiPRDWorkshopAddinToolbar is defined by the CAAPuiPRDWorkshopAddin.CATNls which can be found in install_root/CAAProductStructureUI.edu/CNext/resources/msgcatalog directory.
CAAPuiPRDWorkshopAddinToolbar.Title = "Toolbar 1"; |
The resources of the CAAPuiPRDWorkshopAddinCmd1 are defined by three files:
CAAPuiPRDWorkshopAddinHeader.CATNls (located in the install_root/CAAProductStructureUI.edu/CNext/resources/msgcatalog directory):
CAAPuiPRDWorkshopAddinHeader.CAAPuiPRDWorkshopAddinCmd1.Title = "cmd1"; CAAPuiPRDWorkshopAddinHeader.CAAPuiPRDWorkshopAddinCmd1.Help = "cmd1 long help text"; CAAPuiPRDWorkshopAddinHeader.CAAPuiPRDWorkshopAddinCmd1.ShortHelp = "cmd1 info"; |
These texts correspond to the screen tip, the documentation line and the command
prompt input:
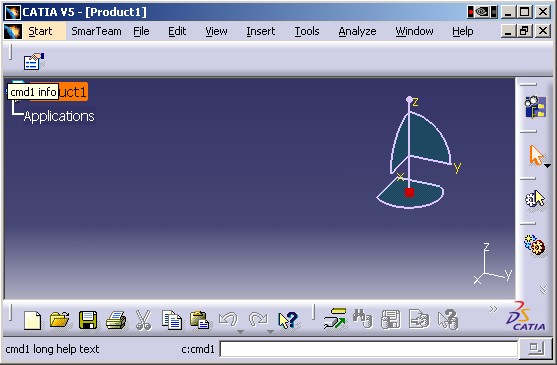
CAAPuiPRDWorkshopAddinHeader.CATRsc (located in the install_root/CAAProductStructureUI.edu/CNext/resources/msgcatalog directory) defines the bitmap name for the command icon:
CAAPuiPRDWorkshopAddinHeader.CAAPuiPRDWorkshopAddinCmd1.Icon.Normal="CAAPuiPRDWorkshopAddin_I"; |
CAAPuiPRDWorkshopAddin_I.gif (located in the
install_root/CAAProductStructureUI.edu/CNext/resources/graphic/icons/normal
directory) contains the bitmap the command icon:
![]()
[Top]
This use case has demonstrated how to create a toolbar with a command:
[Top]
| [1] | Building and Launching a CAA V5 Use Case |
| [2] | Application Frame Overview |
| [3] | The CAA Command Model |
| [4] | Creating an Add-in |
| [5] | Adding a toolbar to the Product Structure Workshop |
| [Top] | |
| Version: 1.1 [Aug 2004] | Document revised |
| Version: 1 [Oct 2003] | Document created |
| [Top] | |
Copyright © 2003, Dassault Systèmes. All rights reserved.