3D PLM Enterprise Architecture |
User Interface - Dialogs |
Arranging Dialog Objects Using a GridHow to manage the dialog object with the grid layout |
| Technical Article | ||
AbstractArranging dialog objects in a dialog window, a dialog box, a frame or a tab page, that is a container, consists in positionning each object at a given place with respect to the others [1]. The container layout will then not changed when the dialog window is resized. The dialog objects can be precisely arranged in their respective containers using a grid attached to the container. |
The grid layout consists in designing a grid made of cells located at the intersection of rows and columns. A cell is defined using the intersecting row and column numbers. Each dialog object occupies a rectangular space spread in one or several cells. It's location is defined using the cell at its top left corner, and using the number of cells in which it horizontally and vertically spreads.
This enables the container sizes to be defined by their contents. A given row has the width of the wider object it contains, and a column has the height of its higher object. A given object that spreads in several cells can have more room that it really needs. To overcome this, the object can define the way it is attached to the cell sides.
The grid layout applies to CATDlgDocument, CATDlgDialog, CATDlgFrame, and CATDlgTabPage objects.
[Top]
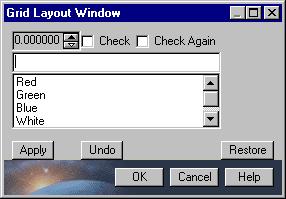
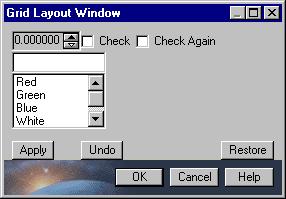
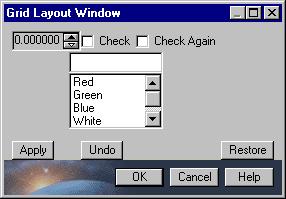
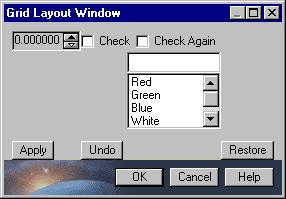
Assume you need to create the following window, as a class that derives from CATDlgDialog.
It contains a spinner and two check buttons aligned on the first row, then a combo alone on the second row, and three push buttons aligned on the third row. The OK, Cancel, and Help push buttons are supplied with the CATDlgDialog derived class and are not to be arranged in the window. The window constructor must be as follows:
GridLayoutWindow ::GridLayoutWindow (CATDialog * Parent,
                                     const CATString& Name,
		           	     CATDlgStyle Style)
                 : CATDlgDialog(Parent, Name, Style)
{}
|
And the object that instantiate it must use the CATDlgGridLayout style as follows:
GridLayoutWindow * pWindow = new GridLayoutWindow (this,
                                                   "GridWind",
                                                   CATDlgGridLayout);
|
The grid to build is as follows:
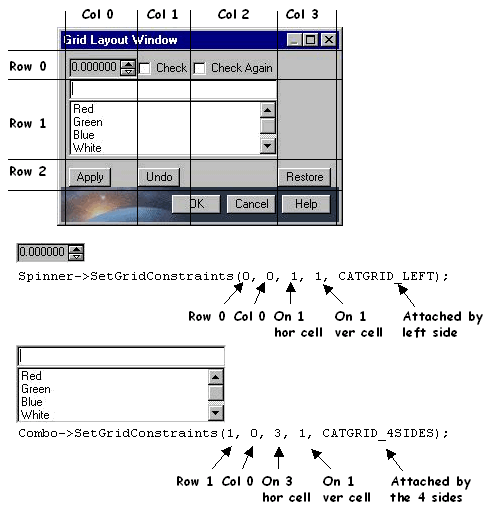
The grid could be built using the SetGridConstraints method. It is used on each control to associate with it the positioning parameters, as the five arguments of SetGridConstraints:
CATGRID_LEFT, CATGRID_RIGHT,
CATGRID_TOP, CATGRID_BOTTOM, and CATGRID_4SIDESRows and column numbers begin with 0. You can see that the combo top left corner is located in the cell at the intersection of the row 1 and column 0, and spreads on three rows and one column. Since it is attached by the four sides, it occupies the full space, even if the size is increased. The set of calls to SetGridConstraints that build the first window displayed is as follows:
Spinner->SetGridConstraints(0,0,1,1,CATGRID_LEFT); CB1 ->SetGridConstraints(0,1,1,1,CATGRID_LEFT); CB2 ->SetGridConstraints(0,2,1,1,CATGRID_LEFT); Combo ->SetGridConstraints(1,0,3,1,CATGRID_4SIDES); PB1 ->SetGridConstraints(2,0,1,1,CATGRID_LEFT); PB2 ->SetGridConstraints(2,1,1,1,CATGRID_LEFT); PB3 ->SetGridConstraints(2,3,1,1,CATGRID_RIGHT); |
The same window is shown with three other attachment modes applied to the combo:
 |
CATGRID_LEFT: The combo is attached by its left side. Even
if it doesn't seem to be spread on three cells, no other control can
occupy this area. |
 |
CATGRID_CENTER: The combo is attached at the center of its
area. |
 |
CATGRID_RIGHT: The combo is attached by its right side. The
space in front of it is empty, but if longer character strings were used
for its lines, its size could grow to the left. |
Since the combo is allone on its row, its size determines the row height, and
the two other attachment modes, that is CATGRID_TOP and CATGRID_BOTTOM,
would have the same effect than CATGRID_LEFT.
[Top]
To use the grid layout, you need to do the following:
[Top]
The grid is not an object itself. You only need to define how each object is located in the grid using one or several CATDlgGridConstraints instances, and the grid is interpreted from these instances. As we see in the example, you can use the SetGridConstraints method on each object you want to arrange, either when this object is a control, or when it is a container contained in another container, such as a frame contained in another frame. The grid you refer to is set to the containment parent [2] of the dialog object, and must be consistently reffered to for any object having this containment parent. SetGridConstraints assigns to the object it applies an instance of the CATDlgGridConstraints class that holds the positionning parameters. You could do this in two ways:
CATDlgGridConstraints GridCst(0,0,1,1,CATGRID_LEFT); Spinner->SetGridConstraints(GridCst); GridCst.Column=1; CB1 ->SetGridConstraints(GridCst); GridCst.Column=2; CB2 ->SetGridConstraints(GridCst); GridCst.Row=1; GridCst.Column=0; GridCst.H_SPAN=3; GridCst.V_SPAN=1; GridCst.Justification=CATGRID_4SIDES; Combo ->SetGridConstraints(GridCst); GridCst.Row=2; GridCst.Column=0; GridCst.H_SPAN=1; GridCst.V_SPAN=1; GridCst.Justification=CATGRID_LEFT; PB1 ->SetGridConstraints(GridCst); GridCst.Column=1; GridCst.Justification=CATGRID_BOTTOM; PB2 ->SetGridConstraints(GridCst); GridCst.Column=3; GridCst.Justification=CATGRID_LEFT; PB3 ->SetGridConstraints(GridCst); |
[Top]
Attaching a dialog object to its cell(s) sides determines the dialog window or container layout when the dialog winodw is first displayed with its original size, and has also an effect when the end user resizes it. The following attachment modes are available:
| Attachment Mode | Description |
|---|---|
CATGRID_LEFT |
Attaches the object to the left side of the cell, or if the object spreads on several cells, to the left side of the left cell |
CATGRID_RIGHT |
Attaches the object to the right side of the cell, or if the object spreads on several cells, to the right side of the right cell |
CATGRID_TOP |
Attaches the object to the top side of the cell, or if the object spreads on several cells, to the top side of the top cell |
CATGRID_BOTTOM |
Attaches the object to the bottom side of the cell, or if the object spreads on several cells, to the bottom side of the bottom cell |
CATGRID_4SIDES |
Attaches the object to each of the four sides of the cell,
or if the object spreads on several cells, to the left side of the left
cell, to the right side of the right cell, to the top side of the top
cell, and to the bottom side of the bottom cell. It is the concatenation
of CATGRID_LEFT, CATGRID_RIGHT, CATGRID_TOP,
and CATGRID_BOTTOM |
CATGRID_CST_WIDTH |
Keeps the object initial width when resizing |
CATGRID_CST_HEIGHT |
Keeps the object initial height when resizing |
CATGRID_CST_SIZE |
Keeps the object initial size, that is initial width and
initial height, when resizing. It is the concatenation of CATGRID_CST_WIDTH
and CATGRID_CST_HEIGHT |
CATGRID_CST_CENTER |
Attaches the object to each of the four sides of the cell,
and keeps the object initial size, that is initial width and initial
height, when resizing. It is the concatenation of CATGRID_4SIDES
and CATGRID_CST_SIZE |
They can be concatenated using the "|" character, as follows:
Combo->SetGridConstraints(1,0,3,1,CATGRID_LEFT|CATGRID_RIGHT); |
The default value is CATGRID_LEFT|CATGRID_TOP.
[Top]
You can also manage the ability of a given row or column to be resized when its container is itself resized. The grid rows and columns are by default non sensitive to resizing. Resizing occurs in two cases:
The height of a resizable row is increased or decreased when its container is resized, while it is the width of a resizable column that changes. To set a row or a column resizable, use the methods SetGridRowResizable and SetGridColumnResizable.
SetGridRowResizable(2,1); SetGridColumnResizable(0,1); |
The first argument is the row or column number in the grid. The second can be set to 0 for a non resizable row or column, and to 1 for a resizable one. In the example above, the third row and the first column are set as resizable.
When the containing window is resized, the controls or containers that are spread in cells belonging to resizable rows or columns are moved or resized according to their attachment mode. For example, the window of the example used in this article is streched as follows:
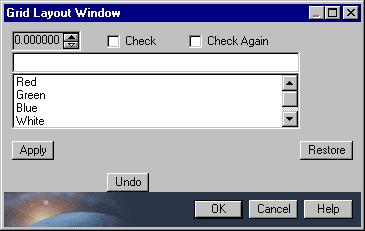
The third row is resizable, as well as the first three columns. This is coded as follows:
SetGridRowResizable(2,1); SetGridColumnResizable(0,1); SetGridColumnResizable(1,1); SetGridColumnResizable(2,1); |
Note that the spinners and the check buttons were explicitly attached to their cell left side. Their cells are stretched, and empty space appears to their rights. The combo were attached to the four sides of the cells, and is stretched to occupy the full width of the three cells. These first two lines have kept their initial height, since they are not resizable. The third row is stretched. Its height increases. Apply and Restore have not moved vertically, because they are attached to their cell top side, but Undo, which is attached to its cell bottom side, has moved vertically. This shows the new row height. As for the first row, the first three columns are stretched, but the fourth, which contains Restore, is not resizable and its width has not changed.
[Top]
To manage the layout of a container using a grid, you can use the following methods. They apply to:
Layout using a grid is available only if the CATDlgGridLayout style is used in the object constructor. The available methods enable to set a row or a column of the grid as resizable, and to ask if a row or a column is resizable. The examples use a CATDlgFrame instance:
| Set 1st row as resizable |
int RowIndex = 0; // First row int Resizability = 1; // 0 means non resizable pFrame->SetGridRowResizable(RowIndex, Resizability); |
| Set 3rd column as resizable |
int ColumnIndex = 2; // Third column Resizability = 1; // 0 means non resizable pFrame->SetGridColumnResizable(ColumnIndex, Resizability); |
| Ask if 4th row is resizable |
RowIndex = 3; // Fourth row Resizability = pFrame->IsGridRowResizable(RowIndex); if (Resizability == 1) ... // Row is resizable else // Resizability == 0 ... // Row is NOT resizable |
| Ask if 6th column is resizable |
ColumnIndex = 5; // Sixth column Resizability = pFrame->IsGridColumnResizable(ColumnIndex); if (Resizability == 1) ... // Column is resizable else // Resizability == 0 ... // Column is NOT resizable |
[Top]
Dialog object container sizes are determined using their contents. Containers can be resized without modifying their contents, that can be partially hidden if necessary. They are arranged according to a grid made of cells that are determined by the intersection of rows and columns. Containers and controls can occupy one cell, or can be spread in several ones. They can be attached to some or all of their cell sides, and can be requested to keep the same width or height when the dialog window is resized. Rows and columns are by default non-resizable, but can be explicitly set as resizable. Container and control location and size after resizing depend on their attachment mode.
[Top]
| [1] | Arranging Dialog Objects |
| [2] | Creating Dialog Objects |
| [Top] | |
| Version: 1 [Jan 2000] | Document created |
| [Top] | |
Copyright © 2000, Dassault Systèmes. All rights reserved.