Checking In a Part for the First Time
When a Part is first saved into the SmarTeam database, it is automatically assigned the New status. This means that the Part has not yet been checked into a SmarTeam vault.
To protect the Part from modifications, place the Part into the SmarTeam vault by checking it in. After the Part is checked in, its status is changed to Checked In.
What happens next?
- To launch the Part into CATIA V5 and modify it, the Part must be checked out. When it is checked out, a new revision number is assigned to it. For more information, see Managing Parts.
- The Part can be copied in your CATIA session in read-only mode.
Checking In a Part
-
Check In, as described below, simply places the document back in the Check In vault. You can later apply the Check Out operation on the document to make further changes.
-
Release, as described in Releasing a Part, moves the document to the Released vault. Thereafter, you can apply the New Release operation on the document to carry out additional changes.
-
Activate the document containing the Part you want to check in.
-
In CATIA, select SmarTeam >Lifecycle>Check In.
-
On the left-hand side of the window, the Checked In icon
 appears to
the left of the selected document. On the right-hand side of the window,
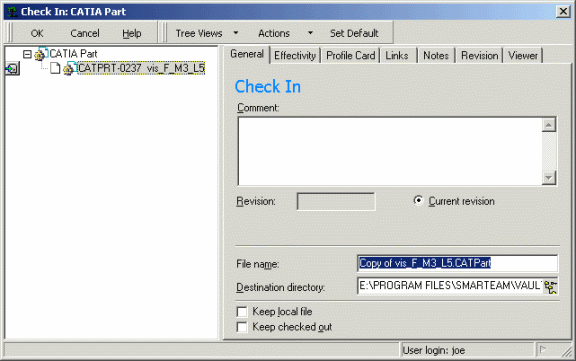
the Check In dialog box is displayed.
 -
Fill in the fields in the Check In dialog box, as described in Check In Dialog Box below. These fields are optional, and you may keep the default.
-
Click OK to check in the Part and exit the Check In view, or click Apply to perform the operation and remain in the view.
The Part is now placed in the Check In vault for safekeeping. Note that the status of the document is now changed to Checked In. A copy of the file remains in your CATIA session in read-only mode.
You can check it out again in order to edit the Part, as described in Checking Out a Part.
The Check In window is then displayed.
 |
Check In Dialog Box
The following describes the attributes in the Check In dialog box:
| Attribute | Description |
|---|---|
|
Revision |
The left revision field is the source revision identifier and the right field is the new revision. You may enter a different revision identifier in this field although it is not mandatory. |
|
Directory |
The directory path of the vault in which the document will be located is automatically displayed. If you are using the vault server, the name of the generic server is displayed and the destination vault dropdown menu enables you to specify the generic destination vault in which the document will be located. |
|
Comments |
You may enter a comment in this field. |
|
Set Default |
Click this option to assign the same registration information for all document revisions such as phase, effective dates, and notes. |
| Effectivity tab | |
|
Phase |
Click an option from the dropdown list to define the phase of this revision. This field is descriptive only and does not affect revision status. |
|
Effective From / Effective Until |
Click the Date button to enter dates in these fields. |