CAA Web Services Home
|
|
Building and Launching a CAA Web Service Use Case
How to build and launch the CAA Web services use cases using Visual Studio .NET 2003
|
|
Use Case
|
Abstract
This article explains how to set up a buildtime and runtime environment for the CAA Web service use cases
that rely on the .NET Framework. It describes how to compile the code samples, and how to
launch the related use case scenarios.
|
What You Will Learn With This Use Case
The code samples delivered within CAA Web service use cases are intended to demonstrate how to write client
applications that consume CAA Web services. The aim of this article is to help you build and run these code
samples. It explains how to set up your buildtime and runtime environments using Visual Studio .NET 2003. It uses a given CAA Web service use case as example, but the related concepts apply to any other
available use case.
[Top]
The CAAXXXDotNet1_1Client Use Cases
CAAXXXDotNet1_1Client is a generic name for the CAA Web service use cases that rely on the .NET Framework. You
should just replace XXX by the actual name of the CAA V5 use case you want to build and launch. To leave your
CD-ROM installation as a safe reference, please create your project in a separate root directory for the CAA use
cases in which you can freely copy, build, run, and possibly modify the use cases.
The code samples are only provided inside a typical CAA Web service framework/module architecture for convenience
purpose. There is no prerequisite on either the CAA V5 buildtime or the CAA Web service runtime environment when
using CAA Web services. In the following section, the code samples are imported from the CAA CD-ROM media for
clarity. It is expected that you generate/write the related code yourself by referring to the use case describing
how to consume the CAA Web service you wish to use.
You can also use the CAA V5 buildtime environment (mkmk) to build the delivered code, as you would build any other
frameworks/modules. Building the code related to a given CAAXXXDotNet1_1Client use case will produce a .NET
assembly and a .NET executable in the runtime view, in the \intel_a\code\clr folder. You can this executable
to run the use case scenario. In this article, we focus on how to use the Visual Studio .NET 2003 environment to
build and launch the use case.
[Top]
Step-by-step Using Visual Studio .NET 2003
The following section first describes how to set up the Visual Studio .NET solution, then how to import the use
case code samples in the created projects, and finally how to build and run the sample use case scenario. In the
following, the CAAENOPosAppBinderDotNet1_1Client use case [1] is used for reference:
-
Setting Up the Visual Studio .NET Solution
-
Creating and Configuring the C# Class Library Project
-
Adding the Required Resources to the C# Class Library Project
-
Creating and Configuring the C# Console Application Project
-
Adding the Required Resources to the C# Console Application Project
-
Building the Solution and Running the Sample Use Case Scenario
Setting Up the Visual Studio .NET Solution
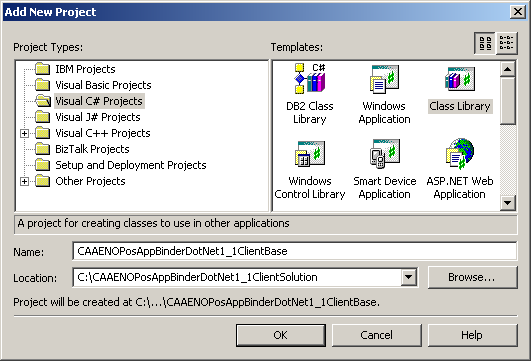
To create the solution, please complete the following steps:
- On the Start menu, point to Programs -> Microsoft Visual Studio
.NET 2003, and click on Microsoft Visual Studio .NET 2003,
- Go to File -> New -> Blank Solution,
- In the Name field, enter CAAENOPosAppBinderDotNet1_1ClientSolution, and then
C:\ in the Location field. The rest of the article will assume that the solution has
been created in the C:\CAAENOPosAppBinderDotNet1_1ClientSolution directory. You are free to choose any
other name or location you wish to use,
- You can then click OK to close the New Project dialog box and create the
solution.
Fig.1: Setting Up the Visual Studio .NET Solution

|
[Top]
Creating and Configuring the C# Class Library Project
In this step, you need to create a C# class library. It holds the C# proxy and wrapper class
that consumes the ENOPosApplicationBinderImpl CAA Web services being demonstrated in the use case:
- From the Solution Explorer, right click on the solution, and go to Add
-> New Project,
- In the Project Types left pane, select the Visual C# Projects folder,
- From Templates right pane, select the Class Library template,
- In the Name field, enter CAAENOPosAppBinderDotNet1_1ClientBase,
- Click OK to close the Add New Project dialog box,
- You can finally delete the default Class1.cs resource created.
Fig.2: Creating the C# Class Library Project
|
Then, you need to configure your project in order to reference the System.Web.Services.dll assembly (from the
.NET Framework):
- From the Solution Explorer, expand the CAAENOPosAppBinderDotNet1_1ClientBase
project. Right click on the References folder, and point to Add Reference,
- In the Add Reference dialog box, select the System.Web.Services.dll assembly from
the .NET pane, and click on the Select button. You should now see the
System.Web.Services.dll assembly in the Selected Components pane,
- Click on OK to close the Add Reference dialog box.
Your solution should now be configured as follows:
Fig.3: Configuring the C# Class Library Project
|
[Top]
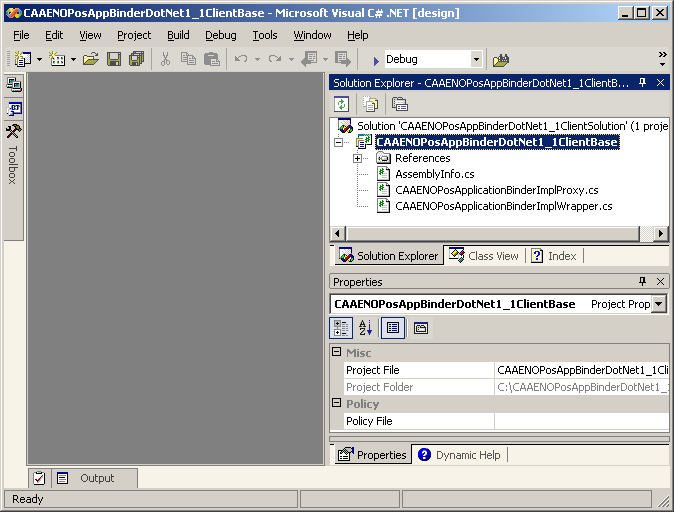
Adding the Required Resources to the C# Class Library Project
From Visual Studio .NET 2003, please complete the following steps:
- From the Solution Explorer, right click on the
CAAENOPosAppBinderDotNet1_1ClientBase project and go to Add -> Add Existing
Item,
- From the Add Existing Item dialog box, browse to the location where you installed the CAA
CD-ROM content. Point to CAAPLMSecurity.edu\CAAENOPosAppBinderDotNet1_1ClientBase.m\src and then select
the two following resources: CAAENOPosApplicationBinderImplProxy.cs and
CAAENOPosApplicationBinderImplWrapper.cs,
- Click Open to close the dialog box and add the resources to the project.
Your solution should now contain the following resources:
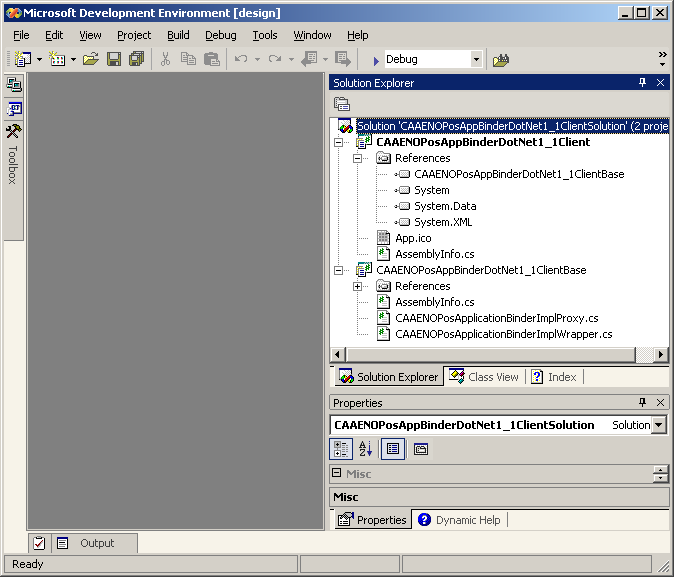
Fig.4: C# Class Library Project
|
[Top]
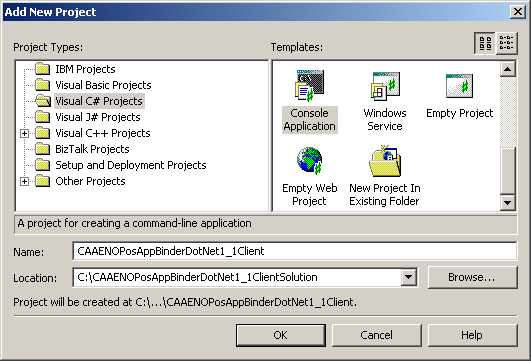
Creating and Configuring the C# Console Application Project
In this step, you need to create a C# console application. It holds the client application built
on top of the ressources held in the C# library project created above:
- From the Solution Explorer, right click on the solution, and go to Add
-> New Project,
- In the Project Types left pane, select the Visual C# Projects folder,
- From Templates right pane, select the Console Application template,
- In the Name field, enter CAAENOPosAppBinderDotNet1_1Client,
- Click OK to close the Add New Project dialog box,
- You can finally delete the default Class1.cs resource created.
Fig.5: Creating the C# Console Application Project
|
Then, you need to configure your project in order to reference the C# library project created above:
- From the Solution Explorer, expand the CCAAENOPosAppBinderDotNet1_1Client project.
Right click on the References folder, and point to Add Reference,
- In the Add Reference dialog box, select the Projects tab,
- In the left pane, select the CAAENOPosAppBinderDotNet1_1ClientBase project,
- Click on the Select button. You should now see the
CAAENOPosAppBinderDotNet1_1ClientBase project in the Selected Components pane at the
bottom,
- Click on OK to close the Add Reference dialog box.
Finally, you can set the C# console application as the startup project. Right click on the
CCAAENOPosAppBinderDotNet1_1Client project, and click on Set as StartUp Project.
Your solution should now be configured as follows:
Fig.6: Configuring the C# Console Application Project
|
[Top]
Adding the Required Resources to the C# Console Application Project
From Visual Studio .NET 2003, please complete the following steps:
- From the Solution Explorer, right click on the CAAENOPosAppBinderDotNet1_1Client
project and go to Add -> Add Existing Item,
- From the Add Existing Item dialog box, browse to the location where you installed the CAA
CD-ROM content. Point to CAAPLMSecurity.edu\CAAENOPosAppBinderDotNet1_1Client.m\src and then select the
two following resources: CAAENOPosAppBinderDotNet1_1Client.cs and
CAAENOPosApplicationBinderImplUseCase.cs,
- Click Open to close the dialog box and add the resources to the project.
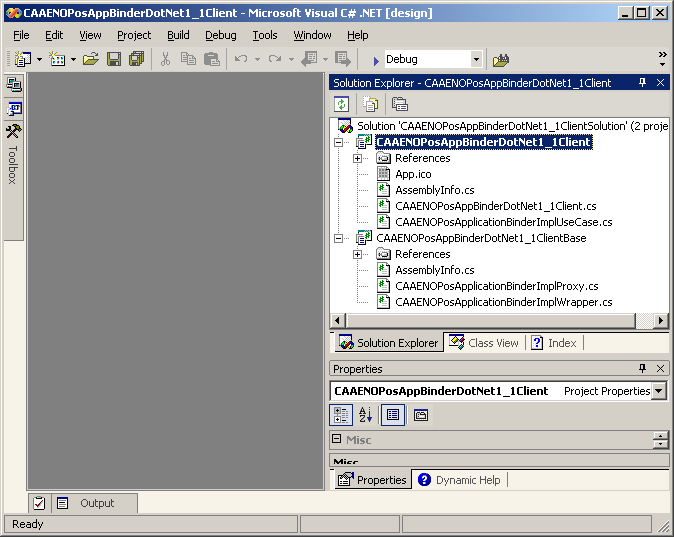
Your solution should now contain the following resources:
Fig.7: C# Console Application Project
|
[Top]
Building the Solution and Running the Sample Use Case Scenario
First, you need to build the entire solution. In Solution Explorer, right-click
CAAENOPosAppBinderDotNet1_1ClientSolution, and then click Build. The
Output window at the bottom of the screen should read: Build: 2 succeeded, 0 failed, 0
skipped.
Then,
you can either directly run the sample use case scenario from Visual Studio .NET 2003, or invoke the created
executable from a command line prompt.
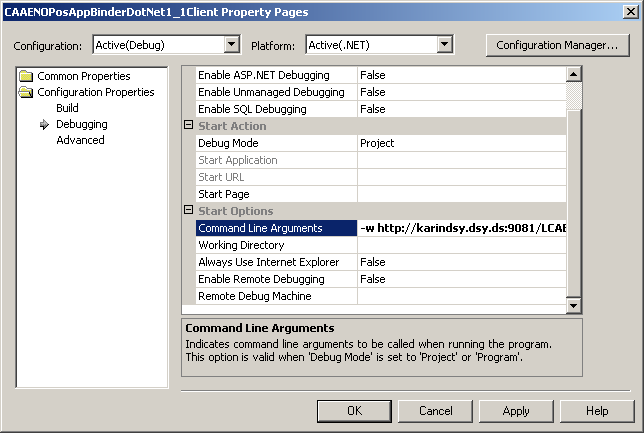
To run the use case from Visual Studio .NET, you need to complete the following steps:
- From the Solution Explorer, right click on the CAAENOPosAppBinderDotNet1_1Client
project and go to Properties,
- Select Configuration Properties then Debugging from the left pane,
- Enter the command line options documented in the use case. For the use case being demonstrated,
you need to enter -w http://karindsy.dsy.ds:9081/LCAB17D49 -e cjk -u wpsadmin -p wpsadmin (the parameter
values depend on your environment), as shown below:
Fig.8: C# Console Application Project Properties
|
- From Visual Studio .NET, go to Debug then Start Without Debugging:
Fig.9: Running the Sample Use Case Scenario
|
To run the use case from command line, you need to complete the following steps:
- Open up a command prompt. Click on Start -> Run and then type
cmd,
- From the prompt, browse to the
C:\CAAENOPosAppBinderDotNet1_1ClientSolution\CAAENOPosAppBinderDotNet1_1Client\bin\Debug directory,
- Invoke the executable created for the use case scenario you wish to run, using the options documented in the
related use case article. For the CAAENOPosAppBinderDotNet1_1Client use case demonstrated, you need to issue the
following command: CAAENOPosAppBinderDotNet1_1Client.exe -w http://karindsy.dsy.ds:9081/LCAB17D49 -e cjk -u
wpsadmin -p wpsadmin (the parameter values depend on your environment).
A sample output is given for the CAAENOPosAppBinderDotNet1_1Client use case demonstrated. Running the client in
your own environment will most likely produce different results. In any case, the last line should always inform
that the test passed successfully:
C:\CAAENOPosAppBinderDotNet1_1ClientSolution\CAAENOPosAppBinderDotNet1_1Client\bin\Debug>CAAENOPosAppBinderDotNet1_1Client.exe
            -w http://karindsy.dsy.ds:9081/LCAB17D49 -e cjk -u wpsadmin -p wpsadmin

            ================================================================================

            Displaying inputs

            ================================================================================

            Web application context root URI: http://karindsy.dsy.ds:9081/LCAB17D49

            ENOVIA LCA V5 P&O username: cjk

            Basic authentication username: wpsadmin

            Basic authentication password: wpsadmin

            ================================================================================

            Running ENOPosApplicationBinderImpl CAA Web service use case

            ================================================================================

            STEP 1: Instantiating and configuring CAA Web service proxy

            --------------------------------------------------------------------------------

            STEP 2: Getting contexts for user specified

            --------------------------------------------------------------------------------

            >>> Invoking 'getUserContexts' on ENOPosApplicationBinderImpl CAA Web service proxy

            Username: cjk

            Status: Success

            Found 1 context(s) in database

            Displaying list of available contexts:

            Context[0]: VPMADMIN.ADMIN.DEFAULT

            --------------------------------------------------------------------------------

            STEP 3: Logging on to ENOVIA LCA V5

            --------------------------------------------------------------------------------

            >>> Invoking 'bindToApplication' on ENOPosApplicationBinderImpl CAA Web service proxy

            Using context: VPMADMIN.ADMIN.DEFAULT

            Status: Success

            --------------------------------------------------------------------------------

            STEP 4: Logging out from ENOVIA LCA V5

            --------------------------------------------------------------------------------

            >>> Invoking 'releaseFromApplication' on ENOPosApplicationBinderImpl CAA Web service proxy

            Status: Success

            ================================================================================

            Use case execution successful
|
[Top]
In Short
This use case describes how to set up a buildtime and runtime environment using Visual Studio .NET 2003 in order
to compile and launch the CAA Web services use cases relying on the .NET Framework.
[Top]
References
History
|
Version: 1 [Jan 2006]
|
Document created
|
|
[Top]
|
Copyright © 1994-2006, Dassault Systèmes. All rights reserved.