CAA Web Services Home |
|
Building and Launching a CAA Web Service Use CaseHow to build and launch the CAA V5 use cases that demonstrate how to consume CAA Web services |
| Use Case | ||
AbstractThis article explains how to set up a buildtime and runtime environment for the CAA Web service use cases that rely on Axis. It describes how to compile one or several code samples, and how to launch the related usage scenario samples. |
The code samples delivered within CAA Web service use cases are intended to demonstrate how to write client applications that consume CAA Web services. The aim of this article is to help you build and run these code samples. It explains how to set up your buildtime and runtime environments using IRAD (IBM Rational Application Developer) 6, although any other Java IDE (Integrated Development Environment) or stand-alone JDK/JRE (Java Development Kit/Java Runtime Environment) could be used for that purpose. It uses a given CAA Web service use case as example, but the related concepts apply to any other available use case.
[Top]
CAAXXXAxis1_3Client is a generic name for the CAA Web service use cases that rely on Axis 1.3. You should just replace XXX by the actual name of the CAA V5 use case you want to build and launch. To leave your CD-ROM installation as a safe reference, please create your project in a separate root directory for the CAA use cases in which you can freely copy, build, run, and possibly modify the use cases.
The code samples are only provided inside a typical CAA Web service framework/module architecture for convenience purpose. There is no prerequisite on either the CAA V5 buildtime or the CAA Web service runtime environment when using CAA Web services. In the following section, the code samples are imported from the CAA CD-ROM media for clarity. It is expected that you generate/write the related code yourself by referring to the use case describing how to consume the CAA Web service you wish to use.
[Top]
The following section first describes how to set up the Axis prerequisites on your project, then how to import the use case code samples, and finally how to build the project. It then explains how to launch the related use case scenario. In the following, the CAAENOPosAppBinderAxis1_3Client use case [1] will be used for reference:
There are various ways available for building client applications that rely on Axis. You can build the code with any Java IDE from the market, or even with the Apache Ant Java-based build tool for example. The only requirement is to set up the Axis prerequisites. See [2] for a detailed description of such prerequisites.
The following section describes how to build the code using IRAD 6.0. These steps could be performed in the almost exact same way when using IBM WSAD (WebSphere Studio Application Developer) 5.1.x or Eclipse 3.x. It demonstrates the use of the Axis 1.3 release, but it can be easily updated to match any other certified release.
![]() If using Java 1.3, a few extra steps are required. These steps (7 to 16) are highlighted in
red below. Their aim is to change the default JRE used but also to add Xerces related
dependencies to the project classpath.
If using Java 1.3, a few extra steps are required. These steps (7 to 16) are highlighted in
red below. Their aim is to change the default JRE used but also to add Xerces related
dependencies to the project classpath.
The following describes how to set up the build time environment:
\axis-1_3\lib subfolder. Select the following JARs using CTRL + Click and
then click on Open: axis.jar, axis-schema.jar, commons-discovery-0.2.jar,
commons-logging-1.0.4.jar, jaxrpc.jar, saaj.jar and wsdl4j-1.5.1.jar,
\xerces-2_6_2\ folder. Select the following JARs using CTRL +
Click and then click on Open: xml-apis.jar, xmlParserAPIs.jar
and xercesImpl.jar,
[Top]
CAA Web service use cases that demonstrate how to consume CAA Web services using Axis generally include:
For the CAAENOPosAppBinderImplAxis1_3Client use case being demonstrated, you can import these resources as described below:
ENOVIA LCA V5 CAA Web services rely on a custom class that must be written in order to maintain the HTTP session state with Axis [3]. This class is provided for convenience and can be added to your project using the following steps:
Several CAA Web services may be used in combination of others. In such context, you will need to import resources from different use case modules before building and launching a given use case scenario. Please refer to the use case that describes how to consume the CAA Web service you wish to use for a complete list of such dependencies. You may then repeat the steps numbered from 1 to 4 above as many times as necessary.
By default, IRAD 6.0 is set on Build Automatically (Project menu). You should see no build errors in the Problems view.
If using the default Java environment from IRAD 6.0, your Java project should look as the following for the CAAENOPosAppBinderImplAxis1_3Client use case demonstrated as example:
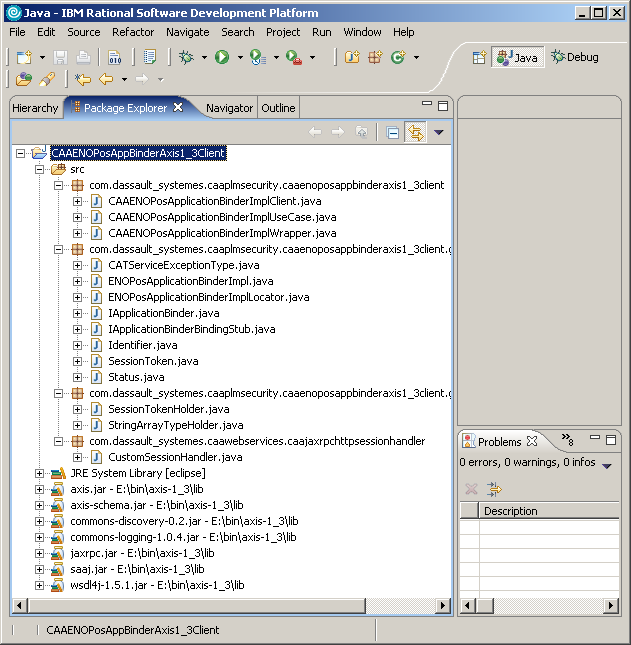
|
[Top]
CAA Web service use cases that demonstrate how to consume CAA Web services using Axis generally contains one or
more CAAXXXClient classes. You should just replace XXX by the actual name of the class
you want to launch. Each class is intended to provide a sample usage scenario for the CAA Web services being
demonstrated. They can be launched using either a JRE or any Java IDE from the market. When using a JRE, please
make sure to set your CLASSPATH so that it includes all of the required dependencies.
The following describes how to launch a use case scenario from within IRAD 6.0. These steps could be performed in the almost exact same way when using IBM WSAD (WebSphere Studio Application Developer) 5.1.x or Eclipse 3.x:
CAAENOPosAppBinderAxis1_3Client),
CAAXXXClient class (for example,
CAAENOPosApplicationBinderImplClient) and click OK,
-w http://karindsy.dsy.ds:9080/B17 -e cjk -u wpsadmin -p wpsadmin,
The output is displayed in the Console view within IRAD 6.0. A sample result is given for the CAAENOPosAppBinderAxis1_3Client use case demonstrated. Running the client in your own environment will most likely produce different results. In any case, the last line should always inform that the test passed successfully:
================================================================================ |
[Top]
This use case describes how to set up a buildtime and runtime environment using IRAD 6 in order to compile and launch the CAA Web services use cases that rely on Axis.
[Top]
| [1] | Consuming the ENOPosApplicationBinderImpl CAA Web Service |
| [2] | Generating a Java Client Binding |
| [3] | Maintaining the Session State |
| Version: 1 [Apr 2005] | Document created |
| Version: 1 [Jan 2006] | Document updated |
| [Top] | |
Copyright © 1994-2006, Dassault Systèmes. All rights reserved.