Portal Applications |
3d com Navigator |
Developing a Browsing DriverHow to develop a driver to browse a document in the Portal |
| Use Case | ||
AbstractThis article discusses the CAAPLBADriverWithVisu use case. This use case explains how to implement the interfaces in order to create a new driver and send documents in the viewer. |
This use case is intended to help you develop a Driver in ENOVIA Portal.
Its main intent is to allow you to view documents, text, html, Office document,
2D or 3D format.
We will define three types of data: the part type, the catia model type and the
document type.
This use case looks like the Pst Driver use case. The three main differences are:
Since the use cases Pst Driver and Driver with Visu share common code, all the explanations are not repeated here. Several references are made to the Pst Driver use case which is considered as e prerequisite to read this document.
[Top]
CAAPLBADriverWithVisu is a use case of the CAAPortalBaseApplications.edu framework that illustrates the ENOVIA PortalBaseApplications framework capabilities.
[Top]
This driver allows you to visualize: hierarchical data in the Portal WebTree and document in the WebSpace.
[Top]
Before launching ENOVIA Portal and using the new driver, you have to compile it and declare it in some environment files.
You have to compile the java files and make a jar file thanks to the mkmk command.
This sample is using different document file samples (text, html and cgm). You will probably have to change pathes to access these files in the WithVisuDriverImpl.java source file:
_path_toCAARTV = "E:/B13/intel_a"; |
is the path to your CAA installation runtime view |
_path_toDocOnline = "E:/B13/Doc/online"; |
is the path to your doc online installation |
URLDocument doc = |
http://localhost/sample/cgmFiles/nasa.cgm is the url to access the local
file InstallRootDirectory/$OS/docs/sample/cgmFiles/nasa.cgm on your
machine if an http server is running. |
FileDocumentV4 doc0 = |
/u/users/userid/foo.txt is the remote file path to access a file foo.txt
on your server. |
[Top]
In order to add this new driver, you have to modify:
These modified files are in:
| Windows | InstallRootDirectory\CAAPortalBaseApps.edu\Data.d\DriverWithVisu |
| Unix | InstallRootDirectory/CAAPortalBaseApps.edu/Data.d/DriverWithVisu |
and must be put in
| Windows | InstallRootDirectory\intel_a\docs\java |
| Unix | InstallRootDirectory/$OS/docs/java |
Modification of the file dsar.properties to register the new jar file in the
CATlet where this jar will be used:
in BookmarkTreeCATlet (you have to increment the number of dsar):
... CLASS: com.dassault_systemes.catweb.bookmarktree.BookmarkTreeCATlet PortalBookmarkTree.dsar ... CAAPLBADriverWithVisu.jar ... |
Modification of the file Driver.properties to add the new driver:
This file contains the list of all the drivers and the information to use it.
Increment the number of drivers.
group=13 ... |
Specify the path of the class that implements the Driver2 interface.
... group.12.element=1 group.12.name=WithVisu Driver group.12.element.0.classname=com.dassault_systemes.CAAPortalBaseApps.CAAPLBADriverWithVisu.WithVisuDriverImpl group.12.element.0.label=WithVisu Driver |
To add the bookmark "DriverWithVisu queries" and the sub-bookmark "Query all" in the Search Tree (to access the driver query window), you have to add this lines in SearchProject.xml.
... <folder NAME="DriverWithVisu queries"> <BOOKMARK NAME="Query All" url="http://localhost/casta/type.com.casta.generic.Query/?CATLET_TYPE=JAVAQUERYTOOL&Specification=Query_WithVisuDriver"> </BOOKMARK></folder> ... |
[Top]
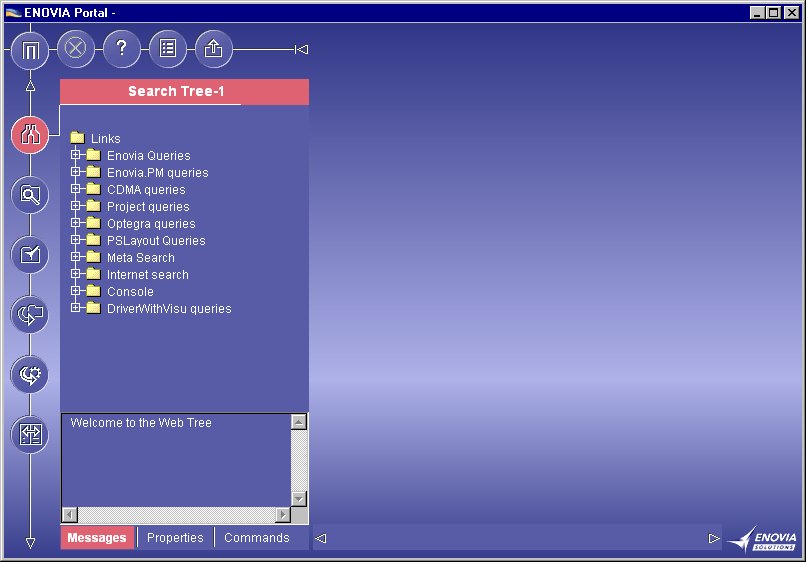
Step 1 - Launch ENOVIA Portal and select the Search Tree workbook
Note the new "DriverWithVisu queries" bookmark that has appeared in the Search Tree workbook. If you cannot see it, the reason may be that you see a previous version of the Search Tree workbook. To update the Search Tree workbook: delete it and add it again.
Step 2 - Open the "DriverWithVisu queries" bookmark, right click on the "Query All" sub-bookmark and select "Activate".
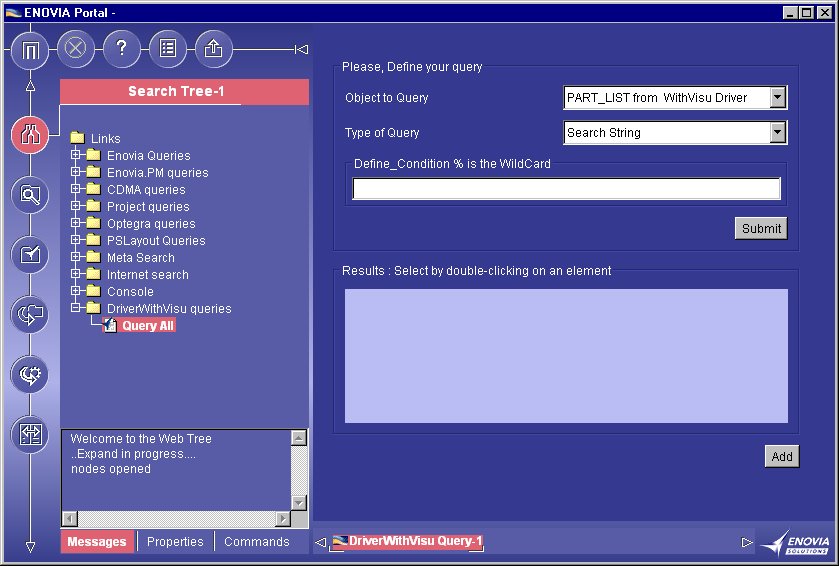
Note that as a result the "DriverWithVisu Query" CATlet has been instantiated in the webspace.
Step 3 - Enter the % query string in the DriverWithVisu Driver CATlet and press the submit button.
As a result, the list of all the parts available with the WithVisu Driver are displayed (this is a hard coded data model).
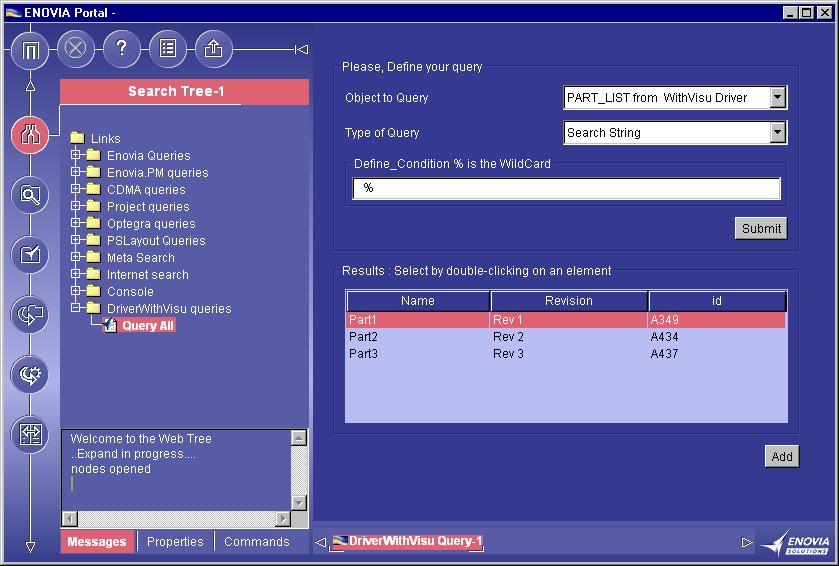
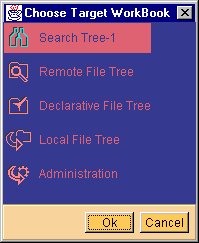
Step 4 - Double-click on the "Part1" result and select the Search Tree workbook as target workbook
Note that as a result a bookmark to the selected result is created in the Search Tree workbook.
Step 5 - Open the "shortcut of Part1 Rev1 A349" bookmark and navigate in the product structure by opening the different nodes.
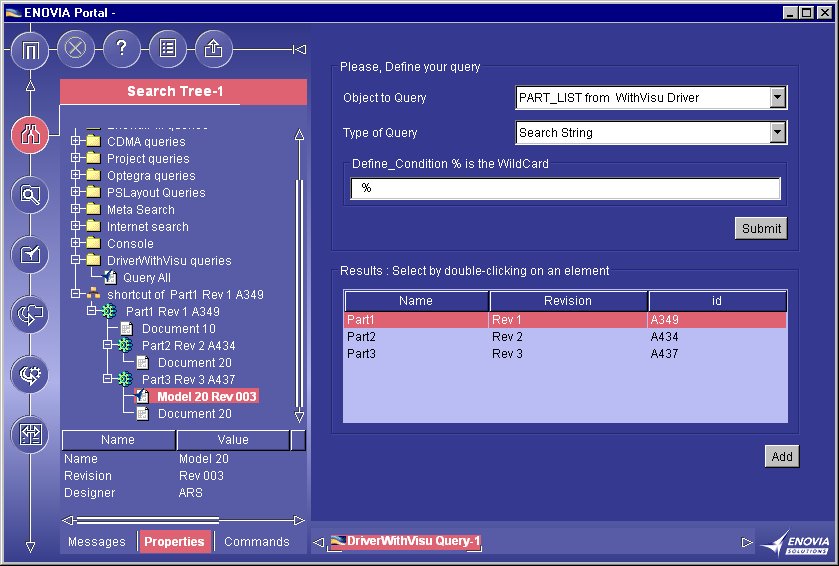
Note that you can display the properties of each leaf or node of the hierarchical tree by clicking on the Properties tab of the webtree.
Step 5 - Right click on "Document20" under "Part3 Rev3 A437" and select Open in new "2D Local Viewer".
The last "Open in new" action shows the possibility of visualizing documents from a PDM in ENOVIA Portal.
[Top]
The CAAPLBADriverWithVisu use case is made of three class named: WithVisuDriverImpl, WithVisuMetdataImpl, and WithVisuDataImpl located in the CAAPLBADriverWithVisu.mj module of the CAAPortalBaseApplication.edu framework:
| Windows | InstallRootDirectory\CAAPortalBaseApps.edu\CAAPLBADriverWithVisu.mj\src\com\dassault_systemes\CAAPortalBaseApps\CAAPLBADriverWithVisu |
| Unix | InstallRootDirectory/CAAPortalBaseApps.edu\CAAPLBADriverWithVisu.mj/src/com/dassault_systemes/CAAPortalBaseApps/CAAPLBADriverWithVisu |
where InstallRootDirectory is the directory where the CAA CD-ROM
is installed.
[Top]
To create a driver for data access, there are six main steps.
Creation of a new class WithVisuDriverImpl which implements the interface com.dassault_systemes.catweb.databackend.dataType.Driver2.
Please refer to the documentation of the Pst Driver sample for the presentation of this interface. The only differences between the two implementations are the implementations classes for the MetadataIF and DataIF interfaces.
...
public class WithVisuDriverImpl implements Driver2
{
...
private WithVisuMetadataImpl _metadata = null ;
private WithVisuDataImpl _data = null ;
...
public void start(InformationObject iInformation)
{
...
_metadata = new WithVisuMetadataImpl();
_data = new WithVisuDataImpl(_metadata);
}
...
|
The name of the driver:
...
public String getName()
{
return "WithVisu Driver";
}
...
|
The method setParameter doesn't need to be implemented in this use case. It deals with parameters that could be set in a properties file. There is no such parameter here so the method is empty.
[Top]
As in the Pst Driver use case, the default implementation of defaultSecurityIFImpl is used here. See [1] for more explanations.
[Top]
As in the Pst Driver use case, the default implementation of defaultEnvironmentIFImpl is used here. See [1] for more explanations.
[Top]
The purpose of this interface is to describe the types of data managed by the
driver. The data could have different types. For example this system will
provide 3 types of objects: part, model and document.
A new class: WithVisuMetadataImpl is created to implement the interface
MetadataIF. This interface contains one method: getTypes, which returns an array
of PEType Objects.
...
public class WithVisuMetadataImpl implements MetadataIF
{
private PEType[] _aType = null ;
public PEType[] getTypes()
{
if( _aType == null)
{
_aType = new PEType[3];
...
|
There are three parameters to construct the different PETypes of this system.
...
_aType[0] = new PEType("PART_LIST", true, "Resources/I_Body.gif");
_aType[1] = new PEType("CATIA_MODEL", false, "Resources/iDBmodel01.gif");
_aType[2] = new PEType("DOCUMENT", false, "Resources/iDBdocument01.gif");
int[] aFileQuery = new int[1] ;
fileQuery[0]=0;
types[0].setSupportedQueries(aFileQuery);
...
|
Then the attributes describing each type are given. For example PART_LIST
type has 4 attributes: NAME, REV, ID and MATURITY.
The visible name of a PART_LIST node is composed of the value of the
"NAME" attribute, the value of the "REV" attribute and the
value of the "MATURITY" attribute. That's why ID is declared not
visible by the setTreeVisibility method and all other PEAttribute have a
treeVisibility equal to their position in the concatenation.
...
PEAttribute[] aPartAtt = new PEAttribute[4];
aPartAtt[0] = new PEAttribute("NAME","Name",_aType[0],0);
aPartAtt[0].setTreeVisibility(1);
aPartAtt[1] = new PEAttribute("REV","Revision",_aType[0],0);
aPartAtt[1].setTreeVisibility(2);
aPartAtt[2] = new PEAttribute("ID","id",_aType[0],0);
aPartAtt[2].setTreeVisibility(0);
aPartAtt[3] = new PEAttribute("MATURITY","maturity",_aType[0],0);
aPartAtt[3].setTreeVisibility(3);
_aType[0].setAttributes(aPartAtt);
...
|
[Top]
The DataIF interface enables the display and the query of data. It is implemented in a new WithVisuDataImpl instantiated by the driver. Two methods have to be implemented:
...
public class WithVisuDataImpl implements DataIF
{
// The types defined in MetadataIF
private PEType[] _types = null;
// The pathes to CAA workspace rutimeview and to doc online
private String _path_toCAARTV = null ;
private String _path_toDocOnline = null ;
public WithVisuDataImpl( MetadataIF iMDimpl )
{
_types = iMDimpl.getTypes();
...
}
...
|
The QueryRoot method searches the objects which meet the conditions expressed by a query and which belongs to a specified environment. For this use case only the simple query (Search String) is supported for the PEType "PART_LIST". The returned data are hard coded: whatever the search string is, the method returns three nodes: Part1, Part2 and Part3.
...
public PELeaf[] QueryRoot(java.lang.Object iSearch, PEType iTypeOfObject, String iEnvironment)
{
PENode[] aNodesToBack = new PENode[3] ;
// Creates the attribute list corresponding to the array of the PEAttribute
// of the PEtype of the Object
String[] aPartAtt = new String[4];
aPartAtt[0] = "Part1";
aPartAtt[1] = "Rev 1";
aPartAtt[2] = "A349";
aPartAtt[3] = "Niv 1";
// "Nodes1" is the unique identifier of the Node
// _types[0] corresponds to the Type of the Node
// the last null corresponds to the array of children
aNodesToBack[0] = new PENode(new defaultUuidImpl("Node1"), _types[0], null);
// Adds the attributes of the PENode
NodesToBack[0].setAttributeValues(aPartAtt);
...
|
The openNode method returns the children of a Node.
In this use case, the returned children of a node are hard coded.
Part1 has 3 children: Part2, Part3 and a document Document10 to which a
LocalFileDocument is attached. The LocalFileDocument is used to set files that
are on the client file system so it is identified by its path.
...
public PELeaf[] openNode(PENode iNode)
{
PELeaf[] aNodesToBack = null;
if (((node.getAttributeValues())[0]).equals("Part1"))
{
aNodesToBack = new PELeaf[3];
String[] aDocAtt = new String[2];
aDocAtt[0] = "Document 10";
aDocAtt[1] = "user2";
aNodesToBack[0] = new PELeaf(new defaultUuidImpl("Document10"),_types[2]);
aNodesToBack[0].setAttributeValues(aDocAtt);
//---------------------------------------------
// Constructs a LocalFileDocument
//---------------------------------------------
String docPath = _path_toDocOnline+"/CAAPbaUseCases/CAAPbaUDriverWithVisu.htm";
LocalFileDocument doc = new LocalFileDocument(docPath);
//---------------------------------------------
// Attaches the document to the PELeaf
//---------------------------------------------
aNodesToBack[0].setDocument(doc);
...
|
Then Part2 has only one child: Document20 to which a URLDocument is attached. The URLDocument is used to set files that are on a http server.
...
else if (((node.getAttributeValues())[0]).equals("Part2"))
{
aNodesToBack=new PELeaf[1];
String[] aDocAtt = new String[2];
aDocAtt[0] = "Document 20";
aDocAtt[1] = "user1";
aNodesToBack[0] = new PELeaf(new defaultUuidImpl("Document20"),_types[2]);
aNodesToBack[0].setAttributeValues(aDocAtt);
// Constructs a URLDocument
// provided that for instance a web server is running on localhost and /sample/cgmFiles/nasa.cgm
// is available from the rootdirectory of the server
URLDocument doc =

      new URLDocument("http://localhost/sample/cgmFiles/nasa.cgm");
aNodesToBack[0].setDocument(doc);
}
...
|
At last, Part3 has 2 children: a model Model20 and a document Document20.
The document attached to Model20 is a FileDocumentV4. The FileDocumentV4 is used
to set files that are on the Portal server.
The document attached to Document20 is a URLDocument. So URLDocument are not
only used to set files located on a http server, but also to the URLDocument can
also be used to set files located on the client file system.
...
else if (((node.getAttributeValues())[0]).equals("Part3"))
{
aNodesToBack=new PELeaf[2];
String[] aModelAtt = new String[3];
aModelAtt[0] = "Model 20";
aModelAtt[1] = "Rev 003";
aModelAtt[2] = "user1";
aNodesToBack[0] = new PELeaf(new defaultUuidImpl("Model20"),_types[1]);
aNodesToBack[0].setAttributeValues(aModelAtt);
// Constructs a FileDocumentV4
// provided that for instance the /u/users/userid/foo.txt file exists on the portal server
FileDocumentV4 doc0 =

      new FileDocumentV4("/u/users/userid/foo.txt");
aNodesToBack[0].setDocument(doc0);
String[] aDocAtt = new String[2];
aDocAtt[0] = "Document 20";
aDocAtt[1] = "user2";
aNodesToBack[1]=new PELeaf(new defaultUuidImpl("Document20"),_types[2]);
aNodesToBack[1].setAttributeValues(aDocAtt);
// Constructs a URLDocument
String doc1Path = "file:/"+_path_toCAARTV+"/docs/sample/cgmFiles/nasa.cgm";
URLDocument doc1 = new URLDocument(doc1Path);
aNodesToBack[1].setDocument(doc1);
}
...
|
[Top]
The Query_DriverWithVisu.properties file is referenced in the "Query All" sub-bookmark that has been defined in SearchProject.xml file. The inner mechanism is that when the "Query All" sub-bookmark is activated the Query CATlet is instantiated giving the Query_DriverWithVisu.properties file as a parameter.
The file Query_DriverWithVisu.properties specifies different properties of the query window:
nameofQuery=DriverWithVisu Query ... |
... typeOfQuery=Casta.StringSearch ... |
... nbTypes=1 Types.0.id=Casta.All Types.0.driver_id=WithVisu Driver |
[Top]
This use case demonstrates the way to create a driver in ENOVIA Portal by
using some interfaces of databackend.dataType.
First the Driver2 interface has to be implemented by a new class which
must also provide the implementation of mandatory interfaces: MetadatIF,
DataIF, SecurityIF, EnvironmentIF. Some default implementations are
supplied by Dassault Systèmes.
This use case also illustrates how some interfaces of databackend.dataType can
be used to send documents in the WebSpace: LocalFileDocument, FileDocumentV4
and URLDocument.
At last, a new property file must describe this driver.
[Top]
| [1] | Pst Driver Use Case |
| [Top] | |
| Version: 1 [May 2000] | Document created |
| [Top] | |
Copyright © 2000, Dassault Systèmes. All rights reserved.