Mechanical Modeler |
|
Copying Mechanical FeaturesUsing CATMmrInterPartCopy |
| Use Case | ||
AbstractThis article shows how to copy mechanical features using CATMmrInterPartCopy. |
This use case explains the usage of the CATMmrInterPartCopy to copy mechanical features. Its presents:
In the What Does CAAMmrInterIntraPartCopy Do section, all the copies done by the code are presented by pictures, and commented. It gives you an overview of the CATMmrInterPartCopy possibilities, and the result of the copies.
[Top]
CAAMmrInterIntraPartCopy is a use case of the CAAMechanicalModeler.edu framework that illustrates MechanicalModeler framework capabilities.
[Top]
This use case uses a Product document containing instances of Part documents.
|
|
The CAAMmrPartCopy document contains one of the CAAMmrPartCopy_Comp3
Part
document, and two instances of the
CAAMmrPartCopy_Comp1 Part document.
 |
The
CAAMmrPartCopy_Comp1 document only contains geometrical features sets [2].
 |
The
CAAMmrPartCopy_Comp3 document contains some points, one pad, and an
invisible surface
(an extruded sketch which is splitted: the result is not visible because Split.1 is not the
current feature. Refer to the article entitled "Order and Absorption Concept [3]).
These four documents, the two Part documents and the two Product
documents are located in the InputData directory of the
CAAMechanicalModeler.edu framework.
The batch carries out a series of copies between mechanical features:
From CAAMmrPartCopy_Comp3 to
CAAMmrPartCopy_Comp1
Source (CAAMmrPartCopy_Comp3) |
Target (CAAMmrPartCopy_Comp1) |
PartBody |
Part |
Point.1 |
Part |
Point.2 |
PartBody |
Point.3 |
Geometrical Set.1 |
Geometrical Set.1 |
Part |
Ordered Geometrical Set.2 |
PartBody |
Ordered Geometrical Set.2 |
Ordered Geometrical Set.3 |
These copies are done with four alternatives:
Note that the copies out of Assembly context, are equivalent to open separately the two Part documents, and to do the copies.
From CAAMmrPartCopy_Comp3 to CAAMmrPartCopy_Comp3
Source (CAAMmrPartCopy_Comp3) |
Target (CAAMmrPartCopy_Comp3) |
PartBody |
Part |
Point.1 |
Part |
Point.2 |
PartBody |
Point.3 |
Ordered Geometrical Set.2 |
These copies are done with two alternatives:
Now the result of these copies are presenting according to the different alternatives.
It consists to copy mechanical features from CAAMmrPartCopy_Comp3
to CAAMmrPartCopy_Comp1.
|
Copy As Result With Link |
Copy As Result |
|
|
|
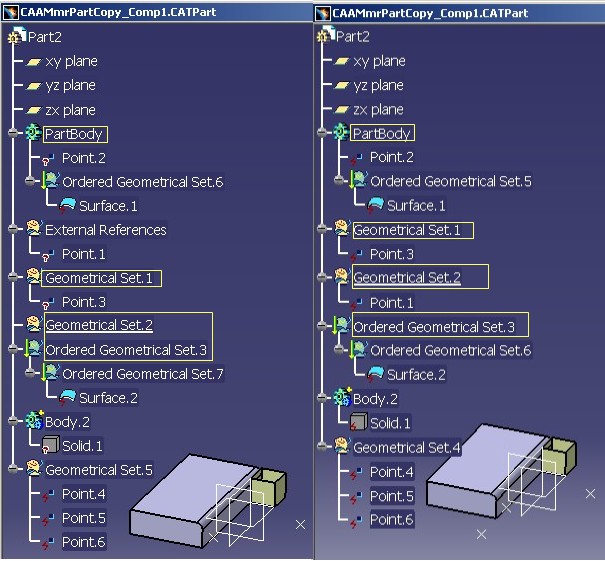
These two images show the CAAMmrPartCopy_Comp1
after the copies. The four existing sets of this Part document are surrounded in
yellow.
First considerations:
It means that the geometry is copied, but in case of original feature
modification, the copied result can be updated. Note that some
icons (![]() ,
,![]() ) have the ? symbol. This
symbol means that
the original document is not opened. If the original document is opened, here
the
) have the ? symbol. This
symbol means that
the original document is not opened. If the original document is opened, here
the CAAMmrPartCopy_Comp3 Part document, the
same icons becomes (![]() ,
, ![]() ).
If you change the coordinates of a point in the original document, the icon of the copied feature becomes :
).
If you change the coordinates of a point in the original document, the icon of the copied feature becomes :
![]() . To synchronize the copied feature, either the synchronization is automatically
done in the update ( See Tools options), or you explicitly synchronize
the feature using the Synchronize command.
. To synchronize the copied feature, either the synchronization is automatically
done in the update ( See Tools options), or you explicitly synchronize
the feature using the Synchronize command.
It means that the geometry is copied, but in case of original feature modification, the copied result will be never updated.
Note that the same icons are now:
and
.
PartBody, from CAAMmrPartCopy_Comp3,
copied into the Part of CAAMmrPartCopy_Comp1 is
Body.2
Point.1, from CAAMmrPartCopy_Comp3,copied into the Part of CAAMmrPartCopy_Comp1 is
Point.1.
On the left, Point.1
is located under the
External References feature, the mechanical feature which groups together
the external references.
On the right, Point.1 is a datum [4]. It is aggregated under
Geometrical Set.2, the current geometrical feature set of
CAAMmrPartCopy_Comp1 - Note
that Geometrical Set.2 is underlined.
Point.2, from CAAMmrPartCopy_Comp3,copied into the PartBody of CAAMmrPartCopy_Comp1 is
Point.2. From R14, It is possible to insert a surfacic feature into a Body
feature.
Point.3, from CAAMmrPartCopy_Comp3,
copied into Geometrical Set.1 of CAAMmrPartCopy_Comp1
is Point.3
Geometrical Set.1, from CAAMmrPartCopy_Comp3,
copied into the Part feature of CAAMmrPartCopy_Comp1
is on left, Geometrical Set.5, and on right, Geometrical
Set.4. This difference comes from that on left, External References has
been created. Except, this naming's difference, you can note that both contain
datum features. The contents of Geometrical Set.1 has been copied
with the "As result" option in the two cases. In a future version, the "As Result
With link" for a geometrical features set will be possible. Note that today,
interactively this kind of copy is impossible.
Ordered Geometrical Set.2, from
CAAMmrPartCopy_Comp3, copied
  into the PartBody of CAAMmrPartCopy_Comp1 is Ordered Geometrical
  Set.6.
On the left, and on the right the same icon:
![]() - It is the same problem as for
- It is the same problem as for Geometrical Set.1. Whatever the
copy option, the contents of an Ordered Geometrical Set is
copied with the "As Result" option.
Sketch.2 included into Ordered Geometrical
Set.2 is not copied. Sketches are never copied such as interactively.
Extrude.1 is not copied, Surface.2
is the "result" of Split.1, an absorbent feature. [3].
Ordered Geometrical Set.2, from
CAAMmrPartCopy_Comp3, copied into the
Ordered Geometrical Set.3 of
CAAMmrPartCopy_Comp1 is
Ordered Geometrical Set.7
It is always the same copies from CAAMmrPartCopy_Comp3
to CAAMmrPartCopy_Comp1, but now in Assembly context.
|
Copy As Result with link |
Copy As Result |
|
|
|
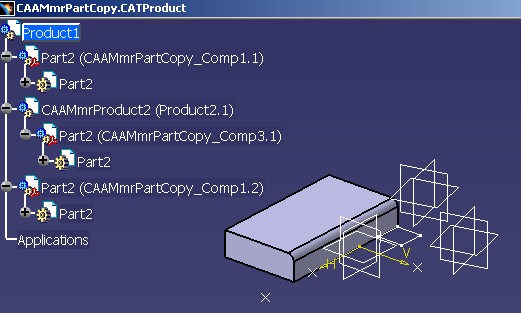
These two images show the CAAMmrPartCopy document
after the copies. The four existing sets of this Part document are surrounded in
yellow.
First considerations are about the Product's icons.
The Part origin of the features is the
CAAMmrPartCopy_Comp3 document. They are copied in an instance of the
CAAMmrPartCopy_Comp1 Part document. (CAAMmrPartCopy_Comp1.1). So
sometimes, you can also read Ref/Inst copies.
Before the copy, on the [Fig.1] you can see
the following icons before each Product instance:
![]()
After the copy, and in copy "As Result", the icons are always
![]() .
.
But in case of "As Result with link" copy option, the icons
become
![]() before
before CAAMmrPartCopy_Comp1.1, and
![]()
before CAAMmrPartCopy_Comp1.2.
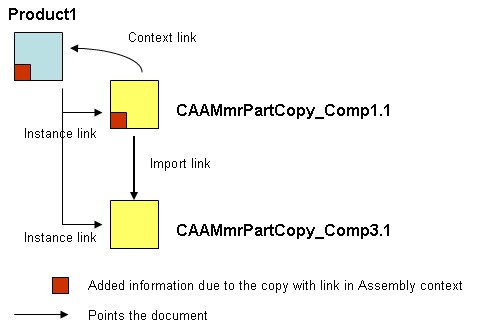
Second considerations are about the copies's location.
You can see on [Fig.5] that two results are
coincident: The yellow pad (from CAAMmrPartCopy_Comp1.1) and the grey
one (from CAAMmrPartCopy_Comp3) are coincident. On the Product
instance links to CAAMmrPartCopy_Comp1.1, a positioning matrix, computed from the matrix of CAAMmrPartCopy_Comp3
and CAAMmrPartCopy_Comp1.1, is stored.
Otherwise, about the result of the copies with (on the left), or without link (on the right) it is the same comments as for copies without Assembly context ([Fig.4]).
In this last case, copies are done from and to the CAAMmrPartCopy_Comp3
Part document.
|
Copy As Result with link |
Copy As Result |
 |
 |
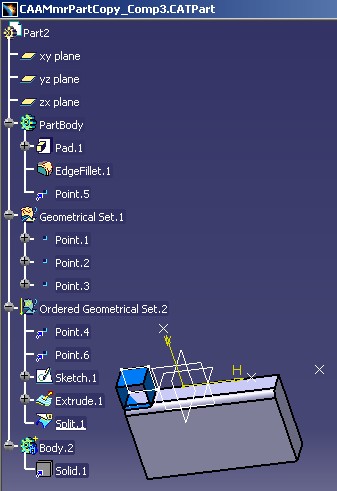
These two images show the CAAMmrPartCopy_Comp3 Part document
after the copies.
First considerations:
On the left, the "As result with link" copies.
See the icons:
![]() for the solid, and
for the solid, and
![]() for the points. It means that the geometry has been copied with the "As result
with link" option within the Part document.
for the points. It means that the geometry has been copied with the "As result
with link" option within the Part document.
On the right, the "As result" (without link)
copies. The same icons are now the icons representing a datum:
![]() and
and
![]() .
.
About the copies themself:
Body.1 is the copy of PartBody. The
geometry are of course at the same location.
Point.4 is the copy of Point.1. The
Part feature being the destination, Point.4 is
included before the current feature of Ordered Geometrical Set.2.
On [Fig.3] you can see that Sketch.1 is the
current feature. So the new point is created just before it [3].
( Point.6 will be created after)
Point.5 is the copy of Point.2.
PartBody being the destination, Point.4 is included in the
Body feature, like it is possible since the V5R14 level.
Point.6 is the copy of Point.3. Such
as Point.4, the new point is created before Sketch.1
into Ordered Geometrical Set.2
To launch CAAMmrInterIntraPartCopy, you will need to set up the build time environment, then compile CAAMmrInterIntraPartCopy along with its prerequisites, set up the run time environment, and then execute the use case [5]. To launch the use case, execute the following steps:
CAAMmrPartCopy_Comp3.CATPart,
    CAAMmrPartCopy_Comp1.CATPart,
    CAAMmrPartCopy.CATProduct, CAAMmrProduct2.CATProduct
They are located in the CAAMechanicalModeler.edu/InputData
directory
InstallRootDirectory/CAAMechanicalModeler.edu/InputData
InstallRootDirectory\CAAMechanicalModeler.edu\InputData
mkrun -c "CAAMmrInterIntraPartCopy InputPath Copy_Option PS_Option "
where
The input documents, those of your directory, are modified, and contain the result of the copies.
Some examples:
To copy the mechanical features, out of the Assembly context, and with "As Result with link" option. See the results, Fig.4 and Fig.6, both on the left
To copy the mechanical features, out of the Assembly context, and with "As Result" option. See the results, Fig.4 and Fig.6, both on the right
To copy the mechanical features, in Assembly context, and with "As Result with link" option. See the results, Fig.5, on the left
To copy the mechanical features, in Assembly context, and with "As Result" option. See the results, Fig.5, on the right
[Top]
The CAAMmrInterIntraPartCopy use case is made of a single source file named CAAMmrInterIntraPartCopyMain.cpp located in the CAAMmrInterIntraPartCopy.m module of the CAAMechanicalModeler.edu framework
| Windows | InstallRootDirectory\CAAMechanicalModeler.edu\CAAMmrInterIntraPartCopy.m\ |
| Unix | InstallRootDirectory/CAAMechanicalModeler.edu/CAAMmrInterIntraPartCopy.m/ |
The use case uses two global functions, CAAMmrGetGeometry and CAAMmrGetPartFromProduct, which are defined in the following directory:
| Windows | InstallRootDirectory\CAAMechanicalModeler.edu\CAAMmrUtilities.m\ |
| Unix | InstallRootDirectory/CAAMechanicalModeler.edu/CAAMmrUtilities.m/ |
where InstallRootDirectory is the directory where the CAA CD-ROM
is installed.
[Top]
There are five logical steps in CAAMmrInterIntraPartCopy:
All the copies shown in the "What Does CAAMmrInterIntraPartCopy Do" section are not there detailed. Only two of them are given to explain the usage of the CATMmrInterPartCopy class.
[Top]
CAAMmrInterIntraPartCopy begins by creating a session, and opening the input
Product document. Next it retrieves all the Product components begining with its
root product,piProductOnRoot. This is the usual sequence for loading a Product document [6].
... CATListValCATBaseUnknown_var * pListDirectChildren = piProductOnRoot->GetChildren(); // Comp1 and Comp2 CATIProduct_var spComp1 = (*pListDirectChildren)[1] ; CATIProduct_var spComp2 = (*pListDirectChildren)[2] ; delete pListDirectChildren ; pListDirectChildren = NULL ; pListDirectChildren = spComp2->GetChildren(); // Comp3 CATIProduct_var spComp3 = (*pListDirectChildren)[1] ; ... |
From the two Product documents, spComp1 and spComp3,
their MechanicalPart feature is retrieved thanks the
CAAMmrGetPartFromProduct global function. Once the Part feature is retrieved, the useful mechanical features
are retrieved using the CAAMmrGetGeometry global function. The contents
of these two global functions being not
essential for the use case, the code is not detailed here; refer to the source
files otherwise.
[Top]
The copy of Point.3 (CAAMmrPartCopy_Comp3) into
Ordered Geometrical Set.2 (CAAMmrPartCopy_Comp3) is detailed. The new
feature
is Point.6. You can see the result on the [Fig.6].
The copy is done with five steps.
... CATISpecObject_var SourceToCopy = spOnPoint3OfComp3 ; CATISpecObject_var Target = spOnOrderedGeomSet2OfComp3 ; CATMmrInterPartCopy * ptCATMmrInterPartCopy = new CATMmrInterPartCopy (SourceToCopy,Target) ; ... |
spOnPoint3OfComp3 and spOnOrderedGeomSet2OfComp3
are smart pointers on Point.3 and Ordered Geometrical Set.2,
two mechanical features of the
CAAMmrPartCopy_Comp3 Part document See [Fig.3].
Refer to the code of the use case, the way to retrieve these two pointers.
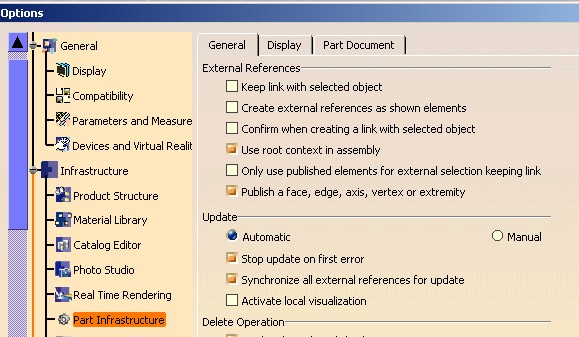
SetLinkMode method.
... ptCATMmrInterPartCopy ->SetLinkMode(CopyWithLink); ... |
CopyWithLink is a CATBoolean value. It is valuated according to
the Copy_Option argument of the program. See the How to Launch CAAMmrInterIntraPartCopy
section. If the argument is 1, the value of CopyWithLink is TRUE, otherwise its value is FALSE. If you do not use the
SetLinkMode method, the option of copy depends on the "Keep link with
selected object" option.
 |
Run method.
... ErrorMsg = "" ; rc = ptCATMmrInterPartCopy ->Run(&ErrorMsg); ... |
GetResult
method.
...
rc = ptCATMmrInterPartCopy ->GetResult(Result);
if ( SUCCEEDED(rc) && (NULL_var != Result) )
{
    CATIAlias_var spAlias = Result ;
    if ( NULL_var != spAlias )
    {
       cout <<" The result of the copy is" ;
       cout <<" " << spAlias->GetAlias().CastToCharPtr() << endl << endl;
     }
...
|
This step is of course optional.
... delete ptCATMmrInterPartCopy ; ptCATMmrInterPartCopy = NULL ; |
To copy another mechanical feature you must come back to the first step.
[Top]
The copy of Point.1 of CAAMmrPartCopy_Comp3 into
the Part feature of CAAMmrPartCopy_Comp1.1 is detailed. The new
feature is Point.1. You can the result on the [Fig.4].
These copy is done with six steps.
CATISpecObject_var SourceToCopy = spOnPoint1OfComp3 ;
CATISpecObject_var Target = spSpecObjectOnMechPartOfComp1;
CATMmrInterPartCopy * ptCATMmrInterPartCopy = new CATMmrInterPartCopy (SourceToCopy,Target) ;
...
|
spOnPoint1OfComp3 is a smart pointer on Point.1 of
the CAAMmrPartCopy_Comp3 document [Fig.3].
spSpecObjectOnMechPartOfComp1 is a smart pointer on the Part
feature of the CAAMmrPartCopy_Comp1 document [Fig.2].
Refer to the code of the use case, the way to retrieve these two pointers.
SetLinkMode method.
... ptCATMmrInterPartCopy ->SetLinkMode(CopyWithLink); ... |
CopyWithLink is a CATBoolean value. It is valuated according to
the Copy_Option argument of the program. See the How to Launch CAAMmrInterIntraPartCopy
section. If the argument is 1, the value of CopyWithLink is TRUE, otherwise its value is FALSE. If you do not use the
SetLinkMode method, the option of copy depends on the "Keep link with
selected object" option. See [Fig.7]
Until then, no difference with the previous copy. But if you use
SetSourceInstance, and the SetTargetInstance you are in
Assembly context.
... ptCATMmrInterPartCopy ->SetSourceInstance(spComp3); ptCATMmrInterPartCopy ->SetTargetInstance(spComp1); ... |
spComp3 and spComp1
are smart pointers on a CATIProduct
interface retrieved in the prolog step. spComp3 is a pointer on the
CAAMmrPartCopy_Comp3 Product instance, and
spComp1 pointer on the CAAMmrPartCopy_Comp1.1
Product instance
![]()
If you do not specify the product context, so if you do not use these two methods, you are copying features without Assembly context. So it is the result that you can see on the [Fig.4].
Run method.
... ErrorMsg = "" ; rc = ptCATMmrInterPartCopy ->Run(&ErrorMsg); ... |
GetResult
method.
... rc = ptCATMmrInterPartCopy ->GetResult(Result); ... |
This step is of course facultative.
... delete ptCATMmrInterPartCopy ; ptCATMmrInterPartCopy = NULL ; |
To copy another mechanical feature you must come back to the first step.
The four modified documents:
CAAMmrPartCopy_Comp3.CATPart, CAAMmrPartCopy_Comp1.CATPart, CAAMmrPartCopy.CATProduct
and
CAAMmrProduct2.CATProduct are saved using the SaveAs method
of the CATDocumentServices class.
 |
If you first save the Product with another name, the saved document pointes to Comp1.1 which will be after saved under another name
If you first save Comp1.1 with another name, the saved document pointes to Product1 which will be after saved under another name
Save method which does not work in batch mode.[Top]
All the documents are removed from the session using the Remove method
of the CATDocumentServices class, and then the session is closed using
the global function named Delete_Session.
[Top]
This use case has shown different kind of copies, and explained the usage of the CATMmrInterPartCopy class.
[Top]
| Version: 1 [Oct 2004] | Document created |
| [Top] | |
Copyright © 2004, Dassault Systèmes. All rights reserved.