Mechanical Modeler |
Setting applicative attributes and colors on Part sub-elementsUsing CATMmrApplicativeAttributes |
| Use Case |
AbstractThis article discusses the CAAMmrApplicativeAttributes use case. This use case explains how to open a Part document, find its sub-elements(faces), set color and applicative attributes on these sub-elements, and retrienve these colors and applicative attributes using dedicated CAA service class. |
This use case is intended to show you how to set colors and applicative attributes on a list of faces.
|
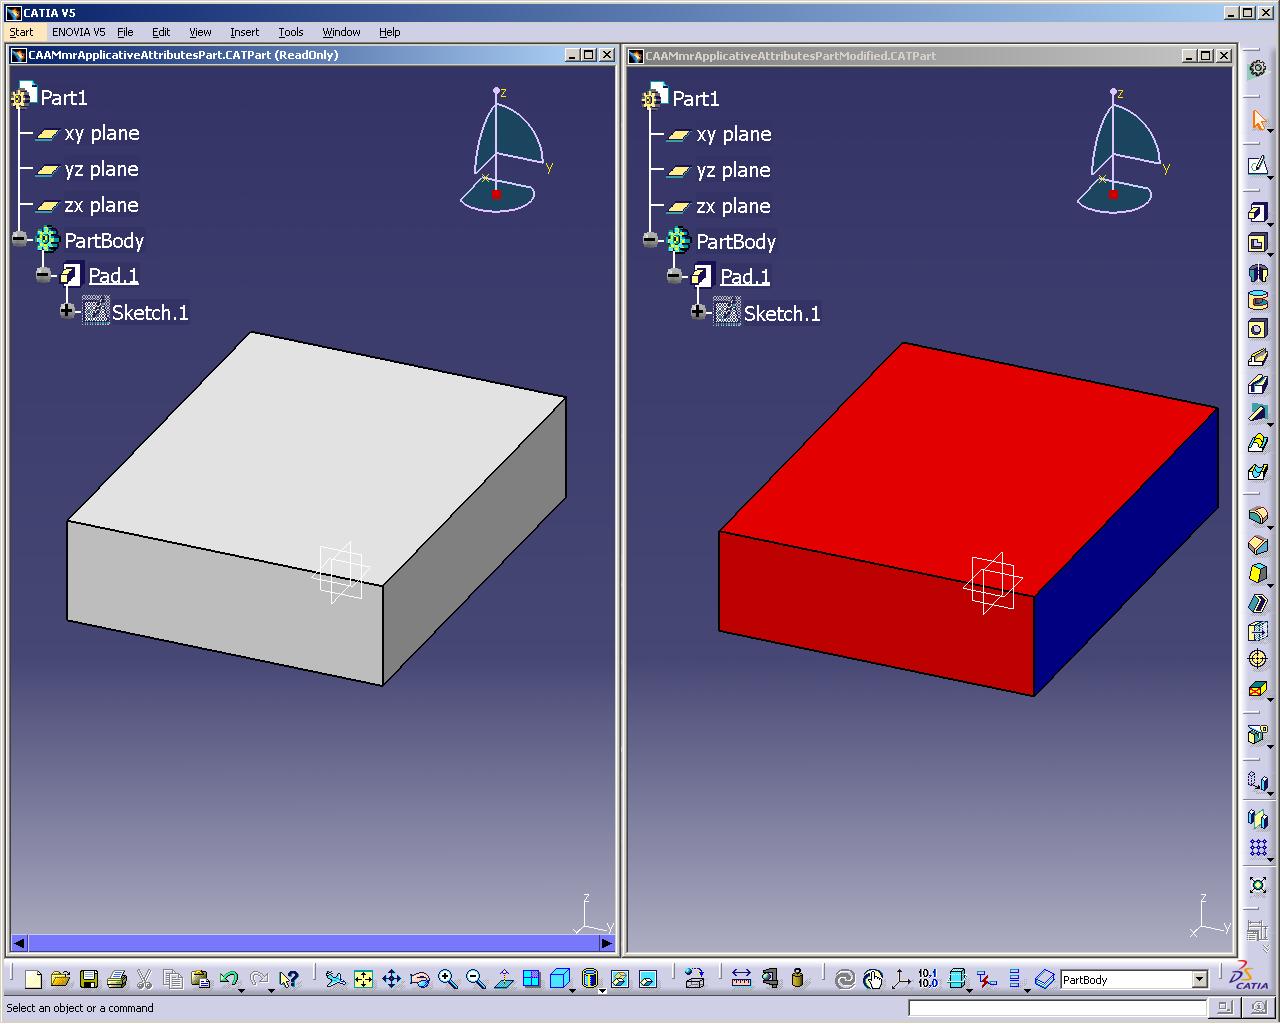
This picture represents a Part document before (left) and after (right) its processing by the use case. The program has looked for all faces in the model and set applicative attributes and colors on its faces. |
[Top]
CAAMmrApplicativeAttributes is a use case of the CAAMechanicalModeler.edu framework that illustrates MechanicalModeler framework capabilities.
[Top]
The job of CAAMmrApplicativeAttributes is divided into several steps:
[Top]
To launch CAAMmrApplicativeAttributes, you will need to set up the build time environment, then compile CAAMmrApplicativeAttributes along with its prerequisites, set up the run time environment, and then execute the use case [2]. To launch the use case, execute the following command:
mkrun -c "CAAMmrApplicativeAttributes FilenameIn FilenameOut"
where
CAAMmrApplicativeAttributesPart.CATPart located:
InstallRootDirectory/CAAMechanicalModeler.edu/InputDataInstallRootDirectory\CAAMechanicalModeler.edu\InputDataFilenameOut is the complete path of a Part document which
will contain the FilenameIn document modified[Top]
The CAAMmrApplicativeAttributes use case is made of a single source file named CAAMmrApplicativeAttributes.cpp located in the CAAMmrApplicativeAttributes.m module of the CAAMechanicalModeler.edu framework:
| Windows | InstallRootDirectory\CAAMechanicalModeler.edu\CAAMmrApplicativeAttributes.m\ |
| Unix | InstallRootDirectory/CAAMechanicalModeler.edu/CAAMmrApplicativeAttributes.m/ |
where InstallRootDirectory is the directory where the CAA CD-ROM
is installed.
[Top]
There are ten logical steps in CAAMmrFeatureTopoBRep:
[Top]
int main(int iArgc,
     char **iArgv) // iArgv[1]: path to an existing Part document
                   // iArgv[2]: path to a  new, modified Part document
    {
      // return code
      int rc = 0;

      // Checks number of arguments
      if( 3!=iArgc )
        return 1;

      // Loads input Part and make it ready
      char *pSessionName = "Sample session";
      CATSession *pSession = 0;
      HRESULT rc = ::Create_Session(pSessionName, pSession) ;
      if( SUCCEEDED(rc) )
      {
        CATDocument *pDoc = 0;
        rc= CATDocumentServices::Open(iArgv[1], pDoc) ;

...
|
This section represents the classical sequence for opening a document [3].
[Top]
...
    if( SUCCEEDED(rc) )
    {
        CATInit *pDocAsInit = 0;
        rc= pDoc->QueryInterface(IID_CATInit, (void**)&pDocAsInit) ;

        CATIPrtContainer *pSpecContainer =
              (CATIPrtContainer*)pDocAsInit->GetRootContainer("CATIPrtContainer");
        ...
        CATIPrtPart_var spPart ( pSpecContainer->GetPart() );
        ...
...
|
We readily use the CATIPrtContainer to access the object representing the part through the Part parsing interface, CATIPrtPart.
[Top]
Now we have the part, we want to find the main body out put geometry.
You can refer to the technical article entitled "Specification/Result Mechanism Applied to Mechanical features" for more details about the result feature [5]. This article explains that the association of the topological body to a geometrical features set is actually managed by a specialized feature, sometimes called the result feature.
...
   CATIPartRequest_var spPartRequest = spPart ;
   ...
   CATBaseUnknown_var spMainPartBody ;
   rc = spPartRequest->GetMainBody("",spMainPartBody);

...
|
GetMainBody of the CATIPartRequest interface retrieves
the main Body feature of a Part document. It is a feature instantiated from
the HybridBody StartUp [4].
...
   CATIBodyRequest_var spMainPartBodyBodyRequest = spMainPartBody ;
   ...
   CATLISTV(CATBaseUnknown_var) ListResult ;
   rc = spMainPartBodyBodyRequest->GetResults("",ListResult);
   ...
   CATIGeometricalElement_var spFeatureResultGeomElem = ListResult[1] ;
...
|
The CATIBodyRequest interface, implemented on HybridBody StartUp, enables you to retrieve the result feature. This feature is a Solid
feature which bears the topological result [5]. The
first element of ListResult, is the feature result itself.
... CATIShapeFeatureBody_var shapefeat = spFeatureResultGeomElem; ... CATISpecObject_var FeatureSolid = shapefeat->GetResultOUT(); ... |
The CATIShapeFeatureBody interface, implemented on Geometrical Element, enables you to retrieve the drawn geometry. Uisng GetResultOUT
on the shape gives you the associated Body out feature.
...
    CATIMfGeometryAccess_var geoAccess = FeatureSolid;
...
|
The CATIMfGeometryAccess enables you to access selecting objects of geometry.
[Top]
...
    CATLISTV(CATBaseUnknown_var) breps;
    int nbfaces = geoAccess -> GetBReps(breps);
    ...
    CATLISTP(CATIBRepAccess) ListBreps;
    CATIBRepAccess * Brep = NULL;
    CATBaseUnknown * Unk = NULL;

    for(int compt = 1; compt <= nbfaces; compt++)
    {
      Unk = breps[compt];
      Brep = (CATIBRepAccess * )Unk;
      ListBreps.Append(Brep);
    }

...
|
We can get access to each selecting object of the geometry using CATIMfGeometryAccess::GetBReps.
Selecting object in this case are faces. We then add each face in a list we will use later.
[Top]
...
    CATListOfInt retrieveRed,retrieveGreen,retrieveBlue;

    rc = CATMmrApplicativeAttributes::GetColorsOnFaces( ListBreps, retrieveRed,retrieveGreen,retrieveBlue);


...
|
We then call CATMmrApplicativeAttributes::GetColorsOnFaces to retrieve each face color. It will return three lists of int that will have
the same size that ListBreps. A color is made of three component : Red, Green, Blue. These lists are these components.
For the first face, the components will be Red = retrieveRed[1], Green = retrieveGreen[1], Blue = retrieveBlue[1].
If a color couldn't be retrieved on a face, all its component will be valued with -1.
[Top]
You now want to overload current colors on every faces. You first have to create new color component lists, one Red/Green/Blue compenent for each face you want to overload, and once this step is done, you can set these new colours to the faces.
In this example, You will create different colour component in order to show you you can color each face with a different color. This enables you to color many faces with different color at the same time
...
    CATListOfInt newRed,newGreen,newBlue,FailedIndex;
    int x=0;
    for (compt = 1;compt <= nbfaces;compt++)
    {
      x = compt%3;
      int red(0),green(0),blue(0);
      if (1 == x)
        red = 255;
      if (2 == x)
        green = 255;
      if (0 == x)
        blue = 255;
      newRed.Append(red);
      newGreen.Append(green);
      newBlue.Append (blue);
    }

...
|
The first and fourth faces will be red colored, the second and fifth will be green colored, the third and sixth will be blue colored.
...
    rc = CATMmrApplicativeAttributes::SetColorsOnFaces(ListBreps,newRed,newGreen,newBlue,FailedIndex);

...
|
If a color couldn't be set on a face, the face index will be added int the FailedIndex in order user to find it easily.
In this example, I set different colors to show you can set different values to each face: you can set more than a color at once. This point is very important as it is faster to color three different faces in a pass than to color three different faces in three passes.
[Top]
...
    rc = CATMmrApplicativeAttributes::GetColorsOnFaces( ListBreps, retrieveRed,retrieveGreen,retrieveBlue);

...
|
Same method you saw previously.
[Top]
You now want to create applicative attributes on every faces. You first have to create a list of applicative attributes for each face, and then, you have to set them.
In this example, You will create different sized list of different applicative attributes in order to show you you can annotate each face with a different list of applicative attributes. This enables you to set different sized list of attributes on many faces at the same time
...
  CATListOfCATUnicodeString **AttrNameListToSet = new CATListOfCATUnicodeString*[nbfaces];
	CATCkeListOfParm *AttrValueListToSet = new CATCkeListOfParm[nbfaces];
  CATICkeParmFactory_var factory = CATCkeGlobalFunctions::GetVolatileFactory();
  for (compt = 1;compt<= nbfaces;compt++)
  {
    x = compt%3;
    if (1 == x)
    {
      AttrNameListToSet [compt-1] = new CATListOfCATUnicodeString (3);
      AttrValueListToSet[compt-1]   = new CATLISTV(CATBaseUnknown_var)(3);

      AttrNameListToSet [compt-1]->Append("FACE_NUMBER");
      CATICkeParm_var tempcke1 = factory -> CreateInteger ("FACE_NUMBER",compt);
      AttrValueListToSet[compt-1]->Append(tempcke1);

      AttrNameListToSet [compt-1]->Append("COLOR");
      CATICkeParm_var tempcke2 = factory -> CreateString ("COLOR","Red");
      AttrValueListToSet[compt-1]->Append(tempcke2);

      AttrNameListToSet [compt-1]->Append("X");
      CATICkeParm_var tempcke3 = factory -> CreateReal ("X",x);
      AttrValueListToSet[compt-1]->Append(tempcke3);

    }
    else
    {
      AttrNameListToSet [compt-1] = new CATListOfCATUnicodeString (2);
      AttrValueListToSet[compt-1]   = new CATLISTV(CATBaseUnknown_var)(2);

      AttrNameListToSet [compt-1]->Append("FACE_NUMBER");
      CATICkeParm_var tempcke1 = factory -> CreateInteger ("FACE_NUMBER",compt);
      AttrValueListToSet[compt-1]->Append(tempcke1);


      AttrNameListToSet [compt-1]->Append("COLOR");
      if (2 == x)
      {
        CATICkeParm_var tempcke2 = factory -> CreateString ("COLOR","Green");
        AttrValueListToSet[compt-1]->Append(tempcke2);
      }
      if (0 == x)
      {
        CATICkeParm_var tempcke2 = factory -> CreateString ("COLOR","Blue");
        AttrValueListToSet[compt-1]->Append(tempcke2);
      }
    }
  }

...
|
You can see you set list of applicative attributes of different size. Moreover, these lists have not the same applicative attributes. The lists of names and values are contained in two arrays.
...
    rc=CATMmrApplicativeAttributes::SetAttributesOnFaces(ListBreps, AttrNameListToSet,AttrValueListToSet,FailedIndex);

...
|
If a list of applicative attributes couldn't be set on a face, the face index will be added int the FailedIndex in order user to find it easily.
In this example, You set different sized list of different applicative attributes to show you can set different values to each face: you can set more than a list of applicative attributes at once. This point is very important as it is faster to set applicative attributes on three different faces in a pass than to set applicative attributes on three different faces in three passes.
[Top]
...

    CATListOfCATUnicodeString * AttributNameList = new CATListOfCATUnicodeString[nbfaces];
    CATCkeListOfParm  AttrValList = new CATListValCATBaseUnknown_var[nbfaces];
    rc = CATMmrApplicativeAttributes::GetAttributesOnFaces(ListBreps, AttributNameList, AttrValList );

...
|
We first create the two arrays of lists that will contains the list of attributes names and the list of attributes values. These two arrays must be same sized as the number of faces, as we will retrieve sub-lists for each face.
We then call CATMmrApplicativeAttributes::GetAttributesOnFaces to retrieve the
applicative attributes.
The AttributNameList[i] list and the AttrValList[i] list will be associated to the ListBreps[i+1] face as
array starts at position zero. The AttributNameList[i][j] attributes name will correspond to the AttrValList[i][j] attributes value.
[Top]
...
   // Saves the part document
   CATDocumentServices::SaveAs(*pDoc, iArgv[2]);

   // Closes the document
   CATDocumentServices::Remove(*pDoc);
  }
  else
  {
    cerr << "doc not opened" << endl;
    rc = 1;
  }

  // Deletes all documents in session
  ::Delete_Session(pSessionName);
}
...
|
In the epilog of the use case, you save the modified Part as a new document under the file path entered on the command line, close the document from session and delete the session, in a way symmetrical to what you did in the prolog. Refer to [3] for details.
[Top]
You saw through this use case how to set colors and applicative attributes on sub-elements using CAA services class CATMmrApplicativeAttributes.
The most important thing you have to remember is you'd rather set colors and applicative attributes on many faces in a pass than doing many passes. Performances improvement have been done to enable user to set and get many colors and applicative attributes on huge amount of faces with few time costs. Do not forget to clean the arrays of attribute names and values as described in the use case, as memory leak can fast become huge with sizeable parts. For more information on CATMmrAppliativeAttributes methods return values, I suggest you have a look at CATMmrApplicativeAttributes header
You also can refer the use case Marking Up Topology in a Part Document - Mechanical Modeler to see another way to color faces. However, the one described here is the fastest way to do it.
[Top]
| Version: 1 [Jun 2006] | Document created | [Top] |
Copyright © 2006, Dassault Systèmes. All rights reserved.