CAA Web Services Home
|
|
Consuming CAA Web Services From Within BizTalk Server 2006 Orchestrations
How to consume CAA Web services from a .NET assembly invoked by an orchestration
|
|
Use Case
|
Abstract
This article discusses the CAAENOVIAQueryProcess use case. It explains how to consume
CAA Web services from within a BizTalk Server 2006 environment. It provides a sample
scenario that demonstrates how to manage a session and perform a query against an ENOVIA LCA V5 system.
The sample scenario relies on a .NET assembly that is invoked by an orchestration, both
of which are developed using Visual Studio .NET 2005.
|
Introducing Microsoft BizTalk Server 2006
Microsoft BizTalk Server 2006 is an integration server that can be used to develop, deploy and manage automated
business processes. It ships with a wide range of adapters that allow to connect to heterogenous sources,
from legacy systems to the latest popular enterprise applications. Business processes are graphically
built from within Visual Studio .NET 2005, then deployed and executed into a BizTalk Server
2006 environment.
One of the native adapters that ship with BizTalk Server 2006 is dedicated to the connectivity through Web
services. It suffers from some limitations, such as the lack of support for array parameter types. The default
Web service adapter also doesn't provide a way to maintain the HTTP session state
across requests performed on
the same or distinct Web services, which is one of the main requirements of ENOVIA LCA V5 CAA Web services.
Relying on the default native adapter is not the only way to consume Web services with BizTalk Server
2006,
as it also provides support to call external .NET assemblies. A .NET adapter class can therefore easily be
written in order to use the .NET Framework capabilities to interact with CAA Web services from a BizTalk
Server 2006 orchestration. This latter approach is the recommended way to consume ENOVIA LCA V5 CAA Web
services and is described in the rest of this use case.
[Top]
What You Will Learn With This Use Case
This use case demonstrates how to develop, deploy and test an orchestration that interacts with an ENOVIA LCA V5
system. First, it explains how to develop and build a C# client library that invokes the ENOPosApplicationBinderImpl
and ENOVWSQueryCpp CAA Web services in order to query an ENOVIA LCA V5
system. Then, it demonstrates how to build, deploy and run the
orchestration that stands as a sample ENOVIA query business process.
It just servers as a simple BizTalk orchestration reference example.
[Top]
The CAAENOVIAQueryProcess Use Case
CAAENOVIAQueryProcess is a use case of the CAAWebServices.edu framework that illustrates how to consume
CAA Web services from a BizTalk Server 2006 environment.
[Top]
What Does CAAENOVIAQueryProcess Do
The CAAENOVIAQueryProcess use case scenario contains the following steps:
- The query business process is triggered by an XML message dropped in a given input folder. This XML message contains a
SelectExpression value,
- The XML message is automatically picked up and processed by the orchestration,
- During the orchestration workflow, a C# adapter class is instantiated and the SelectExpression value is set on this object,
- The main C# adapter class business logic is triggered from the orchestration. It creates a session with a target ENOVIA
LCA V5 system, queries its content based on the input SelectExpression value, and finally terminates the opened session,
- The XML message returned by the ENOVWSQueryCpp CAA Web service is forwarded to the calling orchestration,
- The XML query results message is finally saved in a given output folder using the default native file adapter shipped
with BizTalk Server 2006.
[Top]
Where To Find the CAAENOVIAQueryProcess Code
The complete content of the sample reference Visual Studio .NET 2005 solution demonstrated in this use case can be found at
the following location:
<Install>\CAAENOVWS.edu\Data.d\CAAENOVIAWSSolution
|
-
<Install>: the directory where the CAA CD-ROM is installed.
The above folder contains the following resources:
              \CAAENOVIAWSSolution\CAAENOVIAWSSolution.sln

              \CAAENOVIAWSSolution\CAAENOVIAWSSolution.snk

              \CAAENOVIAWSSolution\CAAENOVIAWSLibrary\Properties\AssemblyInfo.cs

              \CAAENOVIAWSSolution\CAAENOVIAWSLibrary\CAAENOBizTalkAdapter.cs

              \CAAENOVIAWSSolution\CAAENOVIAWSLibrary\CAAENOPosApplicationBinderImplProxy.cs

              \CAAENOVIAWSSolution\CAAENOVIAWSLibrary\CAAENOPosApplicationBinderImplWrapper.cs

              \CAAENOVIAWSSolution\CAAENOVIAWSLibrary\CAAENOVIAWSLibrary.csproj

              \CAAENOVIAWSSolution\CAAENOVIAWSLibrary\CAAENOVWSQueryCppProxy.cs

              \CAAENOVIAWSSolution\CAAENOVIAWSLibrary\CAAENOVWSQueryCppWrapper.cs

              \CAAENOVIAWSSolution\CAAENOVIAWSLibrary\CAAENOVWSUtils.cs

              \CAAENOVIAWSSolution\CAAENOVIAProcess\CAAENOVIAQuery.odx

              \CAAENOVIAWSSolution\CAAENOVIAProcess\CAAENOVIAProcess.btproj

              \CAAENOVIAWSSolution\CAAENOVIAProcess\ENOVIA.xsd

              \CAAENOVIAWSSolution\CAAENOVIAProcess\FilterXML.xsd

              \CAAENOVIAWSSolution\Filedrop\QueryFilter.xml

              \CAAENOVIAWSSolution\Filedrop\InputXmlFilter

\CAAENOVIAWSSolution\Filedrop\OutputQueryResults\QueryResult_{08FC7789-35EB-4446-B913-15B5DCF63A48}.xml |
[Top]
How to Launch CAAENOVIAQueryProcess
Before doing this usecase you must have both Visual Studio .NET 2005 and BizTalk Server 2006
products installed, configured and tested. You can easily check your BizTalk Server 2006 environment by testing one of the
BizTalk Server 2006 tutorials that can be downloaded from Microsoft official Web site.
You can refer to the step-by-step guide below for details on how to build and launch the sample CAAENOVIAQueryProcess
use case.
This document serves as a guideline for your development only. Your step-by-step screens may not be exactly the same as provided
depending on your Visual Studio 2005 and BizTalk installation and configuration. If there is some deviation in your environment please consult
Microsoft Visual Studio developer's guide to fulfill each step's business logical.
If you do not wish to create the complete Visual Studio .NET 2005 solution from scratch, you can open the one delivered
on the CAA CD-ROM in order to directly build, deploy and test the orchestration in your environment. To do so, you must
copy the CAAENOVIAWSSolution folder contained in the CAAENOVWS.edu\Data.d directory at the root
of your C: drive.
Before you try to deploy and test the solution, you must first edit the C# BizTalk adapter class so that it references
your target ENOVIA LCA V5 server. You can refer to the Creating the C# BizTalk Adapter Class section
for details on this task. Then, you can simply follow the two last sections of the step-by-step guide below, including
Building and Deploying the Solution and Running the Sample Application.
[Top]
Step-by-step
Before completing this usecase scenario you must have both Visual Studio .NET 2005 and BizTalk Server 2006
products installed and configured.
-
Setting Up Your Visual Studio .NET 2005 Solution
-
Creating and Configuring the C# Class Library Project
-
Adding the Required Resources to the C# Class Library Project
-
Creating the C# BizTalk Adapter Class
-
Creating and Configuring the BizTalk Server Project
-
Creating the BizTalk Server Orchestration
-
Designing the ENOVIA Query Process Workflow
-
Creating the Messages Instance Variables
-
Instantiating the C# BizTalk Adapter Class
-
Invoking the CAA Web Services
-
Creating and Configuring the Ports
-
Setting Messages on the Actions Shapes and Connecting the Ports
-
Building and Deploying the Solution
-
Running the Sample Application
[Top]
Setting Up Your Visual Studio .NET 2005 Solution
The .NET assembly and the BizTalk Server orchestration demonstrated in this use case are created in the same solution.
To create the solution, please complete the following steps:
- On the Start menu, point to Programs ->
Microsoft Visual Studio .NET 2005, and click on
Microsoft Visual Studio .NET 2005,
- Go to File -> New -> Project -> Blank Solution,
- In the Name field, enter CAAENOVIAWSSolution, and then C:\ in the
Location field. The rest of the article will assume that the solution has been created in
the C:\CAAENOVIAWSSolution directory. You are free to choose any other location you wish to use,
- You can then click OK to close the New Project dialog box and create the solution.
Fig.1: Setting Up Your Visual Studio .NET
2005 Solution

|
You can then directly create the two following folders. The former is used to listen for input XML filter messages, and the
latter is used to store the output XML query results ones:
              C:\CAAENOVIAWSSolution\Filedrop\InputXmlFilter

              C:\CAAENOVIAWSSolution\Filedrop\OutputQueryResults
|
[Top]
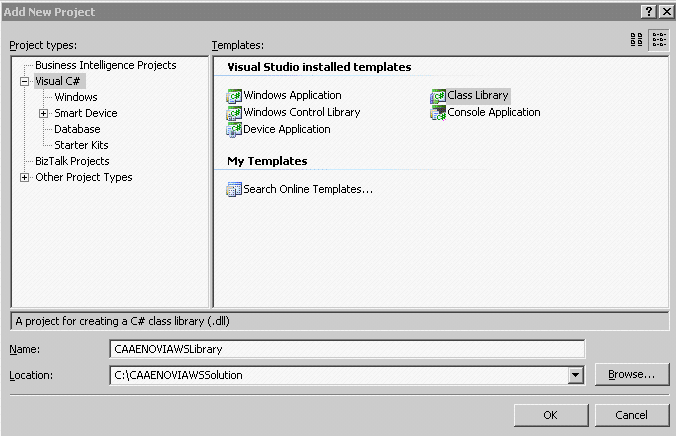
Creating and Configuring the C# Class Library Project
First, you need to create a C# class library. It holds the C# client application that consumes the CAA
Web services being demonstrated in the use case:
- From the Solution Explorer, right click on the solution, and go to Add
-> New Project,
- In the Project Types left pane, select the Visual C# Projects folder,
- From Templates right pane, select the Class Library template,
- In the Name field, enter CAAENOVIAWSLibrary,
- Click OK to close the Add New Project dialog box,
- You can finally delete the default Class1.cs resource created.
Fig.2: Creating the C# Class Library Project
|
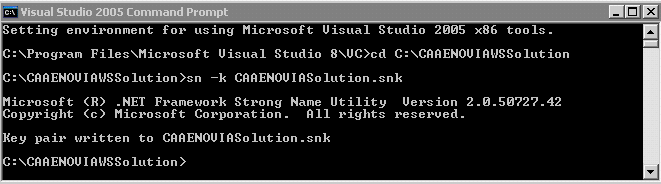
Then, you must create a strong name assembly key file in order to build your projects in Visual Studio
.NET 2005 and then deploy them into the Global Assembly Cache (GAC). Deploying the assembly in the GAC
is a requirement for BizTalk Server 2006, therefore signing is mandatory:
- On the Start menu, point to Programs -> Microsoft
Visual Studio 2005 -> Visual Studio Tools, and then click Visual Studio
2005 Command Prompt,
- Change the current directory to C:\CAAENOVIAWSSolution,
- Issue the following command: sn -k CAAENOVIAWSSolution.snk. You should receive the
following message at the command prompt: Key pair written to CAAENOVIAWSSolution.snk.
Fig.3: Creating a Strong Name Assembly Key File
|
You must now edit the AssemblyInfo.cs file contained in the project to reference the created strong name
assembly key file:
- From the Solution Explorer, expand the CAAENOVIAWSLibrary project, and double-click on the
AssemblyInfo.cs file under pPoperties directory,
- In the code editor window, edit or add the following lines:
                  [assembly: AssemblyVersion("1.0.0.0")]

                  ...

                  [assembly: AssemblyKeyFileAttribute(@"..\\..\\..\\CAAENOVIAWSSolution.snk")]
|
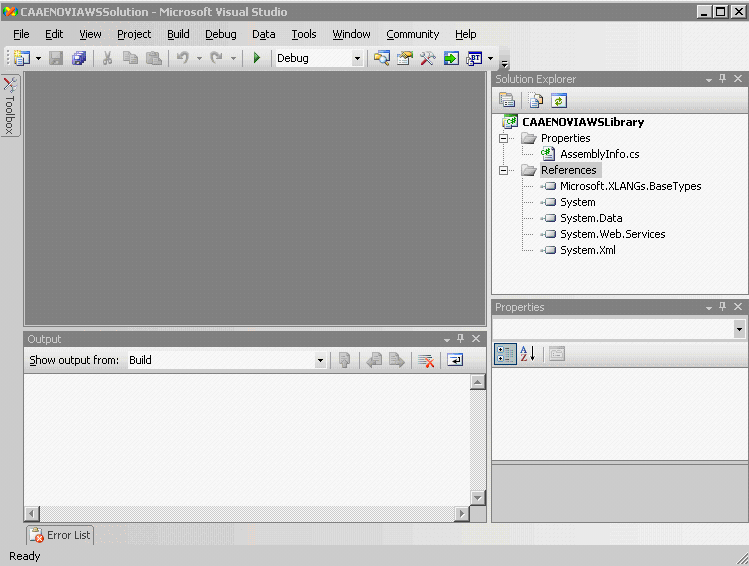
Finally, you need to configure your project in order to reference two assemblies, including System.Web.Services.dll
(from the .NET Framework) and Microsoft.XLANGs.BaseTypes.dll (from the BizTalk Server
2006 libraries):
- From the Solution Explorer, expand the CAAENOVIAWSLibrary project. Right click
on the References folder, and point to Add Reference,
- In the Add Reference dialog box, click on the Browse button,
- Browse to the directory where you installed BizTalk Server 2006, and then click on the following assembly:
Microsoft.XLANGs.BaseTypes.dll
- Click on Open to close the Select Component dialog box. You should now see
the Microsoft.XLANGs.BaseTypes.dll assembly in the Selected Components pane,
- Click on OK to close the Add Reference dialog box,
- Right click on the References folder again, and point to Add Reference,
- In the Add Reference dialog box, select the System.Web.Services.dll assembly from
the .NET pane, and click on the Select button,
- Click on OK to close the Add Reference dialog box.
Your solution should now be configured as follows:
Fig.4: Configuring the C# Class Library Project
|
[Top]
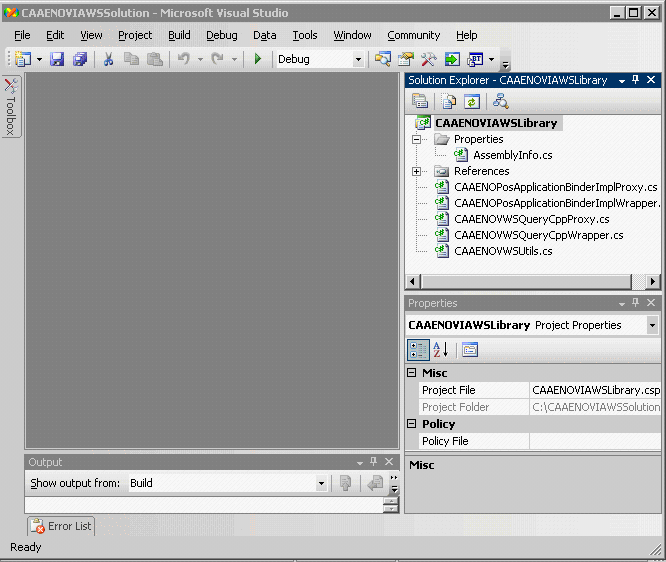
Adding the Required Resources to the C# Class Library Project
In order to consume the CAA Web services from a C# library, you must first generate the C# client bindings from the
WSDL and XSD files describing the services, and then write some client code in order to invoke each target Web service
using the dedicated generated proxy.
These steps are already described in the use cases demonstrating how to consume the available CAA Web services with the
.NET Framework. You can refer to [1] and [2] for further details on
how to generate and write the required code. The reference articles are
documented in .Net 1.1 with Visual Studio 2003, which is officially
supported version for R17GA. Therefore please just use it as a reference
for your work with Visual Studio 2005 .Net 2.0.
In the current use case, we'll just assume that the required resources have already been created. They will be imported
from the CAA CD-ROM content for convenience, but they could also be written from scratch by following the step-by-step
guides available in the articles mentioned above. From Visual Studio .NET
2005, please complete the following steps:
- From the Solution Explorer, right click on the CAAENOVIAWSLibrary project and go to
Add -> Add Existing Item,
- From the Add Existing Item dialog box, browse to the location where you installed the CAA CD-ROM
content. Point to CAAPLMSecurity.edu\CAAENOPosAppBinderDotNet1_1ClientBase.m\src and then select the two
following resources: CAAENOPosApplicationBinderImplProxy.cs and CAAENOPosApplicationBinderImplWrapper.cs,
- Click Open to close the dialog box and add the resources to the project,
- Right click on the CAAENOVIAWSLibrary project and go to Add -> Add Existing
Item again,
- Browse to the location where you installed the CAA CD-ROM content again. This time, point to
CAAENOVWS.edu\CAAENOVWSDotNet1_1ClientBase.m\src and then select the three following resources:
CAAENOVWSQueryCppProxy.cs, CAAENOVWSQueryCppWrapper.cs and CAAENOVWSUtils.cs,
- Click Open to close the dialog box and add the resources to the project.
Your solution should now contain the following resources:
Fig.5: C# Project Content
|
[Top]
Creating the C# BizTalk Adapter Class
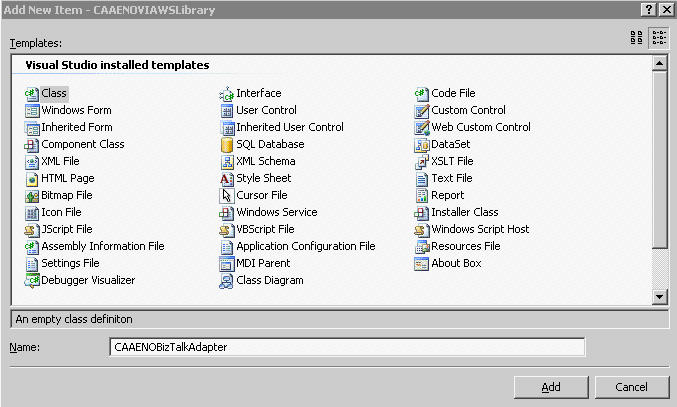
First, you need to create a new C# class within the project:
- From the Solution Explorer, right click on the CAAENOVIAWSLibrary project and go to
Add -> Add New Item,
- Select the Class template from the right pane, and enter CAAENOBizTalkAdapter.cs in
the Name field.
- Click Open to close the Add New Item dialog box.
Fig.6: Creating the C# Adapter Class
|
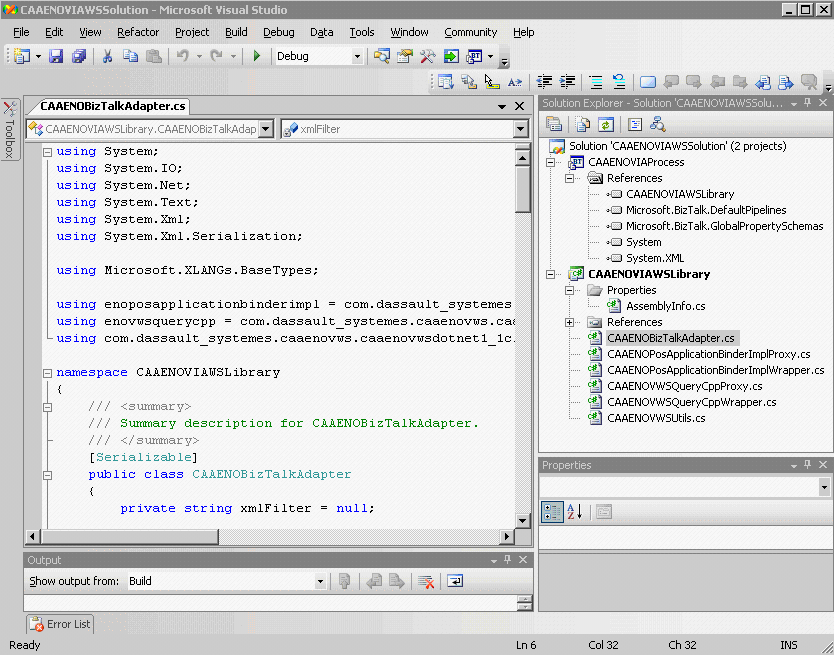
Once the CAAENOBizTalkAdapter class is created, you must add the [Serializable]
attribute to its generated constructor.
Then, you can add a method named SetXmlFilter. It is used to read the XML message processed as
input of the orchestration. The message consists of an XML query string, as detailed in the related technical article (see
[3] for details). The SetXmlFilter method simply consists of some code
that reads the input XLANGMessage object and loads up the related XML content into a string.
You can refer to BizTalk Server documentation for further details on the XLANGMessage object type:
using System;

            using System.IO;

            using System.Xml;


            using Microsoft.XLANGs.BaseTypes;


            namespace CAAENOVIAWSLibrary

            {

              /// <summary>

              /// Summary description for CAAENOBizTalkAdapter.

              /// </summary>

              [Serializable]

              public class CAAENOBizTalkAdapter

              {

                private string xmlFilter = null;


                public CAAENOBizTalkAdapter()

                {

                  //

                  // TODO: Add constructor logic here

                  //

                }


                public void SetXmlFilter(XLANGMessage inputMessage)

                {

                  XLANGPart part = inputMessage.Count == 1 ? inputMessage[0] : null;

                  if (part != null)

                  {

                    XmlDocument document = (XmlDocument) part.RetrieveAs(typeof(XmlDocument));


                    StringWriter sw = new StringWriter();

                    XmlTextWriter xw = new XmlTextWriter(sw);

                    document.WriteContentTo(xw);

                    xmlFilter =

                      "<?xml version=\"1.0\" encoding=\"UTF-8\" ?>\n" + sw.ToString();

                  }

                }

              }

            }
|
In the next step, you need to add a method named RunQuery. This method contains the core of
the business process logic: it invokes both ENOPosApplicationBinderImpl and ENOVWSQueryCpp CAA Web services. The
first one is used to manage the session with the ENOVIA LCA V5 system, and the second one is used to query objects based on
the XML filter used as input of the orchestration.
 You must edit the value of the
 uri, credUser,
credPwd and enoviaUser variables to match your environment configuration. For simplicity, these
values are hard-coded in the sample C# adapter class, but they could easily be read from a file, or retrieved during the
orchestration flow.
using System;

            using System.IO;

            using System.Net;

            using System.Text;

            using System.Xml;

            using System.Xml.Serialization;


            using Microsoft.XLANGs.BaseTypes;


            using enoposapplicationbinderimpl = com.dassault_systemes.caaplmsecurity.caaenoposappbinderdotnet1_1clientbase.enoposapplicationbinderimpl;

            using enovwsquerycpp = com.dassault_systemes.caaenovws.caaenovwsdotnet1_1clientbase.enovwsquerycpp;

            using com.dassault_systemes.caaenovws.caaenovwsdotnet1_1clientbase;


            namespace CAAENOVIAWSLibrary

            {

              /// <summary>

              /// Summary description for CAAENOBizTalkAdapter.

              /// </summary>

              public class CAAENOBizTalkAdapter

              {

                ...

                public XmlDocument RunQuery()

                {
// The values highlighted in red below must be updated with your environment.
// The last slash for the URI value is mandatory.
      string uri = "http://webservicehost:9080/B17/";

                  string credUser = "wsadmin";

                  string credPwd = "wsadminpassowrd";

                  string enoviaUser = "lcauser";


                  XmlDocument results = new XmlDocument();


                  enoposapplicationbinderimpl.CAAENOPosApplicationBinderImplWrapper binderWrapper = null;

                  enoposapplicationbinderimpl.SessionToken sessionToken = null;

                  try

                  {

                    // ------------------------------------------------------------

                    // Step 1 - Instantiate and configure the proxies

                    // ------------------------------------------------------------


                    // Create a CookieContainer object to maintain the HTTP session

                    // state accross proxies

                    CookieContainer container = new CookieContainer();


                    // Instantiate wrapper client classes

                    int timeOut = 360000;

                    binderWrapper =

                      new enoposapplicationbinderimpl.CAAENOPosApplicationBinderImplWrapper(

                        container, uri, credUser, credPwd, timeOut);

                    enovwsquerycpp.CAAENOVWSQueryCppWrapper queryWrapper =

                      new enovwsquerycpp.CAAENOVWSQueryCppWrapper(

                        container, uri, credUser, credPwd, timeOut);


                    // ------------------------------------------------------------

                    // Step 2 - Open session with ENOVIA LCA V5

                    // ------------------------------------------------------------


                    // Get user contexts

                    string[] userContexts = binderWrapper.GetUserContexts(enoviaUser);


                    // Log in using the first available context

                    if (userContexts.Length == 0)

                    {

                      throw new ApplicationException("No context found for the user specified");

                    }

                    sessionToken = binderWrapper.Login(userContexts[0]);


                    // ------------------------------------------------------------

                    // Step 3 - Count objects and display result

                    // ------------------------------------------------------------


                    // Create input XML select expression

                    StringBuilder xmlFilter = new StringBuilder();

                    xmlFilter.Append(this.xmlFilter);


                    // ------------------------------------------------------------

                    // Step 4 - Query objects and display results

                    // ------------------------------------------------------------


                    enovwsquerycpp.ENOVIA resultSet =

                      queryWrapper.QueryObjects(xmlFilter.ToString());


                    XmlSerializer s = new XmlSerializer(typeof(enovwsquerycpp.ENOVIA));

                    MemoryStream inputStream = new MemoryStream();

                    s.Serialize(inputStream, resultSet);

                    inputStream.Position = 0;

                    results.Load(inputStream);

                  }

                  catch (Exception e)

                  {

                    throw e;

                  }

                  finally

                  {

                    // ------------------------------------------------------------

                    // Step 5 - Terminate opened session

                    // ------------------------------------------------------------


                    // The session must be closed even if a call to a method

                    // on the ENOVWSQueryCpp CAA Web service fails

                    binderWrapper.Logout(sessionToken);

                  }


                  return results;

                }

              }

            }
|
Finally, you can build the project. In the Solution Explorer, right-click on the CAAENOVIAWSLibrary
project, and then click Build. The Output window at the bottom of the screen should read:
Build: 1 succeeded, 0 failed, 0 skipped.
[Top]
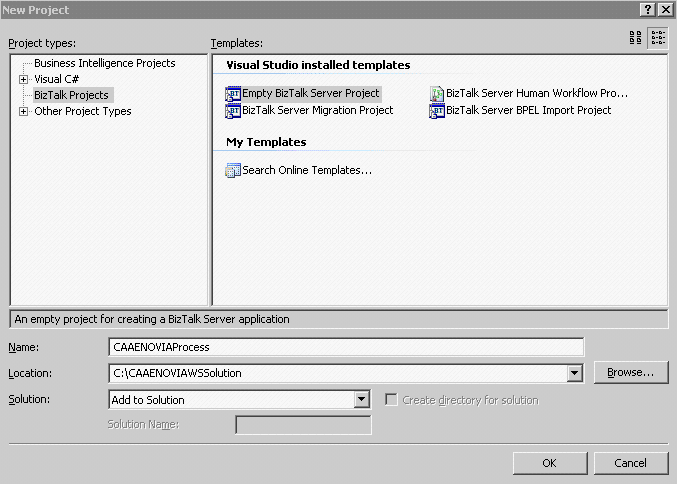
Creating and Configuring the BizTalk Server Project
You can now start to create the BizTalk Server Project:
- From the Solution Explorer, right click on the solution, and go to Add
-> New Project,
- In the Project Types left pane, select the BizTalk Projects folder,
- From Templates right pane, select the Emtpy BizTalk Server Project template,
- In the Name field, enter CAAENOVIAProcess,
- In the Location field, enter or browse to
C:\CAAENOVIAWSSolution,
- In the Solution field, choose Add to Solution from the
drop-down selection
- Click OK to close the Add New Project dialog box.
Fig.7: Creating the BizTalk Server Project
|
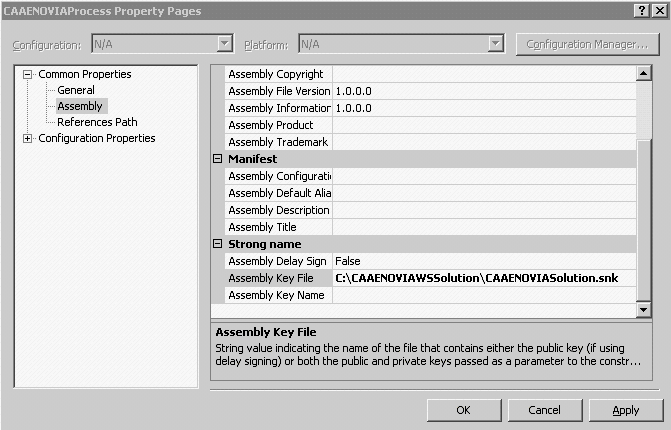
Then, you need to configure your project so that it references the strong name assembly key file created above:
- From the Solution Explorer, right click on the CAAENOVIAProcess project and go to
Properties,
- In the Property Pages dialog box, select Assembly from the left pane,
- In the right pane, scroll down, select Assembly Key File, and then click the ellipsis
(...) button,
- Browse to C:\CAAENOVIAWSSolution, click CAAENOVIAWSSolution.snk, and then click Open,
- Click OK to apply the changes and close the Property Pages dialog box.
Fig.8: Setting the Strong Name Assembly Key File on the Project
|
Finally, you need to configure your project in order to reference the C# library project created above:
- From the Solution Explorer, expand the CAAENOVIAProcess project. Right click
on the References folder, and point to Add Reference,
- In the Add Reference dialog box, select the Projects tab,
- In the left pane, select the CAAENOVIAWSLibrary project,
- Click on the Select button. You should now see
the CAAENOVIAWSLibrary project in the Selected Components pane at the bottom,
- Click on OK to close the Add Reference dialog box.
Your solution should now contain the following resources:
Fig.9: Configuring the BizTalk Server Project
|
[Top]
Creating the BizTalk Server Orchestration
In this step, you use the Orchestration Designer in order to create the orchestration that represents
the flow of the business process. You create create the business process flow by dragging shapes from the
Toolbox to the Orchestration Design surface. To create the orchestration, please complete the
following steps:
- From the Solution Explorer, right click on the CAAENOVIAProcess project and go to
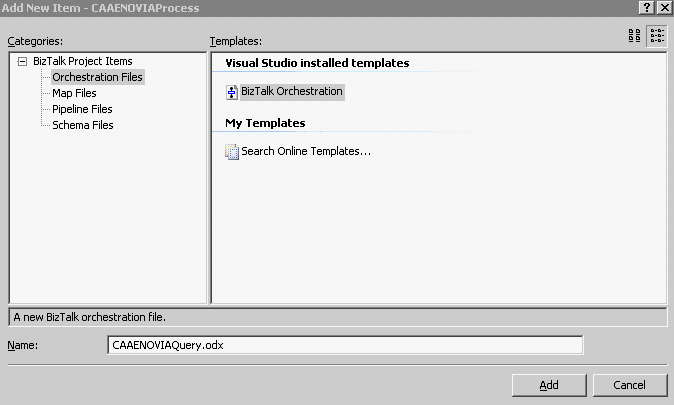
Add -> Add New Item,
- Select the BizTalk Orchestration template from the right pane, and enter CAAENOVIAQuery.odx in
the Name field,
- Click Open to close the Add New Item dialog box.
Fig.10: Creating the Orchestration
|
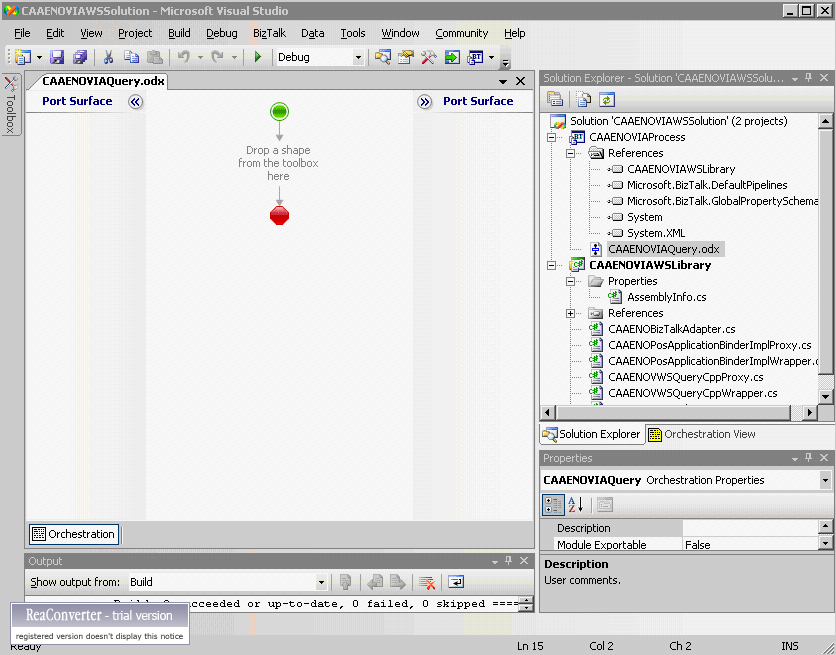
The new orchestration is created and displayed in Orchestration Designer. If the toolbox is not docked on the left side,
on the View menu, click Toolbox. In the toolbox, click the
BizTalk Orchestrations tab to view the BizTalk Orchestration toolbox. Here follows a snapshot of the
Orchestration Designer environment:
Fig.11: Orchestration Designer Snapshot
|
[Top]
Designing the ENOVIA Query Process Workflow
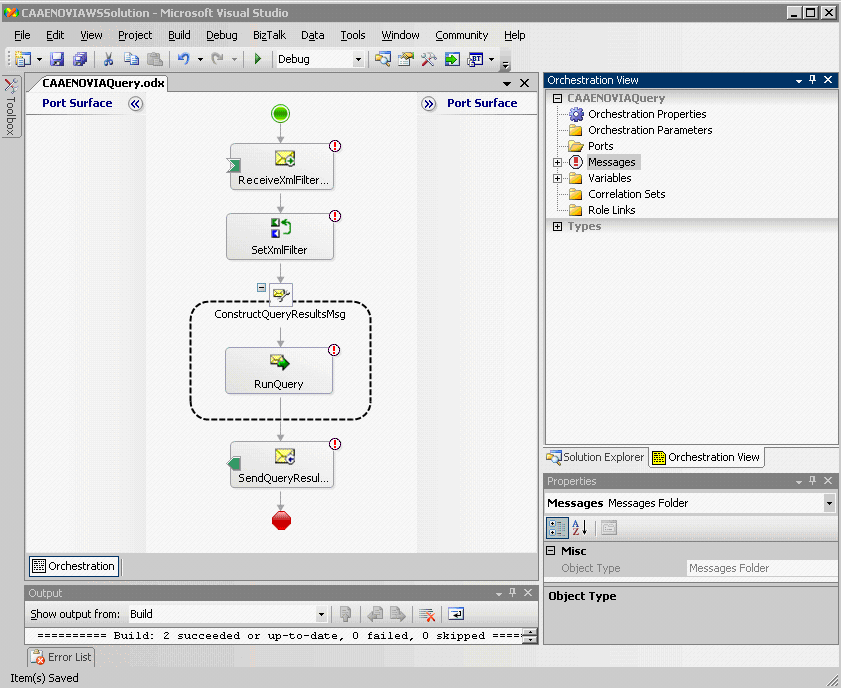
You can now start to design the ENOVIA query process workflow:
- Drag the Receive shape from the toolbox to the Orchestration Design surface, and drop the shape between
the Begin (green circle) and End (red octagon) shapes,
- Select the Receive_1 shape, go to the Properties window, and change the Name
property to ReceiveXmlFilterMsg. You must also set the Activate property to True,
- Drag the Expression shape from the toolbox to the Orchestration Design surface, and drop the shape on
the connecting line directly below the Receive_Request shape,
- Select the Expression_1 shape, go to the Properties window, and change the Name
property to SetXmlFilter,
- Drag the Construct Message shape from the toolbox to the Orchestration Design surface, and drop the shape on
the connecting line directly below the SetXmlFilter shape,
- Select the ConstructMessage_1 shape, go to the Properties window, and change the Name
property to ConstructQueryResultsMsg,
- Drag the Message Assignment shape from the toolbox to the Orchestration Design surface, and drop the
shape inside the ConstructQueryResultsMsg one,
- Select the MessageAssignment_1 shape, go to the Properties window, and change the Name
property to RunQuery,
- Drag the Send shape from the toolbox to the Orchestration Design surface, and drop the shape on
the connecting line between the ConstructQueryResultsMsg and End (red octagon) shapes,
- Select the Send_1 shape, go to the Properties window, and change the Name
property to SendQueryResultsMsg,
- On the File menu, click Save All.
At this point, there will be several insufficient configuration Smart Tags (red exclamation marks) within your orchestration.
You must not try to solve them all yet, they will disappear during the next configurations steps. Your orchestration should
appear similar to the following one:
Fig.12: Query Orchestration
|
[Top]
Creating the Messages Instance Variables
You must now add the required XML Schema files describing the input and ouput XML messages processed by the
orchestration, and create variables for the related message instances:
- From the Solution Explorer, right click on the CAAENOVIAProcess project and go to
Add -> Add Existing Item,
- Browse to the location where you installed the CAA CD-ROM content, point to
CAAWebServices.edu\Data.d\CAAENOVIAWSSolution\CAAENOVIAProcess and then select the two following resources:
ENOVIA.xsd and FilterXML.xsd. These resources are also available in the code unloaded from the ENOVIA
LCA CD-ROM, in the \intel_a\resources\xsd directory,
- Click OK to close the Add Existing Item dialog box,
- If not already selected, click the Orchestration View tab that appears next to the Solution Explorer tab,
- In the Orchestration View window, right-click Messages and then click New Message.
Message_1 is displayed,
- In the Properties window, select the Identifier property, type
XmlFilterMsg,
- Scroll down to the Type property. In the drop-down list to the right of the property, expand
Schemas and select CAAENOVIAProcess.FilterXML.FILTER from the list,
- In the Orchestration View window, right-click Messages and then click New Message again.
Message_1 is displayed,
- In the Properties window, select the Identifier property, type
QueryResultsMsg,
- Scroll down to the Type property. In the drop-down list to the right of the property, expand
Schemas and select CAAENOVIAProcess.ENOVIA from the list,
[Top]
Instantiating the C# BizTalk Adapter Class
The orchestration can now be configured in order to invoke the code contained in the C# library project. The first
code invocation is performed within the Expression shape. It is used to instantiate the BizTalk C# adapter class
and then set the input XML filter on the created object:
- If not already selected, click the Orchestration View tab that appears next to the Solution Explorer tab,
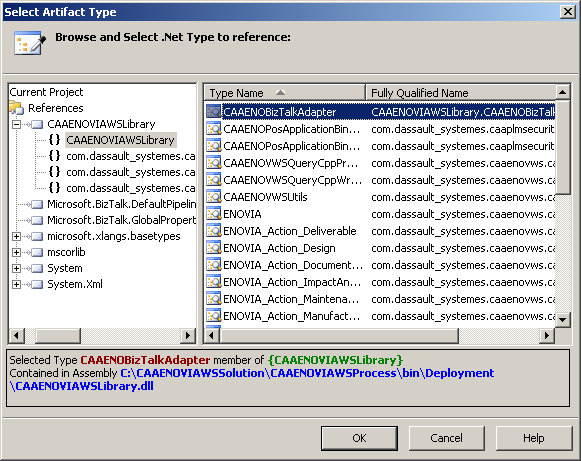
- In the Orchestration View window, right-click Variables and then click New Variable.
Variable_1 is displayed,
- In the Properties window, select the Identifier property, type
CAAENOBizTalkAdapterInstance,
- Scroll down to the Type property. In the drop-down list to the right of the property, select
<.NET Class...> to open the Select Artifact Type dialog box,
- In the left pane, select the CAAENOVIAWSLibrary entry. Then, from the right pane, select the
CAAENOBizTalkAdapter type name, and click OK to close the dialog box,
Fig.13: Select Artifact Type Dialog Box
|
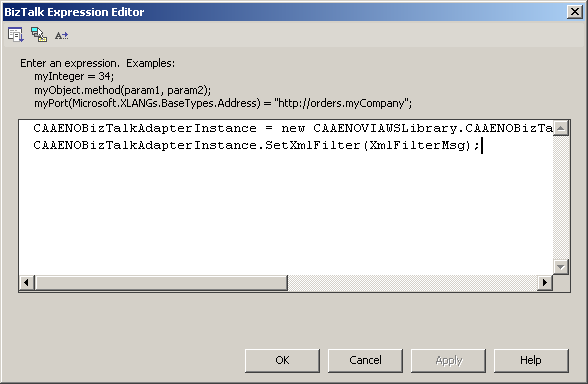
- On the Orchestration Design surface, double-click the SetXmlFilter Expression shape to open
the BizTalk Expression Editor dialog box,
- Type the following code, using the autocompletion feature to help you along:
CAAENOBizTalkAdapterInstance = new CAAENOVIAWSLibrary.CAAENOBizTalkAdapter();

                CAAENOBizTalkAdapterInstance.SetXmlFilter(XmlFilterMsg);
|
Fig.14: BizTalk Expression Editor
|
- Click OK to close the BizTalk Expression Editor dialog box.
[Top]
Invoking the CAA Web Services
The second code invocation is performed within the Message Assignment shape. It is used to invoke the business logic
contained in the BizTalk adapter class. This adapter class performs the login, query and logout operations against the ENOVIA LCA V5
system, and then sends back the query results to the calling orchestration:
- On the Orchestration Design surface, select the ConstructENOVIAResultSetMsg Construct Message shape,
- In the Properties window, select the Messages Constructed property,
- In the drop-down list to the right of the property, check the QueryResultsMsg box,
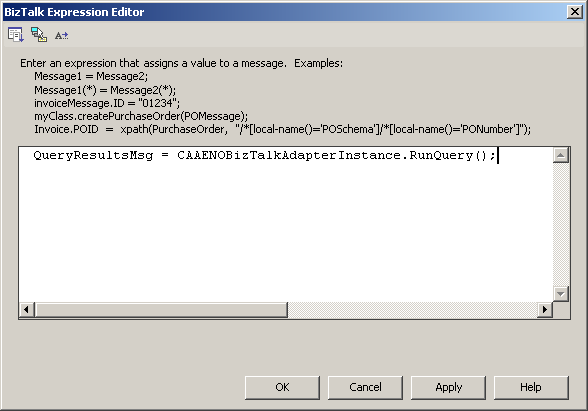
- On the Orchestration Design surface, double-click the RunQuery Message Assignment shape to open
the BizTalk Expression Editor dialog box,
- Type the following code, using the autocompletion feature to help you along:
QueryResultsMsg = CAAENOBizTalkAdapterInstance.RunQuery();
|
Fig.15: BizTalk Expression Editor
|
- Click OK to close the BizTalk Expression Editor dialog box.
Your orchestration should now appear similar to the following one:
Fig.16: Query Orchestration
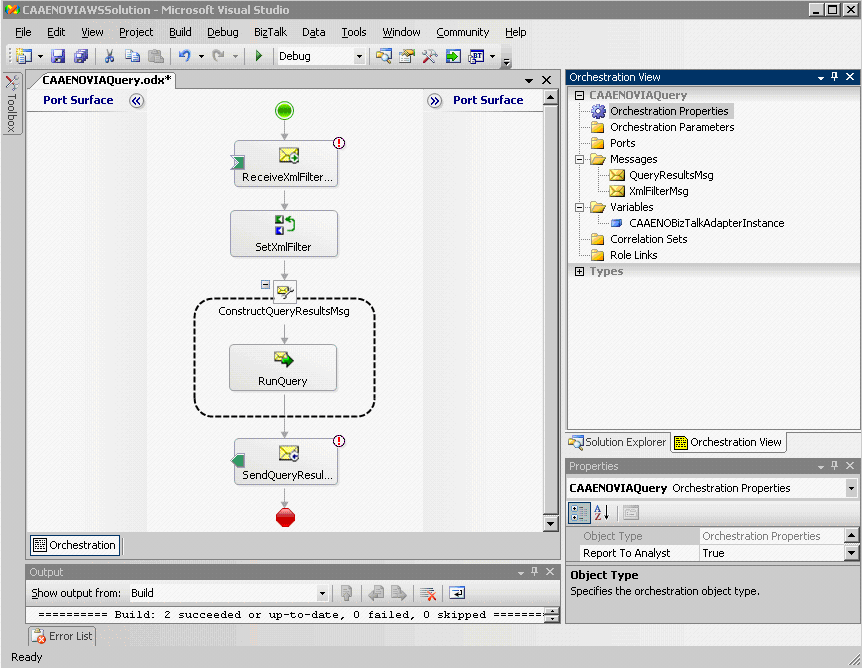
|
[Top]
Creating and Configuring the Ports
In the next step, you use the Port Configuration Wizard to create and configure send and receive ports
in Orchestration Designer. The first port to create is used to monitor a given folder and wait for incoming XML filter
messages. When a message is dropped in the input specified folder, it is picked up and processed automatically by the orchestration:
- Drag the Port shape from the toolbox to the Port Surface on the left side of the Orchestration Design
surface, and drop the shape parallel to the ReceiveXmlFilterMsg shape,
- In the Port Configuration Wizard, click Next,
- On the Port Properties page, type ReceiveXmlFilterMsgPort in the Name field, and then click
Next,
- On the Select a Port Type page, select Create a new Port Type, type
ReceiveXmlFilterMsgPortType in the Name field, and then click Next. You can
leave the Communication Pattern and Access Restrictions fields to their default
values (respectively One-Way and Internal - limited to this project),
- On the Port Binding page, under Port direction of communication, select
I'll always be receiving messages on this port,
- Select Specify Now for the Port Binding, type
C:\CAAENOVIAWSSolution\Filedrop\InputXmlFilter\*.xml under URI, and then select File for the
Transport type,
- Click Next, and then click Finish.
The second port to create is used to process the output XML message containing the query results and store it into the
specified output folder:
- Drag the Port shape from the toolbox to the Port Surface on the right side of the Orchestration Design
surface, and drop the shape parallel to the SendQueryResultsMsg shape,
- In the Port Configuration Wizard, click Next,
- On the Port Properties page, type SendQueryResultsMsgPort in the Name field, and then click
Next,
- On the Select a Port Type page, select Create a new Port Type, type
SendQueryResultsMsgPortType in the Name field, and then click Next. You can
leave the Communication Pattern and Access Restrictions fields to their default
values (respectively One-Way and Internal - limited to this project),
- On the Port Binding page, under Port direction of communication, select
I'll always be sending messages on this port,
- Select Specify Now for the Port Binding, type
C:\CAAENOVIAWSSolution\Filedrop\OutputQueryResults\QueryResults_%MessageID%.xml under URI, and then select
File for the Transport type,
- Select Microsoft.BizTalk.DefaultPipelines.PassThruTransmit for the Send Pipeline
- Click Next, and then click Finish.
Your orchestration should now appear similar to the following one:
Fig.17: Query Orchestration
|
[Top]
Setting Messages on the Actions Shapes and Connecting the Ports
In the next step, you use the Properties windows for each Send and Receive shape to identify the message types that the
action shapes will send or receive. When done, you can use the drag and drop method to connect each port to its target
action shape:
- In Orchestration Designer, on the Orchestration Design surface, select the ReceiveXmlFilterMsg action shape,
- In the Properties window, select Message, and then select XmlFilterMsg in the
drop-down list,
- Connect the ReceiveXmlMsgPort to the ReceiveXmlFilterMsg action shape by selecting the green arrow
shaped handle in the ReceiveXmlMsgPort and dragging it to the green handle on the ReceiveXmlFilterMsg
action shape,
- Select the SendQueryResultsMsg action shape,
- In the Properties window, select Message, and then select QueryResultsMsg in
the drop-down list,
- Connect the SendQueryResultsMsg action shape to the SendQueryResultsPort by selecting the green arrow
shaped handle in the SendQueryResultsMsg action shape and dragging it to the green handle on the
SendQueryResultsPort,
- On the File menu, click Save All.
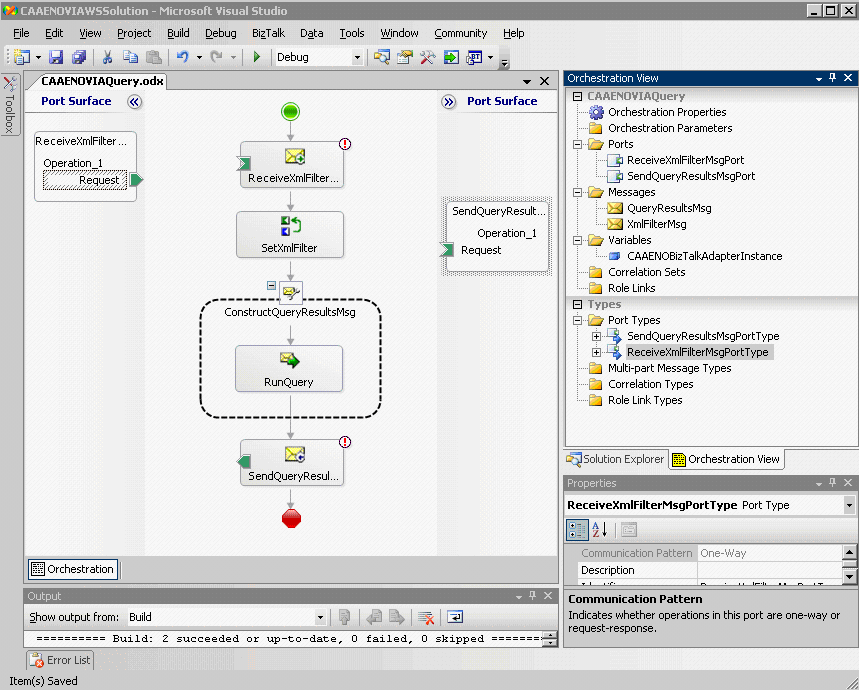
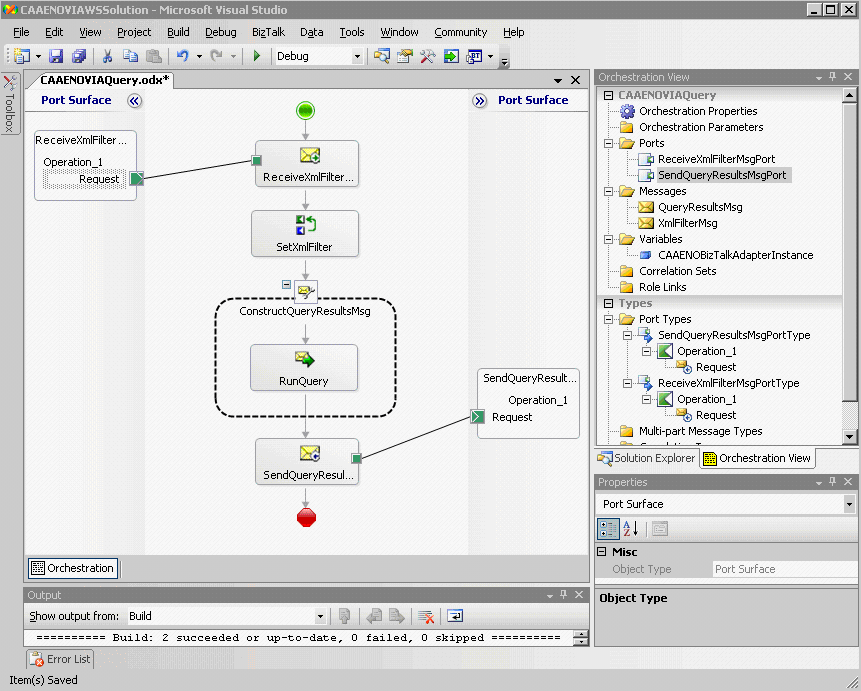
The orchestration is now finished and should appear similar to the following one:
Fig.18: Query Orchestration
|
[Top]
Building and Deploying the Solution
The first step consists in building the entire solution. In Solution Explorer, right-click
CAAENOVIAWSSolution, and then click Build. The Output window at the
bottom of the screen should read: Build: 2 succeeded, 0 failed, 0 skipped. You can safely ignore the
warning from the build step of the CAAENOVIAProcess project.
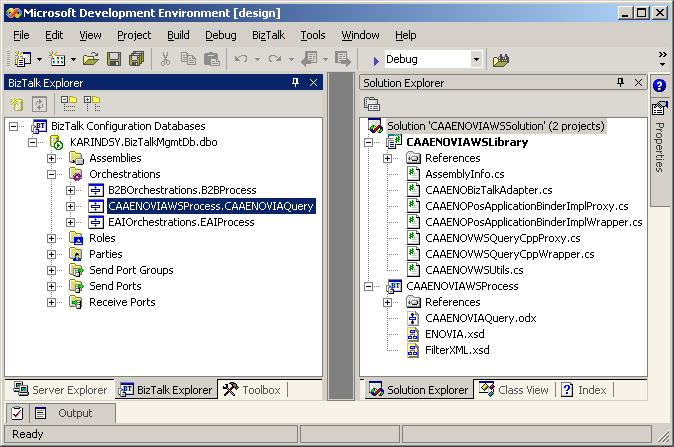
You are now ready to deploy the orchestration into the BizTalk Server 2006 environment:
- From the Solution Explorer, right click on the CAAENOVIAProcess project and click
Deploy. The Output window at the bottom of the screen should read:
Deploy: 1 succeeded, 0 failed, 0 skipped,
- Open the BizTalk Explorer view. If the toolbox is not already docked on the left side, on the
View menu, click BizTalk Explorer,
- Expand BizTalk Configuration Databases, right click on the database node and click on
Refresh,
- Expand the database node and then the Orchestrations folder icon,
- You should see the CAAENOVIAProcess.CAAENOVIAQuery orchestration deployed. Right click on it, and click
on Bind,
- In the Bind Window, click host, from the drop down to select an
available host to set host and click on OK.
- You should see the CAAENOVIAProcess.CAAENOVIAQuery orchestration deployed. Right click on it, and click
on Enlist,
- Right click on the CAAENOVIAProcess.CAAENOVIAQuery orchestration again, and click on Start,
- In the BizTalk Explorer - Express Start dialog box, leave all the boxes checked, and click on
OK.
The BizTalk Explorer view should appear similar to the following one:
Fig.19: Deploying the Orchestration
|
You must then deploy the C# library into the GAC. To do so, you can use the gacutil.exe utility
delivered with the .NET Framework SDK. Open a command prompt, and issue the following command:
"C:\Program Files\Microsoft.NET framework 2.0\SDK\v2\Bin\gacutil.exe" /if "C:\CAAENOVIAWSSolution\CAAENOVIAWSLibrary\bin\Debug\CAAENOVIAWSLibrary.dll"
|
You should receive the following message at the command prompt: Assembly successfully added to the cache, as
shown below:
Fig.20: Deploying the C# Library

|
[Top]
Running the Sample Application
Before trying to run the sample query business process, you need to create the input XML filter message that is processed by
the orchestration. Here follows a sample value, to copy and paste in a file, such as QueryFilter.xml for example.
If you wish, you can also directly use the sample file available from the
CAAWebServices.edu\Data.d\CAAENOVIAWSSolution\Filedrop directory.
<?xml version="1.0" encoding="UTF-8" ?>

              <FILTER CASESENSITIVE="TRUE">

                <SELECT>

                  <OBJECT DOMAIN="PRODUCT" NAME="VPMBOPartInstance" />

                </SELECT>

                <WHERE>

                  <FILTER_CONDITION OPERATOR="AND">

                    <ATTRIBUTE_FILTER>

                      <EXPRESSION OP="LIKE" VALUE="*">

                        <ATTRIBUTE NAME="ENOVIA_VPMPartMaster.V_ID" />

                      </EXPRESSION>

                    </ATTRIBUTE_FILTER>

                  </FILTER_CONDITION>

                </WHERE>

                <ORDERBY>ENOVIA_VPMPartMaster.V_ID</ORDERBY>

            </FILTER>
|
Then, you need to copy the QueryFilter.xml file into the
C:\CAAENOVIAWSSolution\Filedrop\InputXmlFilter folder. It triggers the orchestration, and the file should quickly disappear
from the folder after a few seconds. You can then go to the C:\CAAENOVIAWSSolution\Filedrop\QueryResults folder, and
wait for the resulting XML query results message to be written. You should see a message named QueryResults_{XXX}.xml where
XXX is a GUID value. Here follows a sample content, upon successful execution of the query process:
<?xml version="1.0" ?>

            <ENOVIA xmlns:xsd="http://www.w3.org/2001/XMLSchema" xmlns:xsi="http://www.w3.org/2001/XMLSchema-instance">

              <VPMBOPartInstance>

                <ENOVIA_VPMItemInstance.V_instance_ID>Part1.1</ENOVIA_VPMItemInstance.V_instance_ID>

                <ENOVIA_VPMItemInstance.V_status>In Work</ENOVIA_VPMItemInstance.V_status>

                <ENOVIA_VPMItemInstance.C_modified>2006-03-28T11:52:33.0000000+01:00</ENOVIA_VPMItemInstance.C_modified>

                <ENOVIA_VPMItemInstance.V_user>LCAUser</ENOVIA_VPMItemInstance.V_user>

                <ENOVIA_VPMItemInstance.V_matrix_1>1</ENOVIA_VPMItemInstance.V_matrix_1>

                <ENOVIA_VPMItemInstance.V_matrix_2>0</ENOVIA_VPMItemInstance.V_matrix_2>

                <ENOVIA_VPMItemInstance.V_matrix_3>0</ENOVIA_VPMItemInstance.V_matrix_3>

                <ENOVIA_VPMItemInstance.V_matrix_4>0</ENOVIA_VPMItemInstance.V_matrix_4>

                <ENOVIA_VPMItemInstance.V_matrix_5>1</ENOVIA_VPMItemInstance.V_matrix_5>

                <ENOVIA_VPMItemInstance.V_matrix_6>0</ENOVIA_VPMItemInstance.V_matrix_6>

                <ENOVIA_VPMItemInstance.V_matrix_7>0</ENOVIA_VPMItemInstance.V_matrix_7>

                <ENOVIA_VPMItemInstance.V_matrix_8>0</ENOVIA_VPMItemInstance.V_matrix_8>

                <ENOVIA_VPMItemInstance.V_matrix_9>1</ENOVIA_VPMItemInstance.V_matrix_9>

                <ENOVIA_VPMItemInstance.V_matrix_10>0</ENOVIA_VPMItemInstance.V_matrix_10>

                <ENOVIA_VPMItemInstance.V_matrix_11>0</ENOVIA_VPMItemInstance.V_matrix_11>

                <ENOVIA_VPMItemInstance.V_matrix_12>0</ENOVIA_VPMItemInstance.V_matrix_12>

                <ENOVIA_VPMPartVersion.V_version>---</ENOVIA_VPMPartVersion.V_version>

                <ENOVIA_VPMPartMaster.V_ID>Part1</ENOVIA_VPMPartMaster.V_ID>

                <ENOVIA_VPMPartMaster.V_name>Part1Name</ENOVIA_VPMPartMaster.V_name>

                <ENOVIA_VPMPartMaster.V511_PartType>Assembly</ENOVIA_VPMPartMaster.V511_PartType>

                <ENOVIA_VPMPartMaster.V508_isStandardPart>false</ENOVIA_VPMPartMaster.V508_isStandardPart>

                <ENOVIA_VPMPartMaster.V512_IsConfigured>false</ENOVIA_VPMPartMaster.V512_IsConfigured>

                <ENOVIA_VPMPartMaster.V511_AssemblyType>Product</ENOVIA_VPMPartMaster.V511_AssemblyType>

                <ENOVIA_VPMPartMaster.V511_ControlledBy>ENOVIA</ENOVIA_VPMPartMaster.V511_ControlledBy>

                <ENOVIA_VPMPartMaster.V_description>Part1Description</ENOVIA_VPMPartMaster.V_description>

                <Relation xsi:nil="true" />

                <Domain>PRODUCT</Domain>

                <CATJsyUUID>10252FE9AF00001814439802610000043B0000000007454E4F564C52345 [...] F44554354202020</CATJsyUUID>

              </VPMBOPartInstance>

            </ENOVIA>
|
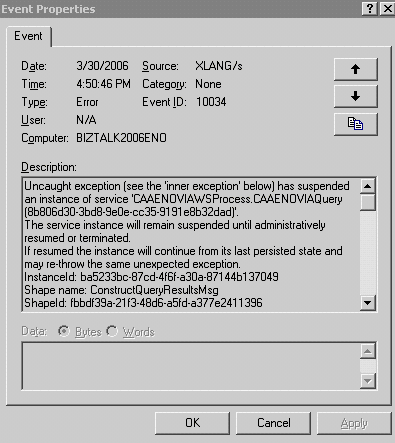
In order to reduce the complexity of the sample orchestration, it does not support exception handling. As a result,
it may be difficult to debug the source of a failure when running the sample application. To help you in the process, you
can track down issues using the Event Viewer. If an exception occurs in the external C# library invoked
by the orchestration, it will be tracked down as an error in the Event Viewer. To display the Event Viewer, go to
Administrative Tools, and then double-click Computer Management. Or, open the
MMC containing the Event Viewer snap-in. In the console tree, click Event Viewer. You can then look for
an error and display its properties. It gives you access to the exception stack trace, as shown below:
Fig.21: Using the Event Viewer to Debug Issues
|
[Top]
In Short
In this article, we described how to consume CAA Web services from a BizTalk Server
2006 orchestration that stands as a sample
query business process. The orchestration relies on an external .NET assembly to invoke the target CAA Web services, which in
turn sends back the XML query results message to the calling orchestration. The sample orchestration is triggered whenever an
XML SelectExpression message is dropped in a given input folder of the file system. It saves the query results as another XML
message stored in a distinct output folder.
[Top]
References
History
|
Version: 1 [March 2006]
|
Document created
|
|
[Top]
|
Copyright © 1994-2006, Dassault Systèmes. All rights reserved.