RADE
|
Data Model Customizer for ENOVIA
|
Customizing the People Modeler
Customizing ENOVIA People with DMC (publishing on UNIX) |
| Use Case |
Abstract
This article aims at presenting a comprehensive customization sample on
ENOVIA People.
|
Principle
| People, Organization and Security is a set of tools and
methods designed to help the ENOVIA database administrator determine
which end users of ENOVIA Lifecycle Applications can work on which
project, and specify which functions users will be able to use, and under
which conditions. Furthermore, the tools allow the user to define security
mechanisms for controlling access to ENOVIA objects manipulated using
ENOVIA Lifecycle Applications. The need of P&O customization can be met
in several cases:
- Need to define new attributes on existing P&O objects
- Need to define new objects inside the P&O schema
- Need to define new security attributes on specific object classes
pertaining to other schemas
- Need to define security rules/conditions as native Data Group objects
on Privileges, that determine the access rights to instances of
customized/secured object classes according to the current security
context
By customizing P&O objects, you can add security concepts,
or modify those already put in place. Such a modification is really
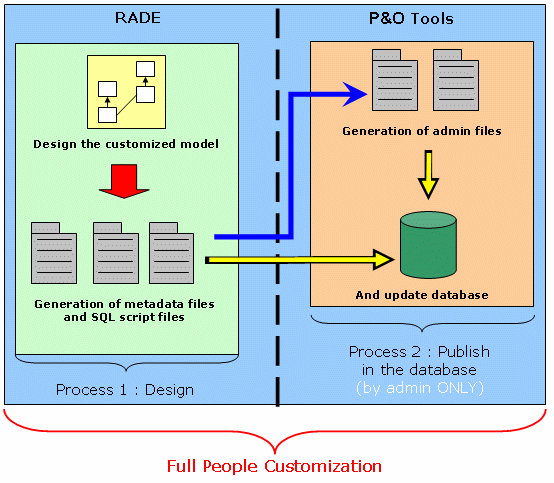
sensitive, consequently, the full customization is divided into 2
processes. The first part will deal with the design of the future
application. The second part will be executed only by an ENOVIA
administrator, to prevent you from losing any information. Indeed, the
administrator must verify whether the customization agrees with his
recommendations before deploying it. If the model turns out to be valid
with the contents of the database, the administrator will update the
database. As this task is critical, before updating tables, a backup of the
database is performed. Therefore, if an error occurs, the design is still safe, and
it is just necessary to execute the second process.
|
[Top]
Rules to Follow
While Customizing People
 |
You can extend the P&O data model:
- By extending some native P&O classes
- The P&O classes that can be derived are:
RscPerson,
RscOrg,
RscRole,
RscProject
- These native classes can be derived at most once
- The resulting classes cannot be derived
- The resulting classes are referred to as “derived P&O classes”
below
- By creating new P&O classes
- The new classes must derive from the P&O common resource base
class:
RscObject
- The new classes cannot be derived
- The resulting classes are referred to as “new P&O classes” below
No other P&O and Security classes can be customized.
You cannot extend the
behavioral model of the P&O objects. In particular:
- No new CAA-exposed API for P&O is provided
- The lifecycle of the P&O objects cannot be customized
- New events related to the P&O domain cannot be defined
or fired
|
For example, a class called MyPerson deriving from the
RscPerson class will represent the business concept of a “person” in the
usual P&O sense in place of the RscPerson class. Hence, at runtime, every
“person” will be an instance of MyPerson instead of RscPerson. Meanwhile the
behavioral model of this “person” will not be changed. In particular, the
inherited relationships of the RscPerson with the other native classes will
not
change and cannot be overridden. It is also true for
RscOrg, RscRole
and RscProject classes.
The role of the new classes deriving from RscObject is
to represent business concepts that are not currently accounted for by the
P&O data model. The administration management of instances of those classes
will be done through the usual P&O tools i.e.
VPMPeopleEdit and
VPMPeopleImport by the P&O administrator. These P&O tools provide the ability
of creating, modifying and deleting instances of new classes. During ENOVIA
LCA runtime, the only possible entry point to account for those instances is
through the Data Group conditions linked to the Privileges of the logged
user. These conditions may contain reference to the new classes via the
provided context variables
Security attributes on classes outside the P&O data
domain can be added by derivation as proposed by the current RADE tools.
Hence, only those classes that are currently CAA derivable can
support some extra security attributes. The role of these security attributes
is to be used in the evaluation of the Data Group conditions linked to the
Privileges of the logged user to manage the access rights to the instances of
the customized class.
|
|
Usually, class relationships in
metadata files can be managed in many different manners. As far as P&O
customization is concerned, NOT ALL types of links are allowed:
-
Only direct relationships are allowed.
-
Only shared aggregations are allowed (of
type Set exclusively).
-
Classes outside the P&O schema cannot directly reference P&O
classes and vice versa.
-
New P&O classes (coming from
RscObject)
can reference any native class (unless it has been derived) or any derived
P&O class (coming from RscPerson,
RscOrg,
RscRole or
RscProject) through
direct relationships or shared aggregations (of type Set exclusively).
-
New P&O classes can also reference each
other by the same means.
-
Derived P&O classes can reference any new
P&O class BUT NOT other native or derived P&O class.
|
Another consequence of the P&O customization
- P&O objects created during installation must be migrated according to the
customized schema. For example, in case of a
RscPerson customization, the
admin user has to be migrated.
- P&O objects created in a production database must be exported before the
customization process and re-imported after the end of the customization
process.
[Top]
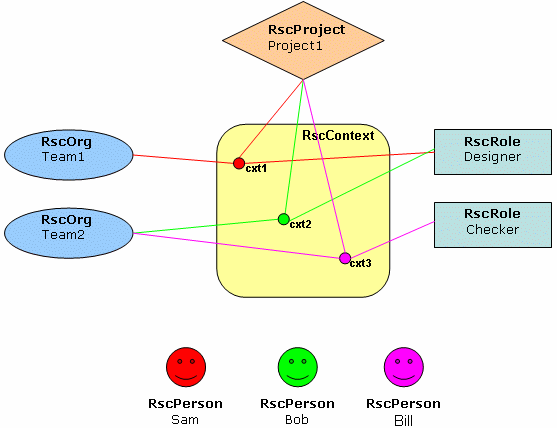
Example
If you have never tried to customize a People modeler, create a
database structured like the one shown in the graphic below.
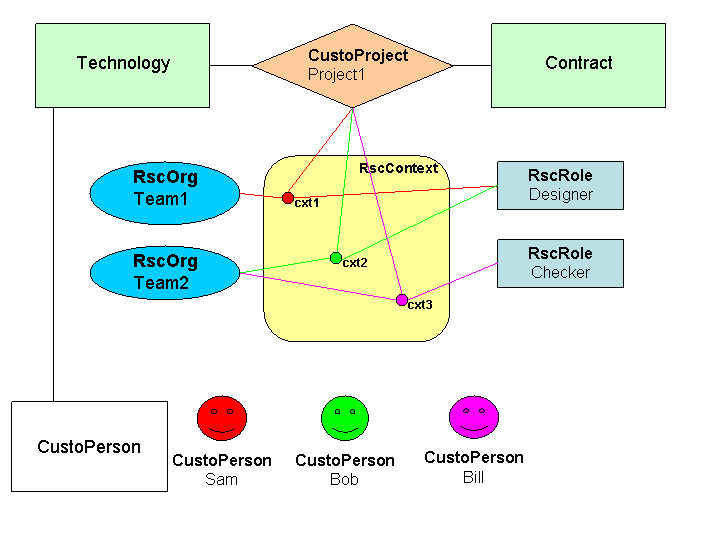
Now, you want to associate to each project a list of implied
technologies, and a list of contracts. The context will now establish relations
with customized projects, original roles, and customized persons. Each person
contains a list of authorized technologies.
[Top]
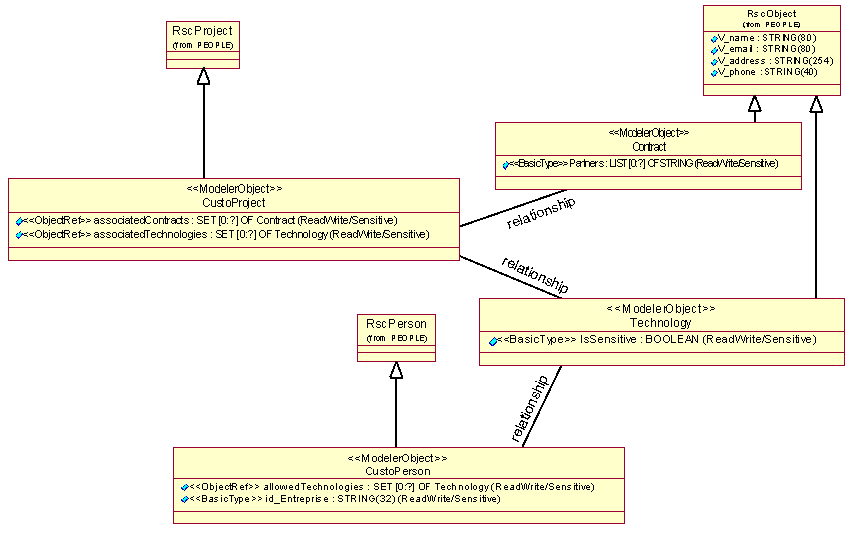
Design Process
This step aims at designing the customization and
generating the associated metadata file. Everybody can take part to
this step. There is no risk for the database. The associated UML schema lists the different relations
between objects, and their attributes. In fact, these UML representations
will appear in several windows. They are gathered below to provide you with a
global
model.
[Top]
Creating a UML Project
- From the
File
menu, select New->Other->UML
Project. Click
Next>.
- Enter the name of the UML project. Click
Next> and
Finish.
- In the
Navigator
view, right-click your project and select
Open as a DMC Project.
- In the
Open a DMC
   Project
window, select the tool level and click
Next>.
- Click
Close
in the Initializing tools
window.
- Click
Add
and select your prerequisite frameworks. Click
Finish.
- Click
Close
in the Installing Prereqs
window.
[Top]
Creating a People
Customization
- From the
File
menu, select New->Other->DMC
Elements->New LCA Customization. Click
Next>.
- Enter the application name in the
Application Name field,
MyPeople in this example.
- Click ...
in the Customize LCA
application field and select People. The list of the Use
Package is automatically updated with the Use Package corresponding to the
application.
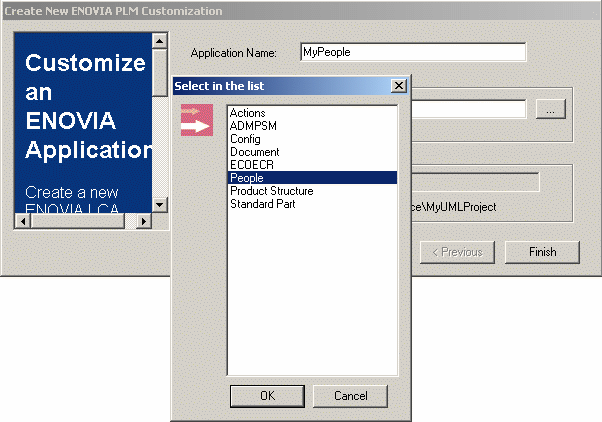
- Click
Finish. The wizard
creates a new workspace.
[Top]
Creating a Modeler Object
-
In the
Navigator view,
expand the MyPeople node and double-click the .emx file.
-
From the
File menu, select
New->Other->DMC
Elements->New Modeler Object. Click
Next>.
-
Enter the name of the new Modeler Object,
Contract in this example.
 |
Unlike other modelers, you can create new objects. So, we will present the
2 cases allowed by RADE tools. Keep in mind that RADE tools are
generic tools, and you must always check that the change you are performing is
granted by People
customization rules.Build a new class
(ex Contract): To build a new class, you must
proceed as if you were customizing the class
RscObject. At the opposite of basic customizable classes,
RscObject can
be derived several times, and is not replaced by the new class created.
Thus, RscObject provides only the structure and a behavior for new
classes, in order that they can be interpreted correctly by ENOVIA.
|
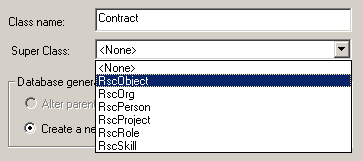
- Select the RscObject in the
Super Class
list.
- Click
Insert to add any
attribute to your Contract.
- Optional: Add a new index by using the second
Insert button.
- In this sample, we create a list of STRING as reference to
partners.
- Click
OK to finish the
command.
-
Customizing an existing class (ex CustoProject)
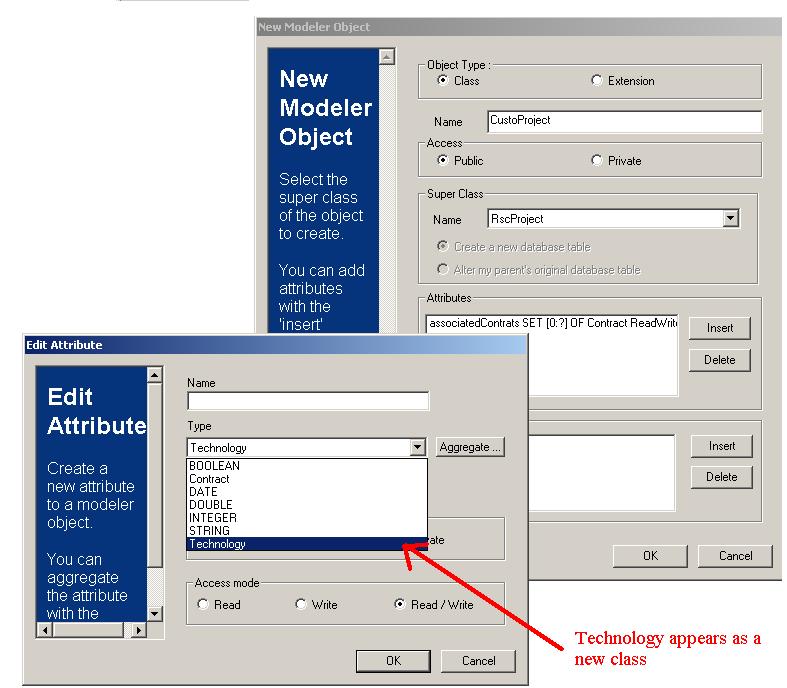
- Enter the name of the new Modeler Object : CustoProject.
- Select the RscProject in the Combo Box.
- Click
Insert to add any
attribute to your CustoProject.
- You can also add a new index by using the second
Insert button.
- Click
OK to finish the
command.
[Top]
Generating the Dictionary File
- Select
DMC Project->Generate VPM Dictionary
     file
.
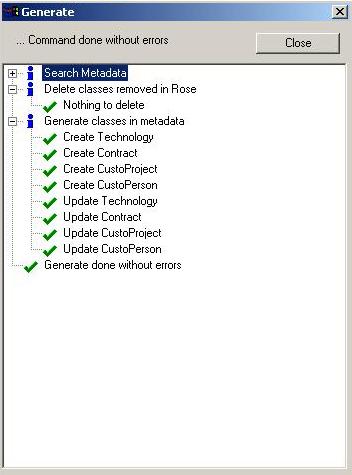
The wizard creates MyPeople.metadata under the directory MyPeople/CNext/code/dictionary.
Generating the SQL Script Files
- Select
 DMC Project->Publish
     VPM Dictionary file in database
.
- This will launch the first part of the publishing process during which
*.sql or *.clp files will be created under the directory
MyPeople/CNext/reffiles/DBMS/ddl.
- This publish step is run as if you did a simulation with any other
domain than PEOPLE. In fact SQL orders are not propagated to the database
at this step.
- At the end of this process, you should be warned that you cannot
disable simulation when customizing People with RADE tools. To go on with
the Publishing process, you have to be ENOVIA admin and go to the server.
[Top]
Publishing Process
Bear in mind that this step is really sensitive. And a bad
customization could have your ENOVIA server crashed. So at this step, only an
ENOVIA database administrators are allowed to publish modifications to
the database, after checking the customization.
 |
To prevent you from losing any information, a backup of
your database is REQUIRED before publishing the
customization to the database. If any of the
following steps failed then return to this backup step and restore your
database. |
[Top]
Publishing the Customization
Now it is time to modify the ENOVIA database. To do so:
- Launch catstart.
- Set 2 extra environment variables. In some cases, one more environment
variable is required.
- Launch the dedicated script.
Steps to follow:
-
Set-up the ENOVIA runtime environment with the catstart
command
on Unix:
$ENOVIA_INSTALL_PATH/$OSDS/code/command/catstart -run ksh -env $EnvName
   -direnv $EnvDir
on Windows:
%ENOVIA_INSTALL_PATH%\intel_a\code\bin\catstart -run cmd -env %EnvName%
   -direnv %EnvDir%
Where:
ENOVIA_INSTALL_PATH is the location where you
installed the ENOVIA CD.
OSDS is the Unix operating system tag (eg. aix_a).
EnvName is the name of the ENOVIA environment
(Default is: ENOVIA_LCA.V5Rxx.Bxx)
EnvDir is the environment folder containing the
EnvName.txt file.
-
Export the following variables:
| ENOVApplicationPath |
The location where your customization is stored |
| ENOVDBAPSSD |
The password of the ENOVIA DBA administrator |
For example:
on Unix:
export ENOVApplicationPath=/u/users/fya/MSDEV/E__TMP_WSCUSTOPEOPLE
export ENOVDBAPSSD=fya
on Windows:
set ENOVApplicationPath=C:\users\fya\MSDEV\E__TMP_WSCUSTOPEOPLE
set ENOVDBAPSSD=fya
|
|
All other needed parameters are stored in a file CAAPeopleVariables
located in ENOVApplicationPath. You cannot go on if this file has not been
generated using RADE tools during the first part of the publish operation (simulation
mode). You may change the backup/deployment directory referred to by
the variable ENOVSavePath
to the location of your choice (the default being /tmp on Unix and C:\tmp on
Windows) by editing this file. |
WARNING: Particular cases
This is happening whenever the workspace containing the P&O customization
(i.e. ENOVApplicationPath) requires a workspace containing any other modeler
customizations (Product, Conf, etc.) that itself requires the ENOVIA
installation path. In these cases, the CATInstallPath contains a
concatenation of all the required workspaces that prevents the P&O
publication script from working properly. To avoid this useless
concatenation, one supplementary environment variable is required, named
ENOVInstallPath. This environment variable needs to be set equal to the
ENOVIA installation path only.
For example:
on Unix:
export ENOVInstallPath=$ENOVIA_INSTALL_PATH/$OSDS
on Windows:
set ENOVInstallPath=%ENOVIA_INSTALL_PATH%\intel_a
Where:
ENOVIA_INSTALL_PATH is the location where you
installed the ENOVIA CD.
OSDS is the Unix operating system tag (eg. aix_a).
3. Launch the script:
on Unix:
$ENOVIA_INSTALL_PATH/$OSDS/code/command/CAAPublishPnOModel.sh
on Windows:
%ENOVIA_INSTALL_PATH%\intel_a\code\command\CAAPublishPnOModel.bat
You have to know that 4 sub-steps are performed while the script is
processed:
- First, while publishing, old records located in original
People tables
are erased. That is why a file containing all data about these records are
exported to a file called AllPnOObjectBeforeCusto in /tmp directory (or C:\tmp
directory on Windows), just before performing the database update. At the end
of the current publishing process all those records have to be re-imported into
the
database. This import step is not part of the publishing script: Use the
VPMPeopleImport tool to re-import your P&O data after the
publishing process. Therefore, the file
AllPnOObjectBeforeCusto must not be
destroyed, and must be securely stored at the temporary location (referred to
by ENOVSavePath in the file
CAAPeopleVariables that
points by default to /tmp or C:\tmp).
- Then, the SQL orders (contained in the script files generated by RADE
tools) are processed in order to update the database structure. And changes
occur in the database to use your customization. This is the more critical
sub-step.
- Although your customization is now published in the database, you still cannot use it. The only way to edit customized P&O data is to use the
VPMPeopleEdit tool. But to identify and modify each new object or
customized object, 2 more files need to be generated using the command
VPMPeopleCusto (automatically called at this step), which are:
on Unix:
- $ENOVApplicationPath/$OSDS/code/dictionary/VPMPeopleCusto.xml
- $ENOVApplicationPath/$OSDS/resources/msgcatalog/VPMPeopleCusto.CATNls
on Windows:
- %ENOVApplicationPath%\intel_a\code\dictionary\VPMPeopleCusto.xml
- %ENOVApplicationPath%\intel_a\resources\msgcatalog\VPMPeopleCusto.CATNls
- Finally VPMPeopleUpdate
-p -m is launched. This should recreate
installation objects and their relations in the new customized tables
(DEFAULT project, ADMIN org, VPMADMIN role, admin person, admin context,
login privileges).
Special Note about the Windows .bat file:
It is possible that some steps will not be performed on Windows
XP because some
subroutine labels declared in the .bat file are not recognized. In this case
the whole publication process has to be done again until all steps are
correctly performed. Examples of such labels are :DoVPMPeopleImport, :DoLoadAdmin,
etc.
Finalizing the Customization
Remember that at the end of the publishing
process all old records have to be re-imported into the database. This import
step is not included in the publishing script: Use the
VPMPeopleImport tool to re-import your P&O data after the publishing process.
Therefore, you have to retrieve the file
AllPnOObjectBeforeCusto stored at the
temporary location (/tmp or ENOVSavePath if you modified the default location)
and run:
on Unix:
$ENOVIA_INSTALL_PATH/$OSDS/code/command/catstart -run "VPMPeopleImport
/tmp/AllPnOObjectBeforeCusto"
-direnv $EnvDir -env $EnvName
on Windows:
%ENOVIA_INSTALL_PATH%\intel_a\code\bin\catstart -run "VPMPeopleImport
C:\tmp\AllPnOObjectBeforeCusto"
-direnv %EnvDir% -env %EnvName%
where:
- ENOVIA_INSTALL_PATH is the location where you installed the ENOVIA
CD.
- OSDS is the Unix operating system tag (eg. solaris_a,
aix_a, hpux_b).
- EnvDir is the environment folder containing the EnvName.txt file.
- EnvName is the name of the customization environment (Default is: WorkspaceEnv
)
Note that during the publishing process,
VPMPeopleCusto has generated a file
called VPMPeopleCusto.import in
the directory called ENOVSavePath
which can be used to check that the import functionality is correct in the new customized database and environment.
This import file contains dummy entities and attributes of each customized type
that can be imported with VPMPeopleImport as described above. If this import
process is OK then you can safely import
AllPnOObjectBeforeCusto.
First
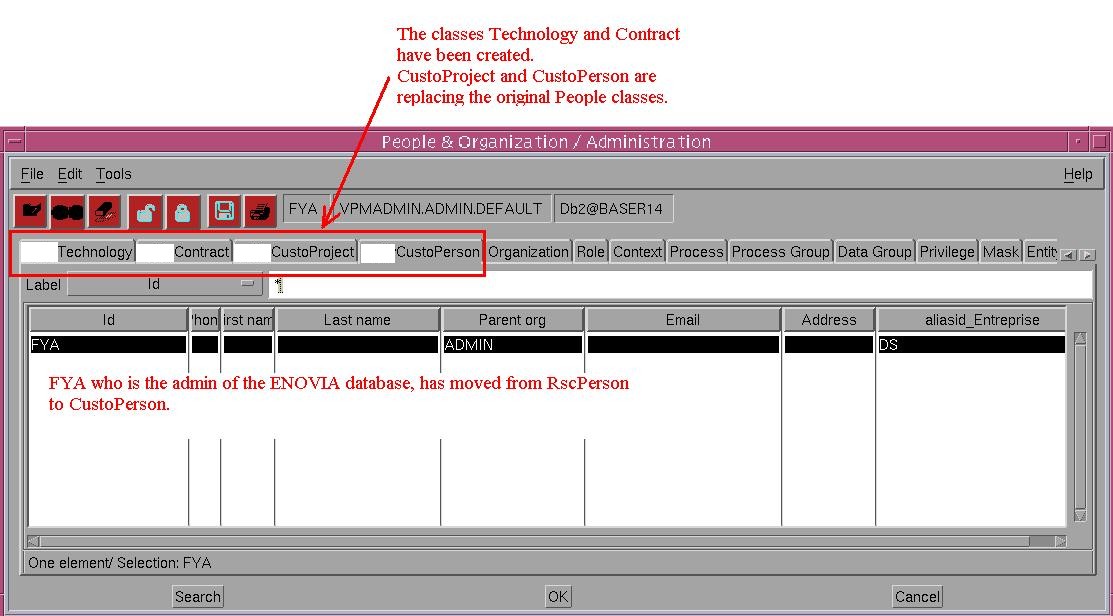
Preview of the Database Using VPMPeopleEdit
Now, let's take a look at the People customization by launching
VPMPeopleEdit, within the customization environment :
On Unix:
$ENOVIA_INSTALL_PATH/$OSDS/code/command/catstart -run "VPMPeopleEdit"
-direnv $EnvDir -env $EnvName
On Windows
%ENOVIA_INSTALL_PATH%\intel_a\code\bin\catstart -run "VPMPeopleEdit"
-direnv %EnvDir% -env %EnvName%
where :
- ENOVIA_INSTALL_PATH is the location where you installed the
ENOVIA CD.
- OSDS is the Unix operating system tag (eg. solaris_a,
aix_a, hpux_b).
- EnvDir is the environment folder containing the EnvName.txt
file.
- EnvName is the name of the customization environment (Default
is WorkspaceEnv
)
[Top]
Modifying Customer Preferences
In VPMPeopleEdit, by default, customized entities and
attributes will appear as defined in the generated file
VPMPeopleCusto.CATNls.
The names of the entities and attributes
will correspond to the names given while customizing People.
So, to modify these names, edit
VPMPeopleCusto.CATNls (located in the customization folder under
CNext/resources/msgcatalog):
- All lines follow the pattern: entityName.attributeName="attributeName";
- Example for entity CustoProject:
CustoProject.IsSensitive="IsSensitive";
- To change attribute names according to your preferences just edit
the quoted string
- Example for entity CustoProject this
could be : CustoProject.IsSensitive="IsClassified";
Old names will be replaced by preferred names.
[Top]
Results
Now it is time to test your customization with ENOVIA client.
To use this customization, you must launch ENOVIA server within the
environment of the customization. So refer the location where your
customization is built on the server, as followed :
On Unix
$ENOVIA_INSTALL_PATH/$OSDS/code/command/enoviastart
-direnv $EnvDir -env $EnvName -object
"-sdirenv $SrvEnvDir -senv $SrvEnvName"
On Windows
%ENOVIA_INSTALL_PATH%\intel_a\code\bin\enovia
-direnv %EnvDir% -env %EnvName%
where :
- ENOVIA_INSTALL_PATH is the location where you installed the
ENOVIA client.
- OSDS is the client operating system tag (eg. solaris_a,
aix_a, hpux_b).
- EnvDir is the client environment folder containing the
EnvName.txt file
- EnvName is the name of the ENOVIA client environment ( Default
is : ENOVIA_LCA.V5Rxx.Bxx
)
- SrvEnvDir is the server environment folder containing the
EnvName.txt file.
- SrvEnvName is the name of the customization environment (
Default is : WorkspaceEnv
)
[Top]
Deploying a People Customization
Once your People Customization has been published and
tested in your development environment, it is time to deploy it on
the production environment.
As for publishing, there is a special process to follow to successfully
deploy your People Customization:
- Make a database backup
- Export People data
- Launch the deployment shell
- Re-import People data
Let's detail these steps.
1. Make a database backup
|
|
To prevent you from losing any information, a backup of
your database is REQUIRED before deploying the customization to the
database.
If any of the following steps fail, then return to this backup step and
restore your database. |
2. Export People data
A DROP of the old tables is necessary and the People data are entirely
deleted. So to restore the People data, an export is required to
prepare the last step, which consists in importing these saved data back to the
new tables.
On your ENOVIA server installation, run
$ENOVIA_INSTALL_PATH/$OSDS/code/command/catstart -run "VPMPeopleImport
-export
/tmp/AllPnOObjectBeforeCusto"
-direnv $EnvDir -env $EnvName
where :
- ENOVIA_INSTALL_PATH is the location where you installed the ENOVIA
CD.
- OSDS is the Unix operating system tag (eg. solaris_a,
aix_a, hpux_b).
- EnvDir is the environment folder containing the EnvName.txt file.
- EnvName is the name of the production environment.
This will save the People data in a file named
AllPnOObjectBeforeCusto (you may set the file name and directory at any
suitable locations; temporary directories shown above are for illustration
purpose only).
3. Launch the deployment shell: CAADeployPnOCusto.sh
|
|
The shell CAADeployPnOCusto works nearly like DeployRadeCusto
except that the People data will be entirely deleted. Be sure you have
done step 2 before running the deployment shell. |
The deployment shell will:
- Create a new RADE directory to store customized files.
- Create a new environment file.
- Generate SQL orders.
- Update the database accordingly.
- Add the customized People modeler to the ADMIN database.
- Import Default Mask generated by RADE.
First, check the prerequisites for the deployment:
- The Development Server and the Production Server
should be installed on the same operating system.
- In the ENOVSavePath directory ( generated during publishing process ),
you should have
- *.custo file, *.metadata file, *.dico file,
SearchEntitiesDefinition.xml, VPMPeopleCusto.xml under
$OSDS/code/dictionary
- *.param file under $OSDS/reffiles/DBMS/Generator
- VPMPeopleCusto.CATNls under $OSDS/resources/msgcatalog
- *.CustomEnv.sh under $ENOVSavePath
|
|
- You can make your customization on DB2 and deploy it on ORACLE ( or the
other way around ).
- You can deploy your customization on a customized database.
|
Then:
3.1 - From the UNIX command line, type: cd
$ENOVIA_INSTALL_PATH/$OSDS/code/command
where:
- ENOVIA_INSTALL_PATH is the location where your Production server
is installed
- OSDS is the Unix operating system tag (eg. solaris_a,
aix_a, hpux_b)
3.2 - Create a command file containing all the parameters you will need to
run the deployment script. The parameters should all wrap continuously as
one line.
|
|
Because the command line contains the user/password of
the LCA admin, maintain the confidentiality of this command file. |
3.3 - The command line is as follows:
./CAADeployPnOCusto.sh ...
| -DBVendor |
ORACLE or DB2 |
| -DBName |
The name of your database |
| -DBAdmHome |
The home directory of Oracle Id or the DB2 instance ID |
| -TbsName |
The tablespace name used by ENOVIA LCA for its database
tables |
| -IdxTbsName |
The tablespace name used by ENOVIA LCA for its indexes |
| -TableOwner |
The ID that is creator/owner of database tables |
| -AdmUsr |
The ENOVIA LCA administrative user ID ( often the same
as TableOwner ) |
| -AdmPwd |
The AdmUser password |
| -DBAID |
The database administrator ID |
| -DBAPwd |
The database administrator password |
| -EnvDir |
The full directory path to the CATEnv directory |
| -EnvName |
The name of the "ENOVIA_LCA~" file in CATEnv directory
without the ".sh" |
| -InitRADECustoDir |
The ENOVSavePath directory of the publish |
| -RADECustoDir |
The directory where you want to deploy the
customization |
For command line help with this script, simply type: CAADeployPnOCusto.sh <return>
from the UNIX command line and it will return some help text.
Here are two sample executable files, one for Oracle and one for DB2
DB2 :
./CAADeployPnOCusto.sh -DBVendor DB2 -DBName ENOVRADE -DBAID db2adm7 -DBAPwd
db2adm7 -DBAdmHome /home/data/db2adm7 -TbsName TBS1_8K -IdxTbsName TBS1_8K
-TableOwner EV5ADM -AdmUsr ev5adm -AdmPwd EV5ADM -EnvDir /CATEnv -EnvName
ENOVIA_LCA.V5R11.B11 -InitRADECustoDir /home/data/ev5adm/MSDEV/CustoOutput
-RADECustoDir /home/data/vpm5adm/RADECusto
ORACLE:
./CAADeployPnOCusto.sh -DBVendor ORACLE -DBName ORARADE -DBAID ora7
-DBAPwd ora7 -DBAdmHome /home/oracle/8.1.7 -TbsName TBS1_8K -IdxTbsName TBS1_8K
-TableOwner EV5ADM -AdmUsr ev5adm -AdmPwd EV5ADM -EnvDir /CATEnv -EnvName
ENOVIA_LCA.V5R11.B11 -InitRADECustoDir /home/data/ev5adm/MSDEV/CustoOutput
-RADECustoDir /home/data/vpm5adm/RADECusto
3.4 - Run the file script from the UNIX command line. Information status
messages appears. Some steps will take several minutes, during which no
additional messages will appear.
3.5 - Run ./catstart -run "VPMPeopleEdit" -env
$EnvName -direnv
$EnvDir to test your deployment
where :
- EnvDir is the environment folder containing the EnvName.txt file.
- EnvName is the name of the new production environment.
4. Re-import People data
|
|
This step is REQUIRED. |
To restore the People data that have been saved at step 2, import
them back to the database using the backup file AllPnOObjectBeforeCusto.
On your ENOVIA server installation, run
$ENOVIA_INSTALL_PATH/$OSDS/code/command/catstart -run "VPMPeopleImport
/tmp/AllPnOObjectBeforeCusto"
-direnv $EnvDir -env $EnvName
where :
- ENOVIA_INSTALL_PATH is the location where you installed the ENOVIA
CD.
- OSDS is the Unix operating system tag (eg. solaris_a,
aix_a, hpux_b).
- EnvDir is the environment folder containing the EnvName.txt file.
- EnvName is the name of the new production environment.
Be sure to re-import the right file generated at step 2 (in particular check
its name and directory if you did not follow the examples).
This step ends the deployment of a People customization.
[Top]
Migrating a People Customization
Migrating a People customization from release N to release N+1 is just
like any other customization migrations plus the peculiarities of the People
customization publication. Refer to the use case "Migrating
an Existing Customization" and strictly follow the provided
instructions.
Then, you will have to perform a specific People publication of your migrated
workspace, just as it is exposed in the present documentation. To know more,
see Publishing
Process. This completes the migration of your People customization.
[Top]
History
| Version: 1 [Mar 2004] |
Document created |
| Version: 2 [Dec 2004] |
Document updated |
| Version: 3 [Apr 2005] |
Document updated |
| Version: 4 [Oct 2005] |
Document updated for Migration and
Deployment |
| Version: 5 [March 2006] |
Document updated |
| Version: 6 [Sept 2007] |
Document updated for Deployment |
| [Top] |
Copyright © 2006, Dassault Systèmes. All rights reserved.