3D PLM Enterprise Architecture |
User Interface - Frame |
Using CamerasCreating a single command seen as several end user commands |
| Use Case | ||
AbstractThis article shows how to create a command that can be passed a parameter. It uses a camera to modify the current window viewpoint, the parameter being the selected viewpoint. |
This use case is intended to show how to pass a parameter to a command, and how to use a camera to modify the current window viewpoint.
[Top]
CAAAfrGeoCommands is a use case of the CAAApplicationFrame.edu framework that illustrates the ApplicationFrame framework capabilities.
[Top]
The CAAAfrGeoCommands use case includes several commands. The CAAAfrChangeViewNormalCmd command that changes the current window viewpoint is the only command described here. This command that belongs to the CAAAfrGeometryWshop changes the current window viewpoint to one of the following.
|
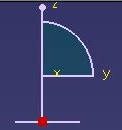
See the yz plane from left. Select View->Normal View->NormalX |
|
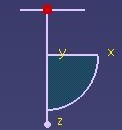
See the zx plane from right. Select View->Normal View->NormalY |
|
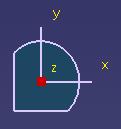
See the xy plane from top. Select View->Normal View->NormalZ |
This command is instantiated from the workshop using as many command headers as there are end user commands, that is, as there are push items in menus or push buttons in toolbars that trigger this command,
See the section entitled "How to Launch the CAAGeometry Use Case" in the "The CAAGeometry Sample" use case for a detailed description of how this use case should be launched. For the specific scenario :
Do not type the module name on the command line, but type CNEXT instead. When the application is ready, do the following:
[Top]
The CAAAfrGeoCommand use case is made of a single class named CAAAfrChangeViewNormalCmd located in the CAAAfrGeoCommands.m module of the CAAApplicationFrame.edu framework:
| Windows | InstallRootDirectory\CAAApplicationFrame.edu\CAAAfrGeoCommands.m\ |
| Unix | InstallRootDirectory/CAAApplicationFrame.edu/CAAAfrGeoCommands.m/ |
where InstallRootDirectory is the directory where the CAA CD-ROM
is installed.
In addition, the command header that stands for this command in the CAAAfrGeometryWshop and that passes the parameter to the command is described with the workshop.
[Top]
To create the command that changes the current window viewpoint, there are three steps:
| # | Step | Where |
|---|---|---|
| 1 | Create the command and storing the argument | constructor |
| 2 | Set the camera axes | Activate method |
| 3 | Create the camera and assign it to the current window | Activate method |
[Top]
The command constructor is as follows.
CAAAfrChangeViewNormalCmd::CAAAfrChangeViewNormalCmd(void *iArgument)
                         : CATCommand("ViewNormalId",CATCommandModeExclusive)
{
   _ArgumentCmd = CATPtrToINT32(iArgument) ;
}
|
The command headers call the constructor with an argument that indicates the plane that should be normal to the sight direction. This argument is:
This argument is kept in the data member _ArgumentCmd. It is an
integer. The CATPtrToINT32 macro enables you to safely convert in
64 bits a pointer to an INT. See the referenced article [1]
to see instantiations of a command header class using the CAAAfrChangeViewNormalCmd class.
The
command is set as exclusive thanks to CATCommandModeExclusive.
Since it doesn't modify the document, it could be also set as shared, but since
it is a one-shot command, there is no possibility of selecting another command
before it completes.
[Top]
The Activate method first sets the camera axes depending on the
argument value.
CATStatusChangeRC CAAAfrChangeViewNormalCmd::Activate(CATCommand * iFromClient,
                                                      CATNotification * iEvtData)
{
  CATMathDirection direction, zenith;
  CATMathPoint origin(0.f, 0.f, 0.f);

  switch (_ArgumentCmd)
  {
    case 1 : direction.SetCoord(-1.f,0.f,0.f);
             zenith.SetCoord(0.f,0.f,1.f);
             break ;
    case 2 : direction.SetCoord(0.f,-1.f,0.f);
             zenith.SetCoord(0.f,0.f,-1.f);
             break ;
    case 3 : direction.SetCoord(0.f,0.f,-1.f);
             zenith.SetCoord(0.f,1.f,0.f);
             break ;
  }
  ...
|
The argument takes the value of 1 for a plane normal to the x axis, 2 for a
plane normal to the y axis, and 3 for a plane normal to the z axis. The camera
axes are made up of a sight direction axis that joins the eye and the target,
and a zenith axis perpendicular to the sight direction. 
These direction as set as CATMathDirection instances is the switch.
[Top]
  ...
  CATFrmLayout *pCurrentLayout = CATFrmLayout::GetCurrentLayout();
  if ( pCurrentLayout )
  {
    CATFrmWindow *pCurrentWindow = pCurrentLayout->GetCurrentWindow();
    if ( pCurrentWindow )
    {
      CATFrm3DCamera * pCameraImpl = new CATFrm3DCamera("cam3d",
                                                        origin,
                                                        direction,
                                                        zenith);
      CATI3DCamera *pCamera = NULL;
      HRESULT rc = pCameraImpl->QueryInterface(IID_CATI3DCamera, (void**)&pCamera);
      if (SUCCEEDED(rc))
      {
        pCurrentWindow->SetCurrentCamera(pCamera);
	pCamera->Release();
      }
      pCameraImpl->Release();
    }
  }
  return CATStatusChangeRCCompleted;
}
|
To set the camera axes as those of the viewpoint of the current window, the
layout is first retrieved thanks to the static CATFrmLayout::GetCurrentLayout
method, and then the current window is retrieved from this layout using GetCurrentWindow.
Then a 3D camera is instantiated with the eye location, sight and zenith
directions determined with respect to the argument passed, that is, with respect
to the View->Normal View item selected by the end user, and a pointer to the CATI3DCamera
interfaces is retrieved from this camera. This pointer is assigned to the
current window whose viewpoint changes to match the camera thanks to the SetCamera
method.
[Top]
A command can be passed a parameter to enable a single command to act as if several commands were offerred to the end user. These end user commands should nevertheless be close to each other. There is a command header for each end user command that instantiates the command and passes the parameter value appropriate to the end user intent, and the command tests this value to do the corresponding task.
A camera is an object that can be assigned to a window to set or reset the viewpoint characteristics of the window, that is, the eye location, and the sight and zenith directions.
[Top]
| [1] | Creating Standard Command Headers |
| [Top] |
| Version: 1 [Jan 2000] | Document created |
| Version: 2 [Mar 2004] | 64 bits |
| [Top] | |
Copyright © 2000, Dassault Systèmes. All rights reserved.