CATDefaultCollectionStandard environment
variable which is set to installation_folder\resources\standard
by default.Two sets of .xml files are provided:
- CATStdLayerAndFilter.xml and CATStdTypeLayerAndFilter.xml for part documents
- CATDftStdLayerAndFilter.xml and CATDftStdTypeLayerAndFilter.xml for .CATDrawing documents.
The default values set in these samples can easily be customized to address your needs, provided that you are logged as administrator.
This scenario aims at explaining how to modify the standard parameters
for layers and filters either by using the
interactive editor, or by editing the .xml
standard file.
The CATStdLayersAndFilters.xml is taken as an example but the method is
identical for editing the CATDftStdLayersAndFilters.xml file which is also
available in the General category.
Prior to modifying standards, you need to set
the CATCollectionStandard environment variable to
identify the location where your customized standards will be saved. For detailed information on how to set environment variables, refer to Customizing Your Environment on Windows (or on UNIX depending on your operating system). |
Using the interactive editor
![]()
-
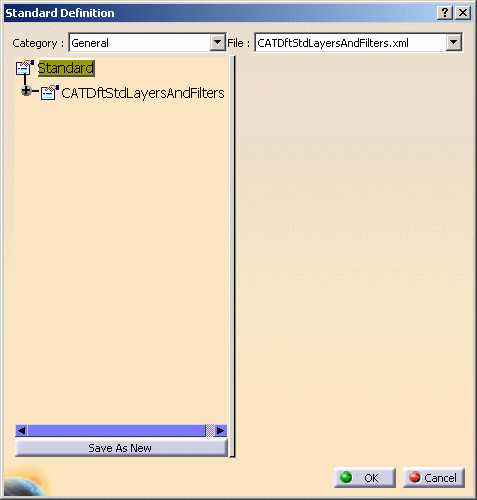
Select Tools > Standards to access the interactive standard editor:
-
Check that the General category is selected then from the file list, select the CATStdLayersAndFilters.xml file.
-
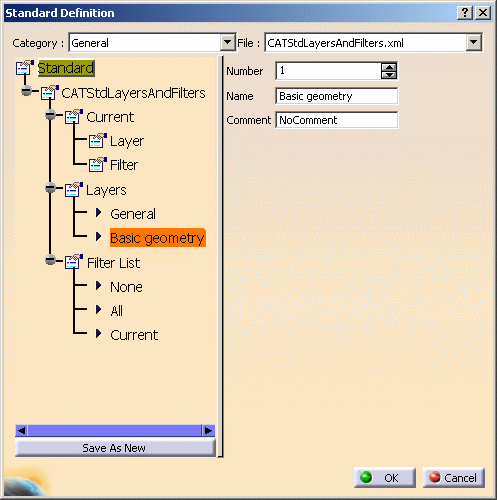
Click the plus sign next to the CATStdLayersAndFilters node then repeat this step for each node to display the complete XML tree structure with the values defined by your administrator.
As you can see in the picture below, standard properties have been defined for the following instances:
-
current layer and filter
-
2 layers named General and Basic geometry.
Refer to Assigning Objects to Layers for detailed information on how to use layers -
3 filters named None, All and Current.
Refer to Using Visualization Filters for detailed information on layer filters.
More precisely, our example shows that the layer Basic geometry has been assigned number "1" without any comment:
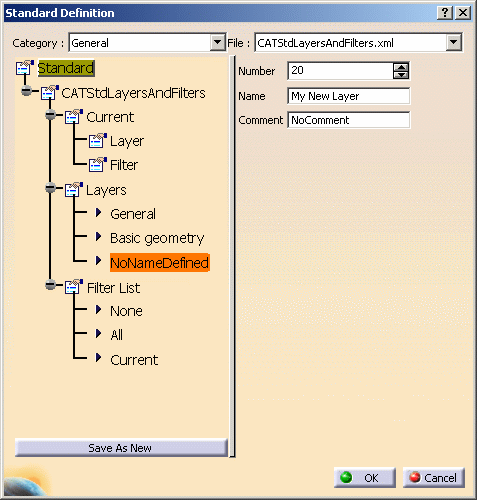
Now let's suppose you want to add a new layer. To do so: -
-
Select the Layers node from the tree structure then click Add instance to the right.
This creates a new instance in the tree structure which is named "NoNameDefined" by default. -
Select the created instance, i.e. "NoNameDefined" then assign a number (the value must be comprised between 0 and 999) to the layer, a name of your own choosing as well as a comment (if necessary) in the corresponding boxes as shown below:
-
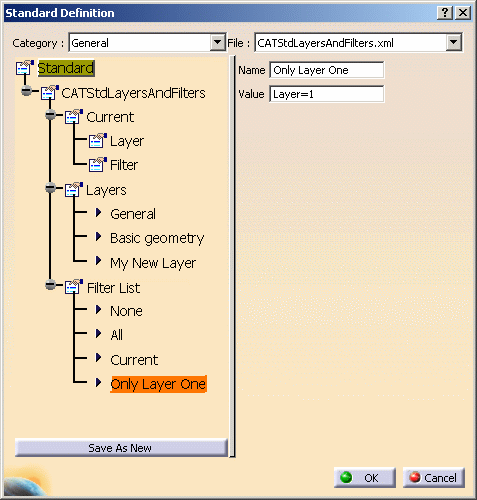
To create a new filter, select the Filter List node then click Add instance.
-
Select the created instance (NoNameDefined) then enter a name and a value:

You can modify any box value anytime simply by selecting the desired instance then entering the new value in the corresponding box. -
If you are not satisfied with an instance, select the node under which you want to remove an instance then click Remove instance (in our example, we choose the Layers node).
This opens the following dialog box which displays the list of available instances for the selected node: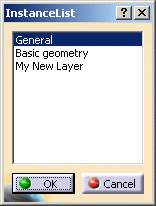
Just select the instance to be deleted then click OK to validate. -
When finished, you can:
-
click OK to save the modifications in the CATStdLayersAndFilters.xml file. A pop-up message will inform you that the modified standard file has been saved in the directory specified when setting the
CATCollectionStandardvariable -
click Save As New to save the modifications in a new .xml file. Clicking this button opens the Save As dialog box which places you in the directory you specified when setting the
CATCollectionStandardvariable. This new file will then be accessible from the File list.
You cannot change the default name of standard files included in the General category. For these files, the Save As New button can only be used to generate a new file in another directory but still with the same name. -
Editing the XML file
XML files can be customized in a simple way, for instance to add new layers and filters, provided that you respect some syntax rules detailed hereafter.
-
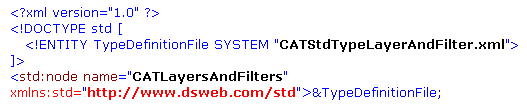
Open the CATStdLayerAndFilter.xml file in your XML editor. This file is made up of the following parts:
- XML starting tags indicating the format as well as the name and type of the file:
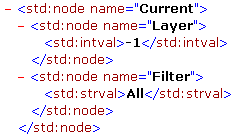
- data related to the "Current" layer and filter, i.e. the
layer to which objects are assigned and the visualization filter
set as current. We recommend that you leave these data unchanged
to avoid any trouble or misunderstanding.
In our example, the value "-1" corresponds to the layer "None" which means that there is no current layer:
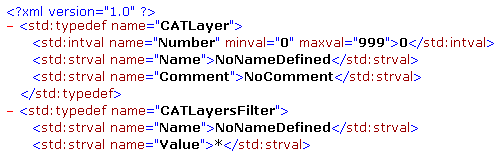
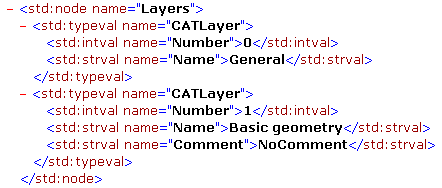
- the list of layers declared in this standard file. This list
is surrounded by
<std:node name="Layers">at the beginning and</std:node>at the end.
Two layers have been defined in our example, each layer definition containing a Number and a Name (a Comment may be added, if necessary):
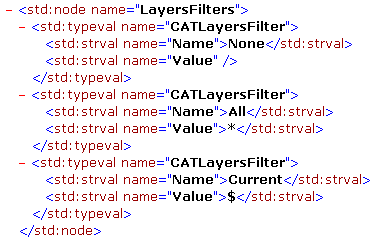
- the list of layer filters. This list is surrounded by
<std:node name="LayersFilters">at the beginning and</std:node>at the end.
Three filters have been defined in our example, each filter definition containing a Name and a Value:
- the file ends with the tag
</std:node>.
-
To declare a new layer, you just have to add a
<std:typeval name="CATLayer">...</std:typeval>sequence to the "Layers" node. For instance:<std:typeval name="CATLayer">
<std:intval name="Number">50</std:intval>
<std:strval name="Name">My new layer name</std:strval>
</std:typeval>Note that the layer number must be comprised between 0 and 999.
-
To declare a new filter, add a
<std:typeval name="CATLayersFilter">...</std:typeval>sequence to the "LayersFilters" node.For instance:
<std:typeval name="CATLayersFilters">
<std:strval name="Name">Only Layer One</std:strval>
<std:strval name="Value">Layer=1</std:strval>
</std:typeval>As you can see it in the above example, a filter must be created using a layer number. However, neither filter value nor filter definition needs the layer to be declared. For instance, you can enter:
<std:typeval name="CATLayersFilters">
<std:strval name="Name">My Filter</std:strval>
<std:strval name="Value">Layer=0 + Layer=50 + Layer=100</std:strval>
</std:typeval>even if "Layer 100" does not exist.
You can even use more complex expressions such as "
Layer=0
             + (Layer>50 & Layer<100)
" but the simpler, the better. -
When finished, save the modified .xml file.
The new standards for layers and filters are applied to any documents you create from now on.
![]()