-
Select Tools > Customize or right-click any icon in any toolbar then select Customize to open the Customize dialog box:
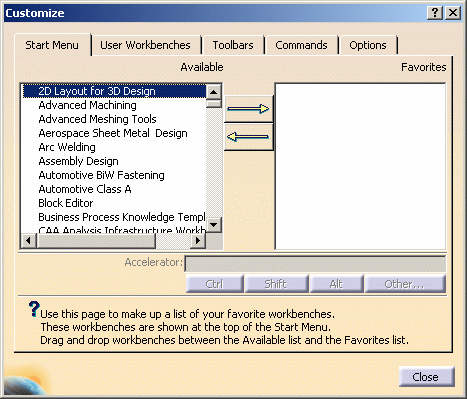
The dialog box contains three tabs: - Start Menu: customizes the Start menu and workbench access icons (as described in Accessing the Navigation Tools)
- User Workbenches: lets you create your own workbenches
- Toolbars: lists the currently visible toolbars (default)
- Commands: lists the commands you can drag and drop onto a toolbar
- Options: contains general customization options.
-
Access the Commands tab to list the commands available.
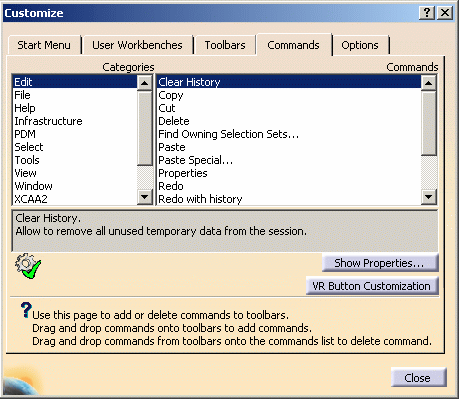
The grey frame below the Categories and Commands lists gives you information on the selected command. When there are more than two lines of text, the arrows displayed to the right are grayed out to let you scroll up or down. 
The category All Commands lists all commands available for the workshop you are working in as well as global commands (e.g. Open, Save, etc.). -
Select a category (menu name), then double-click a command, or select it and click Show Properties....
The Command Properties frame is added to the bottom of the dialog box: 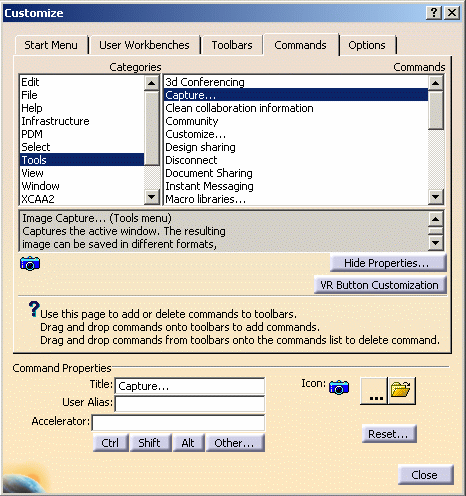
-
Enter a new name for the command, if needed, in the title box.
-
Click Ctrl, Shift and Other to include them in the shortcut displayed in the Accelerator box.
- It is recommended to start the shortcut with a special character such as Ctrl, Shift or any function key. Otherwise, the shortcut will work on UNIX only and not on Windows
- If the command you are customizing is not represented in a toolbar, a menu bar, etc., the Accelerator box is grayed out to prevent you from defining a new accelerator or from using an already existing accelerator. In that case, simply drag and drop the command onto any toolbar to activate the Accelerator box.
-
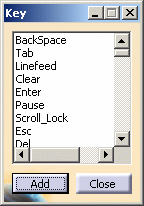
If you want to use another key, click Other... to see the list of available keys:
-
Select a key then click Add, or double-click a key.
-
Click ... to the right of the Icon option (bottom right).
This displays the Icons Browser which lets you access all the graphic icons installed with the Version 5 software, then browse to select the appropriate icon: 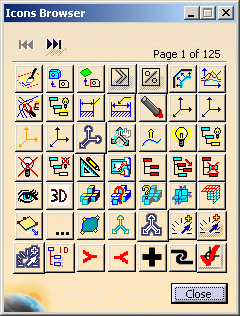

By default, only Version 5 icons are displayed in the Icons Browser. If you want to be able to pick customized icons, proceed as follows: - first, create a directory ending either with
...\icons\normalor...\icons\small. - then, according to the size of your icons, put them in the appropriate directory
- access the Environment Editor and valuate the CATGraphicPath variable with the beginning of the path to the directory you created but without mentioning "\normal" or "\small": in our example, you simply enter "e:\users\icons"
- click OK to validate then re-access the Icons Browser: your customized icons are displayed and you can associate them to commands.
However, keep in mind that: - bitmap images exceeding 24 bits per pixel are not supported
- it is recommended to provide command icons in two
different sizes which are to be stored into the
corresponding directories (as explained above):
- small: 16x16. This size is always used in menus. It is used in toolbars if the Large Icons check box is cleared in the Options tab
- normal: 22x22. This size is used in toolbars if the Large Icons check box is selected in the Options tab
- the color applied in background is the color of the pixel in the top left corner.
Note also that if the customized icon you select is too big, it is replaced by a default image in the Command Properties frame: 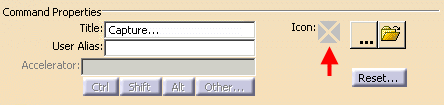
- first, create a directory ending either with
-
Click an icon then click Close (if you used the Icons Browser).
The icon is now displayed for the command in the Commands tab, and Show Properties... changes to Hide Properties... as shown below: 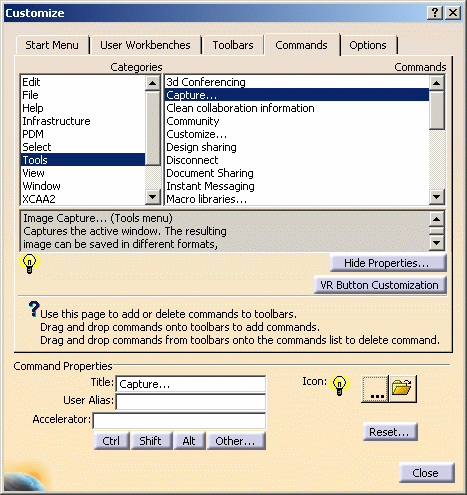
-
Click
 to open the File Selection dialog box which lets you browse
your file tree to select your own icons. You just have to select the
desired icon then click Open.
to open the File Selection dialog box which lets you browse
your file tree to select your own icons. You just have to select the
desired icon then click Open.If you want the selected icon to be taken into account in Version 5, you need to access the Environment Editor and valuate the CATGraphicPath variable with the path to the directory containing the icon. Otherwise, you will still be able to select the icon in the File Selection dialog box but it will not be taken into account in your session.
-
Click Reset... to access the reset options.
You can: - restore the original settings of the present command
- or restore the original settings of all commands in the present category.
-
Click VR Button Customization to access the Button Customization dialog box which lets you assign any command or macro to a device button.
For detailed information, refer to Customizing Buttons in this guide. -
Click Close.
![]()