-
Select an object.
In our example, select the line. 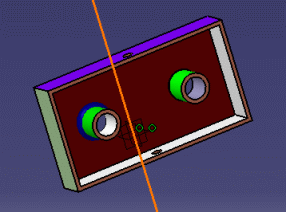
-
Click Hide/Show
 in the View toolbar, or select View > Hide/Show >
Hide/Show.
in the View toolbar, or select View > Hide/Show >
Hide/Show. Note that you can also right-click the object then select Hide/Show. The object (the line in our example) is no longer displayed: it has been transferred into the No Show space. Note also that if you have several document windows open containing the same objects, the object is transferred to the No Show space in each document window.

When selecting multiple elements, all the selected elements are processed in one step and as a whole. There is no individual process, whatever the original space of each selected element. This means that all the selected elements are in the same final state: - if all the selected elements are in the Show space, clicking Hide/Show transfers them all to the No Show space
- if all the selected elements are in the No Show space, clicking Hide/Show transfers them all to the Show space
- if the multi-selection is heterogeneous, clicking Hide/Show transfers the selected elements either to the Show space, or to the No Show space ; the result is unpredictable.
-
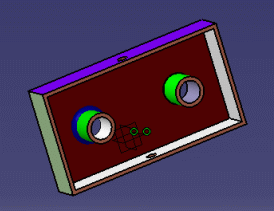
Click Hide/Show
again to display the object in the Show space.
After selecting an object, you can select Edit > Properties, click the Graphic tab, and look at the Shown check box to know whether the object is hidden or not:
means that the object is in the Show space
means that the object is in the No Show space.
This check box is displayed for your information only, the Properties dialog box does not let you modify the object visibility.
A component placed in the No Show space in the product structure appears in low highlighting in the tree.
![]()