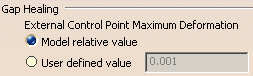
Gap Healing
-
Model relative value (corresponding to the Identical Curves Value defined by the model): External Control Points are modified according to the model's value or tolerance.
|
|
It is the default value. |
-
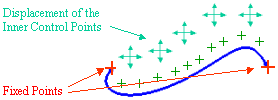
User defined value (External Control Point Maximum Deformation): Here is a schema to explain the position of the External Control Points, before activating this option:

The displacement of the External Control Points after activating this option:

This window allows you to optimize and control the quality of the geometry and to obtain C2 Continuity (deformation is possible).
Examples in the CATIA - V4 Integration User's Guide: Customizing, will help you to understand How to use Gap Healing.
![]()
Curvature Improvement (Maximum Deformation)

Curvature Improvement has an impact on Inner Control Points. Inner Control Points are modified (displaced) according to the value defined by the following options. If you select the Inner Control Point Maximum Deformation option, the Curvature Improvement value can be modified.
- Model Relative Value: Use the default value (corresponding to the Projection Point tolerance defined by the model).
|
|
It is the default value. |
If you choose this option, the value which is taken into account is the maximum value between the V5 resolution value (10-3) and the Projection Point tolerance value (10-3 for instance, in V4) for a model dimension of 10 000m.
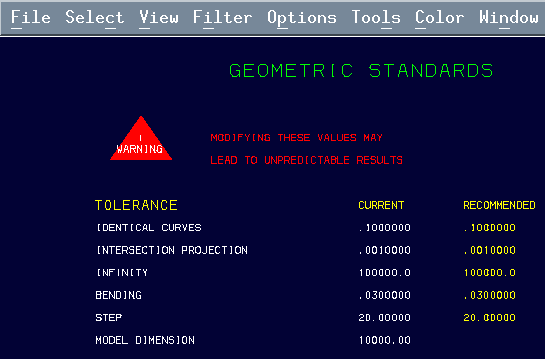
For a model dimension of 10m, the standard value of the Curvature Improvement is 0.001mm (corresponding to the V4 model's value). In CATIA V4, the geometric standards are listed in the following dialog box:
In order to understand Curvature Improvement results, please refer to the scenario How to use Curvature Improvement, described in the CATIA - V4 Integration User's Guide, in Customizing.
User defined value: Inner Control Point Maximum Deformation (User Value)
If the Inner Control Point Maximum Deformation value is equal to 0, the geometry is broken and an edge is created for each patch limit.
To decrease the number of cells/patches in the geometry, you need to select this option (default value) and to increase the tolerance/curvature improvement. The unit is the millimeter (V4 model unit in general).
![]()
Surface and Curve Sub-elements (Segmentation)
|
|
By default, this option is cleared. |
By default, the Keep Segmentation option is not selected, the simplification of the geometry is active:
- If you want to reduce the geometry data size, select this option.
- If you want to keep the same number of sub-elements, deselect this check-box.
For instance, two arcs and two surfaces with a C2 Continuity can be transformed into a single patch or arc in order to simplify the geometry. But if you keep the patch segmentation, these arcs and surfaces are not simplified.
Migration of DETAILS spaces used by dittos
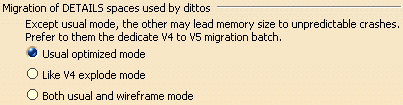
Copying / Pasting DETAILS and DITTOS into CATIA V5:
Usual Optimized Mode:
- only the "reference" solids are taken into account,
- they are copied AS RESULT With Link (CARWL),
- they keep the same place as the DITTOS', with the same scale,
- this link is associative: if you modify the "reference" body in the No Show space, the ones of the CARWL are also modified.
- the DITTOS' s geometry is not created for each DITTO; it is stored as a Reference in the Geometrical Set (in No Show).
|
|
It is the default value. |
Both Usual and Wireframe Mode:
- same behavior like Usual Optimized Mode, but in this case, the "reference" geometry is copied AS RESULT in an OpenBoby under each DITTO. It has the same scale as the DITTO's geometry.
- there is no associativity between the "reference" geometry and the DITTO's.
Like V4 Explode Mode:
- same behavior like Both Usual and Wireframe Modes, but the "reference" Bodies are not CARWL, but Past As Specified in Part Document".
- There is no associativity with the Reference.
![]()
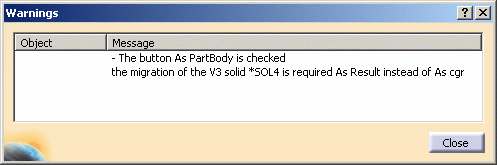
Migrating Isolated Mock-Up Solids
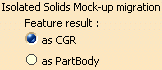
- as CGR,
|
|
It is the default value. |
- or as PartBody.
For the Isolated Mock-Up Solids' migration into CATIA V5, you can choose between:
- the SolidM conversion as CGR: if you want to get only the meshing view (visualization mode).
- the SolidM conversion as PartBody: if you want to be able to see the Geometry of the Solid, to edit it and obtain an exact Solid.
![]()
3D Text Migration
|
|
By default, this option is cleared. |
For information, after the migration, if you want to create Annotations in CATIA V5, you can select Insert > Annotations > Text with Leader.
If the Keep 3D Text button is checked, the migration of V4 3D Texts into V5 Annotations is possible when they are associated to the following features:
- All geometrical objects: Points, Curves, Surfaces.
- Axis.
- Solids, Volumes and Skins if the Text is set on the Solid, on the Volume or on the Skin. If for instance, a solid is migrated and one of its Faces has an associated Text, this Text will not be migrated.
- Faces migrated independently (that is to say out of solid's context, Skin's context, etc.) will have their associated 3D text migrated.
- If V4 entities to be converted are numerous, we advise customers against converting 3D Text from V4 into V5, which can lead to high CPU time consuming.
- V4 3D text properties such as color, font, size, etc., are not migrated into V5.
- Concerning other elements (Dittos, etc.), the migration of V4 3D Text cannot occur.
![]()