RADE
|
Source Code Manager
|
Administration
Managing SCM servers and databases |
| Use Case |
Abstract
This article is written for the SCM administrator. The first part
presents a global view of the SCM system and the second part describes the
commands related to administrative tasks..
|
Global Architecture
The SCM product supports a client/server architecture. Two types of hosts
are involved in the execution of a SCM command:
- The client machine: any command is executed locally on the user's host
and connects to the SCM server host(s) to retrieve information
- The server machine: at least one machine is dedicated for managing SCM
repositories and where SCM daemons are running.
When a command is running, it is connected with several daemons running on
one or several distant hosts (SCM servers).
Fig 1: Single Server Architecture
 |
|
The figure 1 shows the location of processes involved in
the execution of one SCM command running on a client host:
- Connections are established with different daemons depending on the
information to be registered or retrieved
- The "File Contents Server" process manages its own repository.
- The "Monitor" process manages data in SCM database.
- Data for configuration management are stored in database.
The same database can be shared with the "Monitor" process.
|
The global architecture can be more complex depending on the size of
software projects and the number of people involved in. It is possible to have
several machines on which several File Servers and SCM databases processes have
been installed. Whatever the number of databases or File Servers is, the way
commands work is the same, the complexity is often just seen by the SCM
administrator (the end user is not aware of it).
Fig 2: Multiple Servers Architecture
 |
|
The figure 2 shows that several File Servers and databases
can be accessed by a single command. This can occur when the command is
executed from a multi-tree workspace whose trees are managed in different
databases and whose associated source files are registered in different
File Servers.
There is only one "Monitor" process running on one server because its
purpose is to control operations on all databases. |
[Top]
Databases
There are two kinds of databases managed by SCM:
- SCM databases
- File Server databases.
A SCM database is used for storing any data that are not source files. It is
created by the Oracle or DB2 administrator and
is known by SCM commands using its SID (SID = System Identifier = a unique name
for an Oracle database instance). One or more databases can be used depending
on the amount of data and the number of users to manage.
Multiple databases can be used for storing
either:
- Monitor process' data
There is only one database of this type, known as the monitor
database
- Site information (1 database )
There is only one database of this type, known as the central
database
- Configuration management specific data
There can be several databases of this type, known as departmental
databases
The File Server database is a repository managed by a FileServer and whose
purpose is to store any user file. This kind of database is
initialized by the SCM administrator using
the File Server program.
Depending on the number of servers available and their characteristics, it
is possible to install on a same host one SCM database and one File Server but
having several File Servers or several SCM databases on a same host is not
interesting.
[Top]
Trees
(Workspace) Trees are the first "objects" to be created when starting with
SCM. A tree is created by specifying:
- A name
- A database name
It will contain Configuration Management data related to objects managed in
workspaces belonging to this workspace tree
- A host name and a port number identifying a File Server
It will manage all source files for workspaces belonging to this workspace
tree
Any combination of File Servers and databases is possible. The following
figures show how several trees can be managed. One important thing to know is
that multiple databases or File Servers should be installed on different hosts,
providing better performance.
[Top]
Accessing Administrative
Commands
Commands are available in search path after executing the tck_profile
command with an appropriate TCK. Two TCKs are generated when installing a
CD-ROM [1]: one for all users and one for the SCM
administrators only. This second TCK gives access to administrative commands
like:
- adl_lock_base, adl_unlock_base
- adl_ls_contents_server, adl_mk_contents_server
- adl_mk_tree, adl_ren_tree, adl_rm_tree, adl_set_tree
- adl_mk_root_ws
- adl_monitor, adl_mo_admin
- adl_file_server, adl_fs_admin
- adl_upgrade_db
For instance, after having downloaded a CAA V5 Tools CD-ROM under the path "C:\Program
Files\Dassault Systemes\T04D28", execute the tck_profile command and list
the available TCKs:
C:\> "C:\Program Files\Dassault Systemes\T04D28\intel_a\code\command\tck_init.bat"
C:\>tck_list
SCM_adm_V5R5_T04D28 SCM_adm_V5R5_T04D28
V5R5_T04D28 Mkmk_SCM_V5R5_T04D28 SCM_V5R5_T04D28
C:\>
|
The "V5R5_T04D28" TCK corresponds to
the tools brought with the CD-ROM and the "SCM_adm_V5R5_T04D28" TCK gives
access to SCM administrative commands. Here is an example of the traces
produced when calling the tck_profile command.
C:\>tck_profile SCM_adm_V5R5_T04D28
------------------------------------------------------------------------
SCM Variables:
----------------------------
ADL_LEVEL=5
ADL_DIFF_LOCAL=N
ADL_DIFF_LOCAL_PATH=C:\DownloadADLV5
ADL_PATH=C:\Program Files\Dassault Systemes\T04D28\intel_a
------------------------------------------------------------------------
User log cleaner started
User log cleaner ended
C:\>
|
SCM commands are now available in path.
[Top]
Creating Databases
Before creating databases, people must have checked
- how many organizations are going to use the Workspace Manager
- how many people will be involved in development projects
- what is the target hardware for installing SCM and File Server databases
Thinking about these topics should lead to choose a global architecture from
the ones described in Trees section.
[Top]
How Many Databases Are Needed?
We advise to start with a single SCM database and a single File Server
database. It is not needed to set up several databases at the beginning except
if SCM is intended to be used by hundreds of developers. Depending on the
number of SCM users the SCM database is created with different characteristics
(initial size of tablespaces, size of extents, etc). Three types of database
can be set up: small, medium and large:
- small database: for managing a small organization (up to 20 developers)
and 2 or 3 workspaces per user. The number of files should be under 5000
files.
- medium database: for managing between 50 and 100 developers and up to
20000 files.
- large database : for bigger organizations or for managing lot of files.
Is it possible to add new databases for supporting new teams?
Yes it is possible. The method would be to let the first created database as
the monitor database and let the new databases
be the departemental databases, that is to say by creating new trees in the new
databases.
[Top]
SCM Databases
The SCM initialization is performed once an empty database (or instance) has
been created. Please refer to the Oracle or DB2 documentation for this task.
To complete the initialization, you must connect to the new database as
administrator (DBA) and perform the following tasks:
- Create the SCM account and possibly the associated profile
This account will be used both in step 2 and when installing a new SCM
version that needs to upgrade existing databases
- Create the SCM tables.
There are three kind of tables to be created depending on the futur use of
the database being initialized:
- Tables for the "Monitor" process
- Tables for site information
- Tables for configuration management data (trees, workspaces,
components, etc)
The three kinds of tables can be created in a single database as well as in
different databases but
- Tables for the "Monitor" process should be created in only one database
- Tables for site information should be created in only one database (often
the same as the one used by the Monitor).
This database is known as the central database
(cdb).
- Tables for configuration management data are created in each database
whose purpose is to store workspace trees.
Such databases are known as departmental
databases (dept)
The creation tasks are performed by SQL programs that are generated by the
adl_admin_site command. Here is the command lines to execute:
E:\> adl_admin_site -init_db -db_user xxx -db_type monitor -db_size medium -target_dir c:\temp
E:\> adl_admin_site -init_db -db_user xxx -db_type cdb -db_size medium -target_dir c:\temp
E:\> adl_admin_site -init_db -db_user xxx -db_type dept -db_size medium -target_dir c:\temp
|
As shown above the adl_admin_site command must be executed three times to
get the SQL programs for the three kinds of tables. Those programs are
generated under the directory specified by the -target_dir option.
E:\> dir C:\TEMP\*.sql
 Directory of c:\temp

06/10/00  16:07                 25 978 CreateTablesCdb.sql
06/10/00  16:07                 66 736 CreateTablesDept.sql
06/10/00  16:03                  3 874 CreateTablesMonitor.sql
06/10/00  16:07                    262 DropTablesCdb.sql
06/10/00  16:07                  1 446 DropTablesDept.sql
06/10/00  16:03                    151 DropTablesMonitor.sql
06/10/00  16:07                    695 EstimateStatisticsCdb.sql
06/10/00  16:07                  3 390 EstimateStatisticsDept.sql
06/10/00  16:03                    387 EstimateStatisticsMonitor.sql
06/10/00  16:07                  3 209 InitInstanceCdb.sql
06/10/00  16:07                  3 209 InitInstanceDept.sql
06/10/00  16:03                  3 209 InitInstanceMonitor.sql
              12 File(s)        112 546 bytes
|
Step 1: the InitInstanceXXX.sql program is the first one to be
executed and must be executed only one time on a given database, i.e. if only
one database is used for managing monitor, site and configuration management
tables, only one of InitInstanceCdb.sql, InitInstanceDept.sql
and InitInstanceMonitor.sql programs will be used.
Step 2: each of the CreateTablesXXX.sql programs must be executed on
the database that will manage XXX information. If a single database is used,
the three programs must be executed on it.
Notice: several tables are duplicated between databases and then the SQL
programs can generate errors when a single database is used.
Step 3: the EstimateStatisticsXXX.sql programs must be executed
regularly (weekly for instance) to keep performances to be the best.
Note: the DropTablesXXX.sql programs are provided just for cleaning up a
database before restarting its creation. They must not be used in a normal
database initialization process.
[Top]
SCM Databases Connection
By default, the connection to SCM databases is done with "adl" user and "adl"
password. To use another user and/or password, execute the adl_admin_site
command:
E:\> adl_admin_site -init_db_connect -db_user user -db_password password
|
This command stores the user and the encoded password in the site profile.
So, this command must be executed after the installation on each machine.
[Top]
File Server Data
 Prerequisites: "Monitor" and site information tables must have been created and
the Monitor started.
Prerequisites: "Monitor" and site information tables must have been created and
the Monitor started.
File Server data are composed of two root directories into which the File
Server will format its own repository files. Here are the steps to follow to
create a new file Server database.
Step 1: declare the new File Server in the central database by the
adl_mk_contents_server command
- Specify the name of the host where the File Server will be launched
- Specify the port number on which it will be listening
- Give a brief description of its purpose (for information only)
E:\> adl_mk_contents_server -host tartampion -port 23451 -desc "file server for CAA dev project"
Creating the contents server with the host name "tartampion" and the port number 23451 Command successful.
|
Step 2: log on the host where the File Server will be launched
- Use the SCM administrator identity
- Create two directories on one (or two) disks local to this host
(reliability is not ensured when using network file systems)
E:\> mkdir E:\FileServer\FSFiles
E:\> mkdir E:\FileServer\FSData
|
- Format these directories by starting the File Server using the -format
option
- Take care that the -format option must be used only when
initializing a new File Server since any data under the two directories
will be lost
- Specify the first directory by using the -files option
- Specify the second directory by using the -data option
- Specify the port number by using the -port option (as
registered at step 1)
E:\> adl_file_server -files E:\FileServer\FSFiles -data E:\FileServer\FSData -format -port 23451
Formatting storage area. The format procedure is successfully terminated. E:\>
|
Step 3: when started with the -format option, the File Server stops
after few seconds. The corresponding repository is then ready to store source
files. Read the "How to start it" section to
know how to start the File Server.
[Top]
The SCM Daemons
There are two types of daemons running on SCM servers: the Monitor and one
or several File Servers.
The Monitor
Purpose
The Monitor is the first program to be run since it controls all operations
performed in all databases (SCM, File Server).
Its purpose is
- to log every commands run on the site
- to manage concurrent access on objects like trees, workspaces, images
- to trigger recovery mechanism after a command crash
[Top]
How to Start It
Log on the host where the Monitor will be launched and change to the SCM
administrator identity.
Set up the current environment using the
TCK for administration and execute the adl_monitor
command.
Note that the '&' character can be used on Unix platform for running the
process as a background process. It is not possible to run it the same way on
Windows platform. SCM provides the adl_admin_site command for
registering a service for that purpose.
[Top]
How to Stop It
From any host and being the SCM administrator, set up the current
environment using the TCK for administration and execute the
adl_mo_admin command with the -stop option. This option
causes the Monitor to wait for the current active commands to finish and then
stop.
E:\>adl_mo_admin  -stop
# ADLMo - 0100: Monitor will stop at the end of the currently processed commands
|
The -abort option can be used for stopping the Monitor by aborting
any running command.
E:\>adl_mo_admin  -abort
The monitor is aborting
|
Please, consult the "Monitoring Commands"
section for learning more about the adl_mo_admin command.
[Top]
Using Windows Services
On Windows platform, the adl_admin_site command provides
the -create_service for registering a new service to launch a SCM daemon
(Monitor, File Server or Multi-site Transfer Manager) on the host where the
service is declared.
To declare a service for the monitor, log on the SCM server having system
privileges, use the TCK for administration
to have access to the adl_admin_site command and execute the following command
line:
E:\>adl_admin_site -create_service -service_type monitor -start_at_boot
|
The -start_at_boot option is used for specifying to the service system
manager that the given service must be started at boot time.
Starting The Monitor Service
Fig 7: Control Panel/Services
 |
|
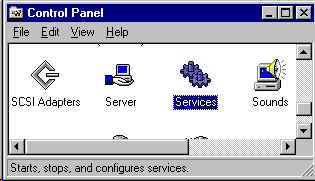
The adl_admin_site command just declares a new
service but does not start it. To start the monitor, use the Windows
service tool. This tool is found by opening the "Start/Settings" menu and
selecting the "Control Panel" item.
Then run the "Services" programs and find the service named
"SCM Monitor V5R5_T04D28"
where V5R5_T04D28 is the TCK corresponding to the monitor installation. |
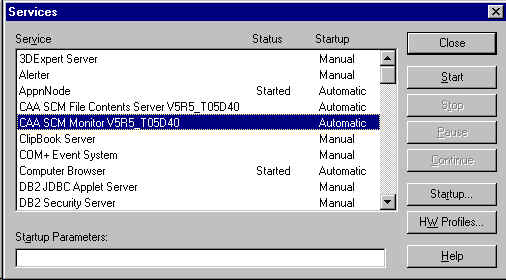
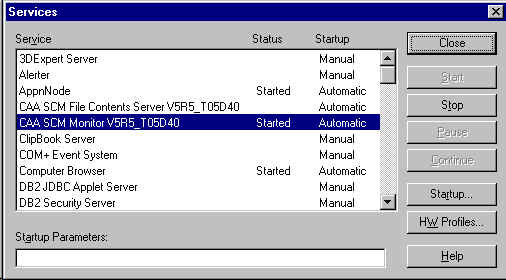
Fig 8: Starting the Monitor Service
 |
|
To start the Monitor service, select the
corresponding line and click on the "Start" button:
- a popup window appears while the service is starting
- the service status changes to "Started" when the service has been
started
The way the service is started (manual or automatic) can be changed
whatever the service was registered using the adl_admin_site command. The
startup type can be also changed to "Disabled" if you want to prevent the
system (or anyone) to start the Monitor for a while. |
Only one service can be created on a given host for a given daemon and a given
installation.
[Top]
Stopping the Monitor Service
Fig 9: Stopping the Monitor Service
 |
|
Open the "Services" program like when starting
the Monitor service, select the line corresponding to the monitor and click
on the "Stop" button:
- a popup window appears while the service is stopping
- the "Started" status disappears
|
If a File Server service has been registered on the same host and has been
started, the "Services" program will display a message indicating the File
Server will be stopped too.
[Top]
The File Server
Purpose
The File Server is a process that receives requests from SCM commands for
storing or extracting files.There is no direct user commands for requesting it,
all requests are performed by workspace commands.
One File Server can store files for one or several workspace trees wherever
these trees are managed (in one or several SCM databases, on a single or
different servers).
[Top]
How to Start It
Log on the host where the File Server will be launched and change to the SCM
administrator identity.
Set up the current environment using the
TCK for administration and execute the adl_file_server
command:
- Specify the File Server directories by using the -files and -data
options
- Specify the port number by using the -port option
E:\>adl_file_server -port 23451 -files E:\FileServer\FSFiles -data E:\FileServer\FSData
Recovery start.
Processing REDO log.
REDO log processed.
Recovery stop.
Server start.
|
The process is then ready to server requests.
Note that the '&' character can be used on Unix platform for running the
process as a background process. It is not possible to run it the same way on
Windows platform. SCM provides the adl_admin_site command for
registering a service for that purpose.
[Top]
How to Stop It
The adl_fs_admin command is used for monitoring File
Servers. It provides the -stop and -abort options for
stopping a File Server.
From any host and being the SCM administrator, set up the current
environment using the TCK for administration
and execute the adl_fs_admin command with the -stop option. This
option causes the File Server to wait for the current active commands to finish
and then stop.
E:\>adl_fs_admin -host algue -port 23451 -stop
|
The -abort option can be used for stopping the File Server by
aborting any active transaction.
E:\>adl_fs_admin -host algue -port 23451 -abort
|
Note: even if the adl_fs_admin command finishes, the File Server may take
few seconds to stop because some sub-processes must stop first before the main
process can stop itself. The adl_fs_admin command can be used for testing
whether a File Server is running or not:
E:\>adl_fs_admin -host algue -port 2340 -ping
While opening a connection with "algue:2340" (host:port_offset).
# ADLSOCK - CONNECT: The connection was rejected.
Check network and server machine with "ping" or "ftp" command.
|
[Top]
Using Windows Services
On Windows platform, the adl_admin_site command provides
the -create_service for registering a new service to launch a SCM daemon
(Monitor, File Server or Multi-site Transfer Manager) on the host where the
service is declared.
To declare a service for the File Server, log on the corresponding SCM
server having system privileges, use the TCK
for administration to have access to the adl_admin_site command and execute
the following command line:
E:\>adl_admin_site -create_service -service_type fcs -port 23451 -fs_files E:\FileServer\FSFiles -fs_data E:\FileServer\FSData -start_at_boot
|
The -start_at_boot option is used for specifying to the service system
manager that the given service must be started at boot time.
The parameters of the -port, -fs_files and -fs_data options must be those
specified when initializing the File Server repository (see
File Server Database).
If the File Server service is registered after having registered the Monitor
Service, a dependency is set up between the two services that will cause the
Monitor to be automatically started (if it is not already started) when the
File Server is being started.
[Top]
Starting the FCS Service
Fig 10: Control Panel/Services
|
|
The adl_admin_site command just declares a new
service but does not start it. To start the File Server, use the Windows
service tool. This tool is found by opening the "Start/Settings" menu and
selecting the "Control Panel" item.
Then run the "Services" programs and find the service named
"SCM File Contents Server V5R5_T04D28"
where V5R5_T04D28 is the TCK corresponding to the File Server installation. |
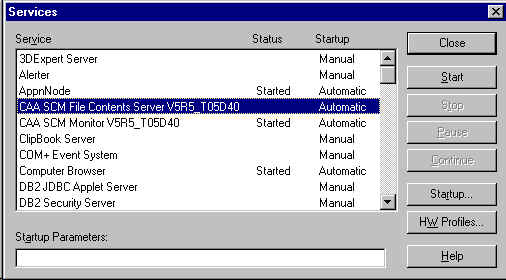
Fig 11: Starting the FCS Service
 |
|
To start the FCS service, select the
corresponding line and click on the "Start" button:
- a popup window appears while the service is starting
- the service status changes to "Started" when the service has been
started
The way the service is started (manual or automatic) can be changed
whatever the service was registered using the adl_admin_site command. The
startup type can be also changed to "Disabled" if you want to prevent the
system (or anyone) to start the File Server for a while. |
[Top]
Stopping the FCS Service
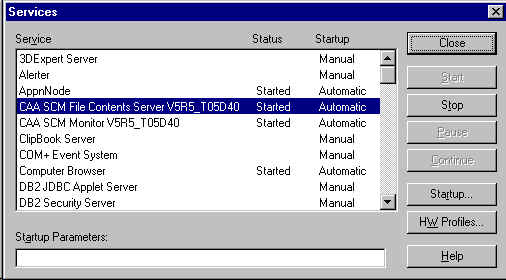
Fig 12: Stopping the FCS Service
 |
|
Open the "Services" program like when starting
the FCS service, select the line corresponding to the File Server and click
on the "Stop" button:
- a popup window appears while the service is stopping
- the "Started" status disappears
|
[Top]
The Intersite Transfers
It is possible to work on the same project, even if the different developers
are located on different sites. For this purpose, see the documentation related
to the [2] intersite transfers.
The Multi-site Transfer
Manager
Purpose
The Multi-site Transfer Manager controls data replication between multiple
SCM installations. Having two installations on a W.A.N., launching the Transfer
Manager on one site allows to send or receive data from the other site.
[Top]
How to Start It
Log on the host where the Multi-site Transfer Manager will be launched and
change to the identity needed for starting it. Note that it is possible to use
s specific identity for starting the manager regarding the remark here after.
The
Transfer Manager will execute commands in the workspaces dedicated to
replicating data and this will be done under the same login as the one used for
starting it.
Set up the current environment using the
TCK for administration and execute the adl_transfer_mngr
command. The port number that is specified is the one that will be used for
starting data transfers afterwards.
E:\>adl_transfer_mngr -port 23452 -cmdfile %ADL_ADMIN_PATH%\AuthorizedCommands.txt (*)
|
(*) Syntax for Windows
The process is then ready to serve requests.
Note that the '&' character can be used on Unix platform for running the
process as a background process. It is not possible to run it the same way on
Windows platform. SCM provides the adl_admin_site command for
registering a service for that purpose.
On UNIX platform it is possible that the transfers fail due to system resource
limits. It is advised to use the adl_start_transfer_mngr.sh command instead of
adl_transfer_mngr directly in order to let it increase those limits.
$ adl_start_transfer_mngr.sh -port 23452 -cmdfile $ADL_ADMIN_PATH\AuthorizedCommands.txt (**)
|
(*) Syntax for Unix
 The file "AuthorizedCommands.txt" that appears in the previous examples
contains the list of commands that are not SCM commands but that are required
for sharing components between sites. It must be specified on Unix platform but
is automatically referenced on Windows platform.
The file "AuthorizedCommands.txt" that appears in the previous examples
contains the list of commands that are not SCM commands but that are required
for sharing components between sites. It must be specified on Unix platform but
is automatically referenced on Windows platform.
[Top]
How to Stop It
From any host and being the SCM administrator, set up the current
environment using the TCK for administration
and execute the adl_transfer_client command with the -stop_server
option. This option causes the Multi-site Transfer Manager to stop. Note that
the server is stopped even there are some multi-site transfers under way.
E:\>adl_transfer_client -server <hostname> -port 23452 -stop_server
|
- The <hostname> is the name of the machine where the Transfer Manager is
running.
- The port number is the one used for starting the daemon
- The -stop_server option specifies the daemon must stop.
[Top]
Using Windows Services
On Windows platform, the adl_admin_site command provides
the -create_service for registering a new service to launch a SCM daemon
(Monitor, File Server or Multi-site Transfer Manager) on the host where the
service is declared.
To declare a service for the Multi-site Transfer Manager, log on the
corresponding SCM server having system privileges, use the
TCK for administration to have access to
the adl_admin_site command and execute the following command line:
E:\>adl_admin_site -create_service -service_type transfer -port 23452 -start_at_boot
|
The -start_at_boot option is used for specifying to the service system
manager that the given service must be started at boot time.
[Top]
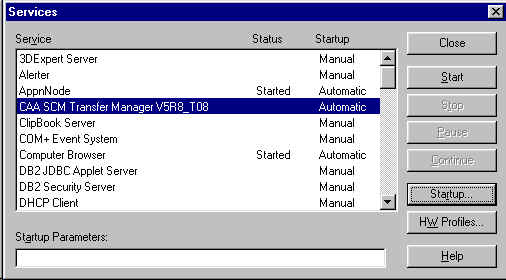
Starting the SCM Transfer
Service
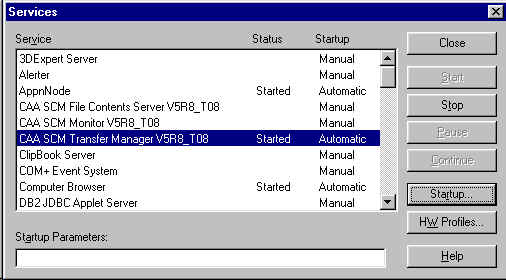
Fig 13: Control Panel/Services
|
|
|
The adl_admin_site command just declares a new
service but does not start it. To start the File Server, use the Windows
service tool. This tool is found by opening the "Start/Settings" menu and
selecting the "Control Panel" item.
Then run the "Services" programs and find the service named
"SCM Transfer Manager V5R8_T08"
where V5R8_T08 is the TCK corresponding to the Transfer Manager
installation. |
| Fig 14: Starting the Transfer Manager
Service
|
To start the Transfer Manager service, select
the corresponding line and click on the "Start" button:
- a popup window appears while the service is starting
- the service status changes to "Started" when the service has been
started
The way the service is started (manual or automatic) can be changed
whatever the service was registered using the adl_admin_site command. The
startup type can be also changed to "Disabled" if you want to prevent the
system (or anyone) to start the Transfer Manager for a while. |
[Top]
Stopping the SCM Transfer
Service
Fig 15: Stopping the Transfer Manager Service
 |
|
Open the "Services" program like when starting
the Transfer Manager service, select the line corresponding to the Transfer
Manager service and click on the "Stop" button:
- a popup window appears while the service is stopping
- the "Started" status disappears
|
[Top]
Monitoring Commands
All commands run under Monitor control. Therefore it is possible to list or
control the running commands at any time by retrieving information from the
Monitor.
The adl_mo_admin command gives access to information
managed by the Monitor process.
This command is available after setting the environment with the TCK for
administration. Here are options available for querying the Monitor.
| Options for connecting to the
Monitor |
Purpose |
| -host host_name (*) |
To specify the name of the host where the Monitor is
running |
| -port port_number (*) |
To specify the port to be used for sending requests to the
Monitor |
| Options for managing commands |
Purpose |
| -rmcmd command_identifier |
To abort and remove a given (user) command from the Monitor |
| -rmlock lock_identifier |
To remove a lock for a terminated command. It is needed to
first abort and remove a command before removing associated locks (if some
are still there). |
| Options for listing information |
Purpose |
| -lscmd |
To list all commands currently managed by the Monitor.
Information displayed for a command are: user name, host name, pid,
platform, command name and command identifier. |
| -lslock |
To list all locks currently managed by the Monitor.
Information displayed for a lock are: user name, host name, pid, platform
and lock identifier. |
| -filter {criteria} |
To filter the list of command or lock displayed. |
| -dscmd command_identifier |
To display all information about a specific command.
Command identifiers are listed using the -lscmd option. |
| -dslock lock_identifier |
To display all information about a specific lock.
Lock identifiers are listed using the -lslock option. |
| -dsrecobj recoverable_object_identifier |
To display all information about a specific "recoverable
object".
Such objects are for internal use. They correspond to information that are
used when running a recovery after a command crash. |
| Options for managing the Monitor |
Purpose |
| -ping |
To check if the Monitor is running. The command returns the
0 error code when it is running. |
| -stop |
To let all active commands to finish (forbidding new
connection), then stop. |
| -abort |
To abort all active commands (forbidding new connection),
then stop. |
| -suspend |
To forbid any new connection |
| -resume |
To accept new connections |
| -verb verbose_level |
To change the level of messages logged by the Monitor.
Only levels between 0 and 3 are meaningful. |
(*) In specific cases only. The command can get these information from the
current environment.
[Top]
In Short
Commands store information in two kinds of repositories: File Server
repositories and SCM databases.
Several File Server repositories can be set up, each of them being managed
by a dedicated File Server process.
All commands run under the control of a Monitor process. This process can be
queried using the adl_mo_admin command.
[Top]
References
History
| Version: 3 [Oct 2002] |
Document update: add intersite transfers reference |
| Version: 2 [Nov 2001] |
Document update |
| Version: 1 [Jun 2000] |
Document created |
| [Top] |
Copyright © 2000, Dassault Systèmes. All rights reserved.