| See Also | UseCases | Properties | Methods |
Represents a drawing view of a drawing sheet in a drawing document.
The drawing view is placed in the drawing sheet using the following properties:

The x, y, and Angle properties are used to place the drawing view in the drawing sheet. The drawing view has also a Scale property which determines its size in the drawing sheet with respect to the 3D document represented. The GenerativeBehavior property retrieves the DrawingViewGenerativeBehavior object associated with the drawing view, and you can get or set the reference view thanks to the ReferenceView property.
Using the Activate method, you can make the drawing view the active one. The AlignedWithReferenceView and UnAlignedWithReferenceView methods enable you to align and deactivates the alignment with respect to the reference view. The IsGenerative methods returns whether the drawing view is generated from a document.
The DrawingViewGenerativeBehavior object includes additional parameters to fully define the drawing view. First, it includes a link to the represented document using its Document property. Then it includes a link to the parent view, if any, thanks to the ParentView property. It also includes the DefinexxxView methods to define views according to the different available types. The SetProjectionPlane , GetProjectionPlane , and GetProjectionPlaneNormal methods manage the drawing view projection plane. The drawing view projection plane is usually defined when the drawing view is created, either by setting it explicitly for a front view or an isometric view, or by deducing it from the one of the parent view for the other views.
Let's now detail the different type of views.
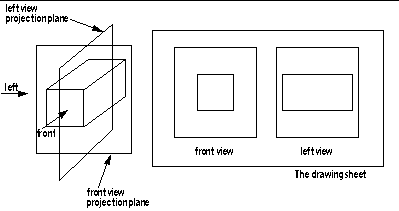
A drawing view can be used as a parent view for other drawing views. When you create a drawing view, for example from a part, you first create a front view, and then you can create a left, right, top, or bottom drawing view from this front view. The left, right, top, or bottom view is called a projection view. The front view is used as a parent view to determine how the document is projected in the projection view. For example, left means projecting the part on a vertical plane which is perpendicular to the front view projection plane, and which is seen from the left.
A drawing view is strongly linked to its parent view. If the parent view is updated because the document it displays has changed, or if you change its scale, all the drawing views which have this view as parent view are changed accordingly.

The front view is also used as a reference by the left view for positioning. If you want to move the left view, it is constrained to move horizontally to remain a left view of the front view. The left view can access its reference view by means of the ReferenceView property.
The following table summarizes the different view types along with their ability to have a parent view and if this parent view can also be a reference view.
| View Types | Parent View | Reference View | Creation Method |
|---|---|---|---|
| Front View | No | No | DefineFrontView |
| Isometric View | No | No | DefineIsometricView |
| Projection View | Yes | Yes | DefineProjectionView |
| Section View | Yes | Yes | DefineSectionView |
| Detail View | Yes | No | DefineCircularDetailView |
| Auxiliary View | Yes | Yes | DefineAuxiliaryView |
A front view or an isometric view are defined using the components of the two vectors defining its projection plane in the 3D space.
The other views are all defined by giving the DrawingViewGenerativeBehavior object of their parent view, and additional information:

Use x and y properties to set or retrieve the x and y coordinates of the view coordinate system. The following example sets these coordinates to 260mm and 120mm respectively.
Dim myView As Object
Set myView = CATIA.Documents(2).ActiveSheet.ActiveView
myView.x = 260
myView.y = 120
Copyright © 1994-2003, Dassault Systèmes. All rights reserved.