3D PLM Enterprise Architecture |
User Interface - Commands |
Getting Started with State Dialog CommandsA first simple but complete example of a state dialog command |
| Technical Article | ||
AbstractThis article shows, using an example, how to design and program a state dialog command, and how to make it available. The example is a command that creates lines in the 3D space, named the Line command. |
The Line command is a state dialog command. It is an interactive command running in the application frame and that creates line geometrical elements. A state dialog command is a state machine that uses states to let the end user input the requested parameters, and transitions between states to process these input parameters and progress in the statechart.
The Line command allows the end user to create a line by providing two points. To simplify the example, it does not feature any undo capability.
Designing a dialog command follows these steps:
Once the state dialog command is designed, you can create a class and the methods to provide the command behavior. Then, you can integrate it into the application to make it available for its targeted document type.
[Top]
The Line command creates a line when the end user has provided two points. This simple task may be described by the following dialog between the end user and the Line command:
And the Line command creates the line using the two points input using the mouse indication.
[Top]
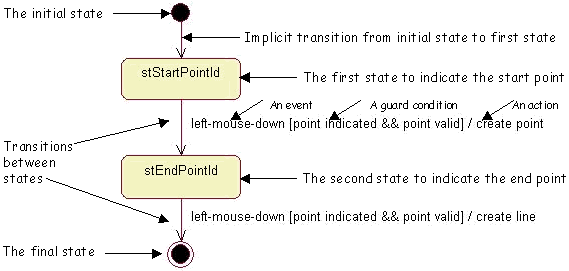
Statechart diagrams allow you to describe a state dialog command as a state machine in a graphical format. The Unified Modeling Language (UML) is used for such diagrams.
The dialog flow starts with the initial state, which is a pseudo state that has no incoming transition. The command is never in the initial state that automatically skips to the first state. This first state is dedicated to the start point input and is shown in the box using its state identifier. A prompt linked to the first state can invite the end user to indicate this start point. The transition between the first state and the second state is triggered as soon as the end user indicates a valid point. This happens when the expected event is detected (the mouse left key is pressed), and when the guard condition is satisfied. The transition action, that is create a temporary point, is executed. A prompt linked to the second state can then invite the end user to indicate the end point. The transition to the final state is triggered as soon as the end user indicates a valid point. This creates the line.
[Top]
The Line command creation is described as a step-by-step process to follow the statechart diagram. Some parts of the code are not shown, such as the line creation in the document. The complete code can be found in the CAADegGeoCommands.m module of the CAADialogEngine.edu framework.
The Line command is created as the CAADegCreateLineCmd class deriving from the CATStateCommand class that is provided as a template for all state dialog commands. The CAADegCreateLineCmd class creation follows the following steps:
BuildGraph
methodBuildGraph method[Top]
This shows how to create the class header file. The main to do is:
class CAADegCreateLineCmd : public CATStateCommand |
CmdDeclareResource(CAADegCreateLineCmd,CATStateCommand); |
Activate, Desactivate,
and Cancel. Activate is called when the Line
command takes the focus, Desactivate is called when a shared
command takes the focus, and thus leaves the Line command on the command
stack in its current state, and Cancel is called when the
command completes, or when an exclusive command takes the focus and requests
the Line command to be deleted.
CATStatusChangeRC Activate (CATCommand * iCmd, CATNotification * iNotif); CATStatusChangeRC Desactivate(CATCommand * iCmd, CATNotification * iNotif); CATStatusChangeRC Cancel (CATCommand * iCmd, CATNotification * iNotif); |
BuildGraph method.
virtual void BuildGraph(); |
CATIndicationAgent * _daIndication; |
CATBoolean CheckStartPoint(void * iUsefulData); CATBoolean CheckEndPoint(void * iUsefulData); |
CreatePoint is for the first transition
to create a temporary point, and CreateLine is for the second
transition to create the line.
CATBoolean CreatePoint(void * iUsefulData); CATBoolean CreateLine(void * iUsefulData); |
The complete header file is provided below.
#include "CATStateCommand.h"
#include "CATMathPoint.h"

class CATISO;
class CATIndicationAgent;
class CAAISysPoint;

class CAADegCreateLineCmd : public CATStateCommand
{
  CATDeclareClass;
  CmdDeclareResource(CAADegCreateLineCmd,CATStateCommand);
  public :
    CAADegCreateLineCmd();
    virtual ~CAADegCreateLineCmd();

    CATStatusChangeRC Activate   (CATCommand * iCmd, CATNotification * iNotif);
    CATStatusChangeRC Desactivate(CATCommand * iCmd, CATNotification * iNotif);
    CATStatusChangeRC Cancel     (CATCommand * iCmd, CATNotification * iNotif);

    virtual void BuildGraph();

    CATBoolean  CheckStartPoint(void * iUsefulData);
    CATBoolean  CheckEndPoint(void * iUsefulData);
    CATBoolean  CreatePoint(void * iUsefulData);
    CATBoolean  CreateLine(void * iUsefulData);

  private :
      void NewLine(const CATMathPoint &iPoint); // To actually create the line

  private :
    CATIndicationAgent  * _daIndication;
    CAAISysPoint        * _FirstPoint;        // Temporary point
    CATISO              * _ISO;               // To display the temporary point
    CATBaseUnknown      * _RootObject;        // Used by NewLine and condition methods
    CATBaseUnknown      * _RootContainer;     // Used by NewLine
};
|
The methods and data members that are not mentioned above are used by the dialog agent, or used to show the temporary point created, or finally to actually create the line and update the document with the new line.
[Top]
The command lifecycle is managed using the constructor and the destructor,
and using the three methods Activate, Desactivate, and
Cancel.
CATCommandModeExclusive.
A command that creates or modifies the document must always be declared as
exclusive. The command identifier is passed as the first parameter of the
CATStateCommand constructor. The command constructor includes code to
enable object creation in the document that is not shown here.
...
CAADegCreateLineCmd::CAADegCreateLineCmd()
                : CATStateCommand("CreateLineCmdId", CATCommandModeExclusive),
                  _daIndication(NULL), _FirstPoint(NULL)
{ ... // Include code to access the document }
...
|
BuildGraph method, and deletes or releases
data members created or retrieved in the constructor.
...
CAADegCreateLineCmd::~CAADegCreateLineCmd()
{
  if ( NULL != _daIndication )
  {
    _daIndication->RequestDelayedDestruction();
    _daIndication = NULL;
  }
  ... // delete or release other data members
}
...
|
Activate is called when the Line command
takes the focus. This happen in two cases:
Activate is not overridden here, since the default behavior
provided by the base class CATCommand is enough. CATCommand::Activate
simply returns CATStatusChangeRCCompleted to state that the
command normally takes the focus.
Desactivate is called when a shared command
takes the focus. The Line command is frozen in its current state and put in
the command stack. When the shared command will complete, the frozen Line
command will be reactivated from its current state using the Activate
method. Desactivate is not overridden here, since the default
behavior provided by the base class CATCommand is enough. CATCommand::Desactivate
simply returns CATStatusChangeRCCompleted to state that the
command normally looses the focus.Cancel is called when the Line command
completes, or when an exclusive command takes the focus and requests the
Line command to be deleted. When the Line command completes, the focus is
given to the default command (usually Select). Cancel must
delete or release temporary objects created by the command, possibly after
having removed them from the sets of objects. In this example, this code
could be put in the destructor, but if the command were declared in repeat
mode, this must be located here and nothing else should be done.
...
CATStatusChangeRC CAADegCreateLineCmd::Cancel(CATCommand * iCmd, CATNotification * iNotif)
{
  if ( _FirstPoint )
  {
    _ISO->RemoveElement(_FirstPoint);
    _FirstPoint->Release();
    _FirstPoint = NULL ;
  }
  return (CATStatusChangeRCCompleted);
}
...
|
[Top]
The end user input is defined in the BuildGraph method by
creating the states, creating the dialog agent(s), and plugging the dialog
agent(s) to these states.
GetInitialState method for the first state
CATDialogState *stStartState = GetInitialState("stStartPointId");
|
AddDialogState method for the second state
CATDialogState *stEndState = AddDialogState("stEndPointId");
|
Note that:
SetMathPlane
method that assigns this plane to the dialog agent. In this command, the
plane is a projection plane parallel to the screen plane. It is the
default plane, when the SetMathPlane is not used. The point clicked on the
screen is projected onto this plane.
_daIndication = new CATIndicationAgent("PointIndication");
|
AddDialogAgent method.
stStartState->AddDialogAgent(_daIndication); stEndState->AddDialogAgent(_daIndication); |
The BuildGraph method is as follows:
void CAADegCreateLineCmd::BuildGraph()
{
  CATDialogState * stStartState = GetInitialState("stStartPointId");
  CATDialogState * stEndState = AddDialogState("stEndPointId");

  _daIndication = new CATIndicationAgent("PointIndication");
  _daIndication->SetMathPlane(_ProjPlane);

  stStartState->AddDialogAgent(_daIndication);
  stEndState->AddDialogAgent(_daIndication);
...
}
|
[Top]
The states are linked with transitions that trigger actions if the guard conditions are satisfied.
AddTransition
method connects a source state set as its first argument to a target
state sets as its second argument. The other arguments are used for
conditions and actions.
CATDialogTransition * pFirstTransition = AddTransition(SourceState, TargetState, ...) |
Two transitions are created: one between the first state and the second
state, and one between the second state and the final state. The transition
between the initial state and the first state is implicit and should not be
created. Note that the final state is referred to by the NULL
value. Ellipsis show temporarily missing arguments.
CATDialogTransition * pFirstTransition = AddTransition(stStartState, stEndState, ...); CATDialogTransition * pSecondTransition = AddTransition(stEndState, NULL, ...); |
Condition method.
For each point, the Line command checks two conditions:
IsOutputSetCondition method
provided to check that the point indication dialog agent is valued.CheckStartPoint
and CheckEndPoint methods of the CAADegCreateLineCmd class.These two conditions are merged in a composite condition. This composite
condition is provided as the third argument of the AddTransition
method and implemented by means of the AndCondition method.
Ellipsis show temporarily missing arguments.
CATDialogTransition * pFirstTransition = AddTransition(stStartState, stEndState,
   AndCondition(IsOutputSetCondition(_daIndication),
                Condition((ConditionMethod) & CAADegCreateLineCmd::CheckStartPoint)),
     ...);

  CATDialogTransition * pSecondTransition = AddTransition(stEndState, NULL,
     AndCondition(IsOutputSetCondition(_daIndication),
                  Condition((ConditionMethod) & CAADegCreateLineCmd::CheckEndPoint)),
     ...);
|
Action
method. The action is then added to a transition by using it as the last
argument of the AddTransition method. The complete source code
of the BuildGraph method is as follows:
void CAADegCreateLineCmd::BuildGraph()
{
  CATDialogState * stStartState = GetInitialState("stStartPointId");
  CATDialogState * stEndState = AddDialogState("stEndPointId");

  _daIndication = new CATIndicationAgent("StartPointIndication");

  stStartState->AddDialogAgent(_daIndication);
  stEndState->AddDialogAgent(_daIndication);

  CATDialogTransition * pFirstTransition = AddTransition(stStartState, stEndState,
     AndCondition(IsOutputSetCondition(_daIndication),
                  Condition((ConditionMethod) & CAADegCreateLineCmd::CheckStartPoint)),
     Action((ActionMethod) & CAADegCreateLineCmd::CreatePoint));

  CATDialogTransition * pSecondTransition = AddTransition(stEndState, NULL,
     AndCondition(IsOutputSetCondition(_daIndication),
                  Condition((ConditionMethod) & CAADegCreateLineCmd::CheckEndPoint)),
     Action((ActionMethod) & CAADegCreateLineCmd::CreateLine));
}
|
[Top]
This is the implementation of the command behavior declared using the BuildGraph
method. The two condition methods are as follows:
CheckStartPoint method checks that the point can be
created, that is, that the object that holds the point factory, here _RootObject,
exists.
CATBoolean CAADegCreateLineCmd::CheckStartPoint(void * iDummy)
{
  CATBoolean ret = TRUE;
  if ( ! _RootObject ) ret = FALSE;
  return ret;
}
|
CheckEndPoint retrieves the end point from the dialog
agent as a CATMathPoint2D instance on the projection plane of the dialog
agent using the GetValue method. The GetMathPlane
retrieves the projection plane. It converts it as a
CATMathPoint instance, that is a 3D point, using the EvalPoint
method, and compares the distance between start and end points to a minimum
tolerance EPSILON. If the two points are identical with respect
to this tolerance, the dialog agent is recycled to be reused in the second
state that becomes current again, because FALSE is returned.
This enables the end user to select another end point. Otherwise, TRUE
is returned.
CATBoolean CAADegCreateLineCmd::CheckEndPoint(void * iDummy)
{
  CATBoolean ret = TRUE;
  if ( _FirstPoint )
  {
    CATMathPoint2D point2D = _daIndication->GetValue();
    CATMathPoint EndPoint;
    CATMathPlane ProjPlane = _daIndication->GetMathPlane();
    ProjPlane .EvalPoint(point2D.GetX(),point2D.GetY(), EndPoint);

    float x,y,z ;
    _FirstPoint->GetCoord(x,y,z);
    CATMathPoint StartPoint(x,y,z);
    if ( EndPoint.DistanceTo(StartPoint) < EPSILON )
    {
      ret = FALSE;
      _daIndication->InitializeAcquisition(); // Recycle dialog agent
    }
  }
  else ret = FALSE;
  return ret;
}
|
The two action methods are as follows:
CreatePoint method is called when the first transition is
triggered. It creates the start point as a temporary point and puts it in
the Interactive Set of Objects (this is not described here). It then
recycles the dialog agent that can be reused for the second state.
CATBoolean CAADegCreateLineCmd::CreatePoint(void * iDummy)
{
  ... // Include here the code to create the first 3D point
  _daIndication->InitializeAcquisition(); // Recycle dialog agent
  return TRUE;
}
|
CreateLine method creates the line. It takes the start
point as argument and retrieves the end point from the dialog agent.
...
CATBoolean CAADegCreateLineCmd::CreateLine(void * iData)
{
  ... // Include here the code to create the line
}
...
|
[Top]
The command resources are the prompts displayed in the status bar for each state. They are stored in the CAADegCreateLineCmd.CATNls file located in your framework's CNext\resources\msgcatalog directory. This file contains the following prompts, associated with the identifiers set for each states in Defining End User Input:
CAADegCreateLineCmd.stStartPointId.Message = "Click to indicate the first point"; CAADegCreateLineCmd.stEndPointId.Message = "Move the mouse and click to indicate the second point"; |
[Top]
The Line command is integrated into the application by following these steps:
[Top]
The CATCreateClass macro inserted in the command class CAADegCreateLineCmd.cpp file creates a creation function for the Line command. This
enables the command class to be instantiated by the application using a command
header. This macro is provided by the CATCreateExternalObject.h header file.
... #include "CATCreateExternalObject.h" CATCreateClass(CAADegCreateLineCmd); ... |
[Top]
The command header class should be created in the chosen workshop, workbench,
or add-in class using the MacDeclareHeader macro. The command
header is an instance of this class created in the CreateCommands
method of the workshop, workbench, or add-in class. Then the command header is
associated with a command starter and arranged with the other commands in the CreateWorkshop,
CreateWorkbench, or CreateToolbars method of the
workshop, workbench, or add-in class respectively.
The Line command header is created in the Geometry workshop. MacDeclareHeader
creates the CAAGeometryHeader class for the header file, and this class is
instantiated in the CreateCommands method. It is then put in the
Insert menu, associated with a command starter and arranged after the Point
command in the CreateWorkshop method, as follows:
#include "CATCommandHeader.h"
MacDeclareHeader(CAAGeometryHeader);
...
void Geometry::CreateCommands()
{
  ...
  new CAAGeometryHeader("Line",                  // Command header identifier
                        "CATDegEduGeometryCmd",  // Command shared library or DLL
                        "CAADegCreateLineCmd",      // Command class
                        (void *) NULL);          // Argument to pass to the command
  ...
}
...
CATCmdWorkshop * Geometry::CreateWorkshop()
{
  ...
  NewAccess(CATCmdStarter,pLineInsert,LineInsert);
  SetAccessCommand(pLineInsert,"Line");
  SetAccessNext(pPointInsert,pLineInsert);
  ...
}
|
[Top]
You should now provide the resources for the command header. They are stored
in files located in your framework's CNext\resources\msgcatalog directory. The
resource keys are built using the command header class name concatenated to the
command header identifier using a dot, that is, CAAGeometryHeader.Line,
concatenated to other keywords depending on the resources. These resources
include:
Title, ShortHelp,
Help, and LongHelp respectively. They are stored
in the CAAGeometryHeader.CATNls file.
...
CAAGeometryHeader.Line.Title     = "Line" ;
CAAGeometryHeader.Line.ShortHelp = "Line" ;
CAAGeometryHeader.Line.Help      = "Creates lines: indicate 2 points" ;
CAAGeometryHeader.Line.LongHelp  = "Line (Insert menu)
Create lines:
 1- Indicate the first point:
    click with the left button: a cross appears
 2- Indicate the second point:
    click with the left button: the cross disappears and the line is created.";
...
|
Icon.Normal keyword. This
is stored in the CAAGeometryHeader.CATRsc file, and the icon files are
stored in the CNext\resources\graphic\icons directory as bmp files.
... CAAGeometryHeader.Line.Icon.Normal = "I_EduLine"; ... |
[Top]
A state dialog command is a dialog command designed as a state machine, each state enabling end user input, that enables the end user to pass from state to state using transitions between these states triggered when requested events happen and when requested guard conditions are satisfied, and that execute the declared actions. It is modeled using a class deriving from the CATStateCommand class.
The statechart diagram is implemented using the BuildGraph
method, and the command life cycle is managed by the Activate, Desactivate,
and Cancel methods in addition to the command class constructor and
destructor.
[Top]
| Version: 1 [Jan 2000] | Document created |
| [Top] | |
Copyright © 2000, Dassault Systèmes. All rights reserved.